

THE PROBLEM WITH THE INCLINE BENCH PRESS
The Incline Bench Press exercise variation is one of the best upper chest exercises there is, but there’s one major problem preventing us from getting the maximum benefit out of it.
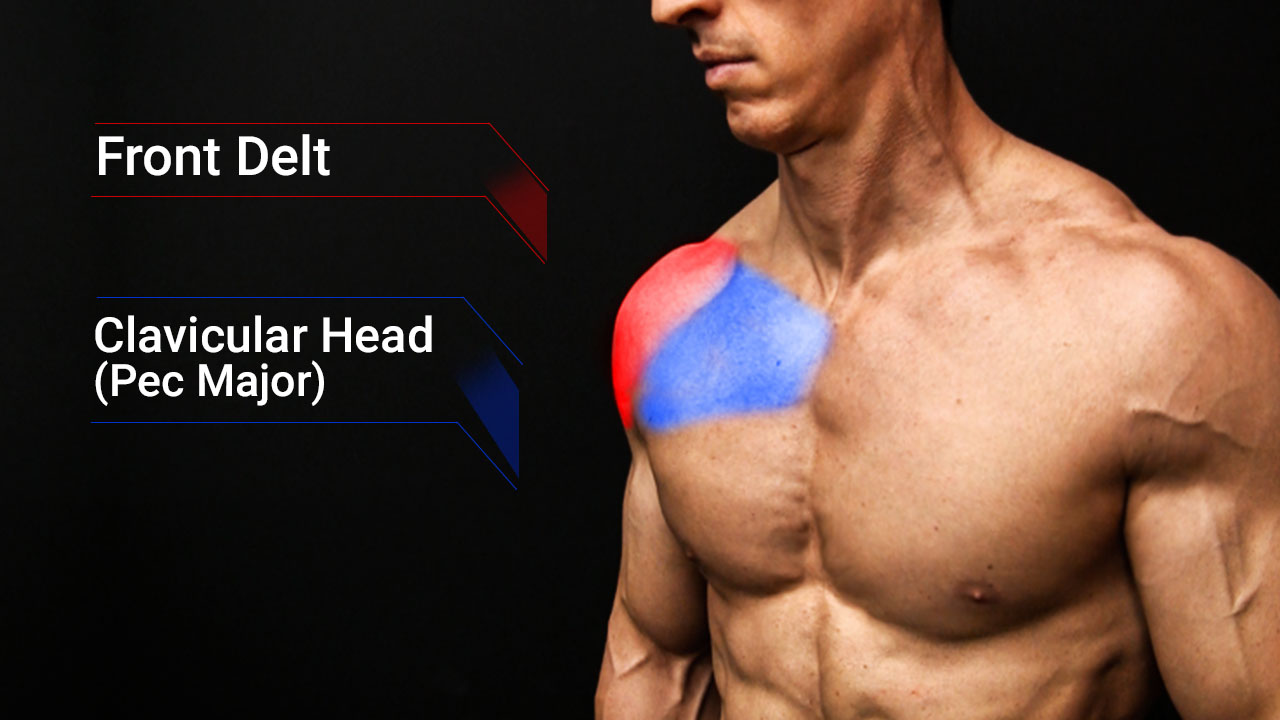
The front delt likes to dominate the movement, taking away from the action of the upper chest as the primary muscle!
You see, these two muscles – the anterior deltoids and the upper chest fibers of the pectoralis major – are really close to each other, which means that one of the two can really start dominating the other if we don’t do this dumbbell chest exercise correctly.
The front deltoid gets a great deal of work from not just shoulder workouts and exercises, but as an assistant on many pushing and common chest exercises as well as any every day activities that we do in the front of our body. This causes the front delt to become almost too active, especially during exercises that we are trying to stress the upper chest like the Incline Bench Press.
There are two big mistakes that most people make with the dumbbell Incline Bench Press that are making this situation worse!
If you’re making either of these two errors, it’s preventing you from maximizing your upper body workout.
I’m going to show you the two worst Incline Bench Chest Press mistakes…and I’m going to be breaking out the Muscle Markers to help you get more out of this intense exercise!
First, so we have a better understanding of this popular movement, let’s take a look at what muscles the dumbbell incline bench press works.
INCLINE BENCH PRESS MUSCLES WORKED
- Front Delt
- Clavicular Head (Pectoralis Major)
The main muscles worked during incline presses are the front deltoid and the clavicular head (upper portion of pectoralis major). However, in order to get the muscular activation in the upper pecs in this incline chest press exercise, it’s crucial to get the bench angle correct.
Since we’re trying to use the dumbbell incline bench press to hit the upper portion of the pec major, we want to minimize the activation of the shoulder musculature. Read on to see what the correct incline bench press angle is, and why.
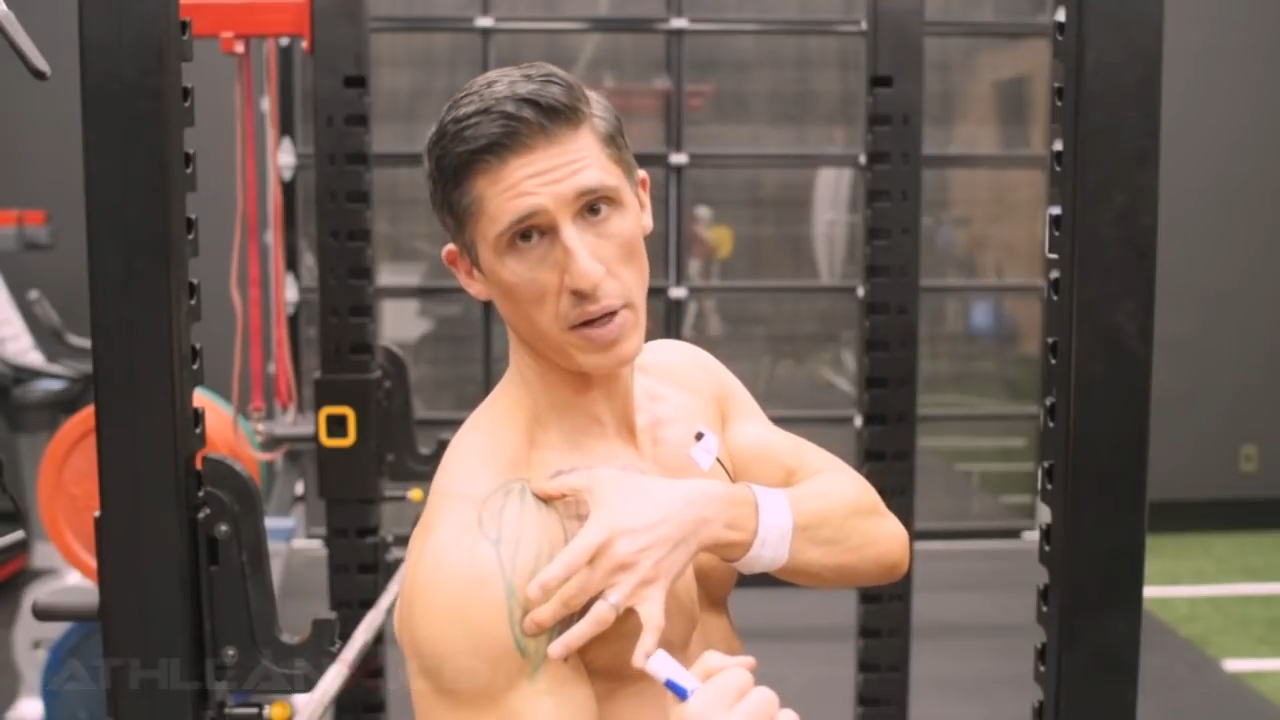
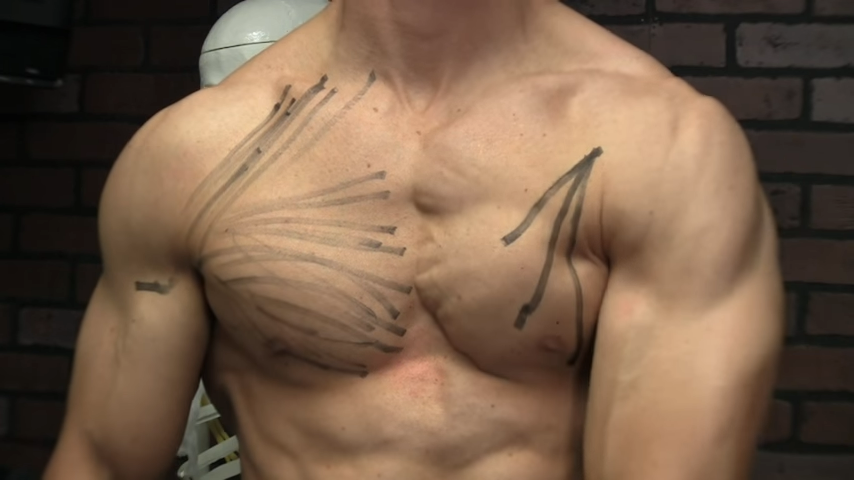
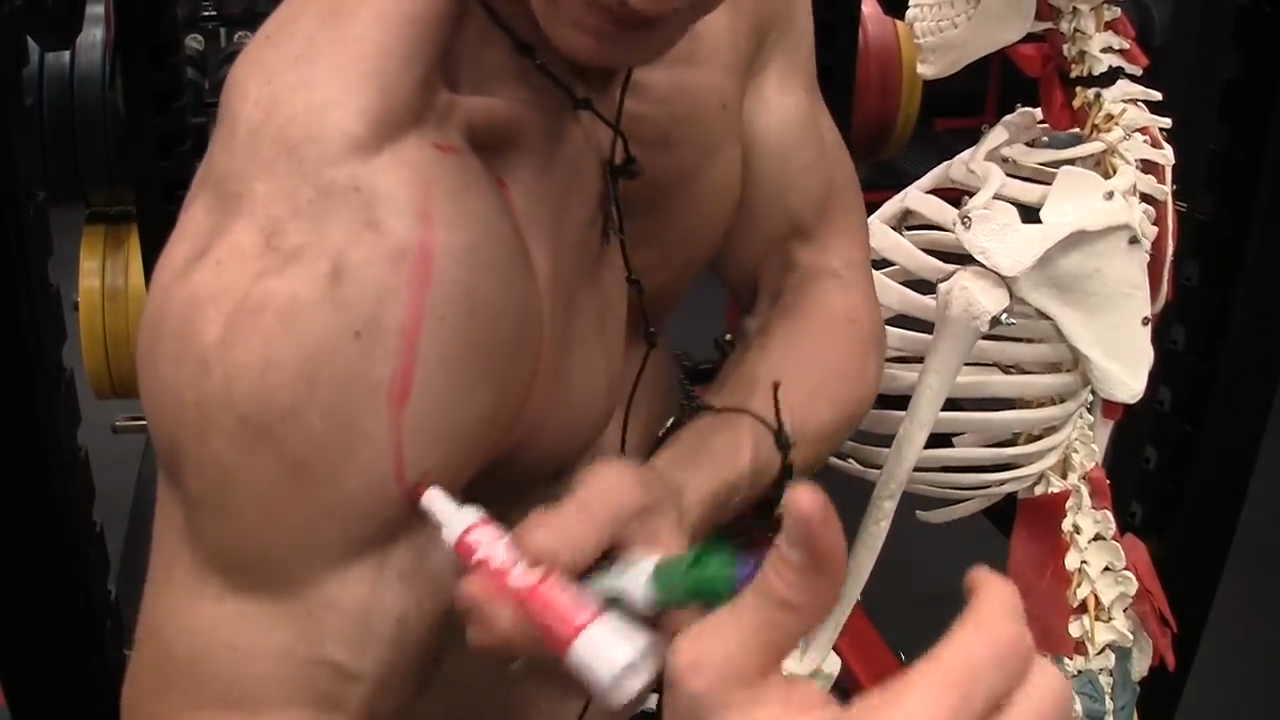
And to ensure you get strong mind muscle connections, take a look at the anatomy below so that you can see where the front delt and the pec major are located.
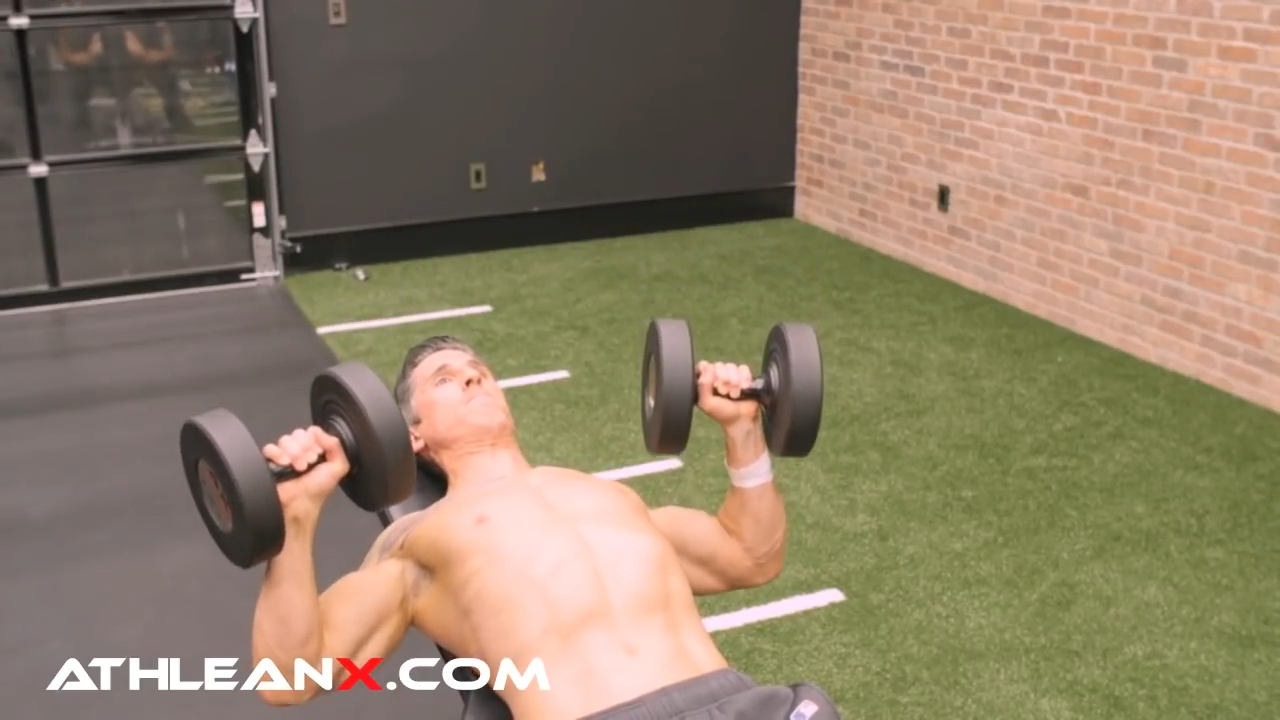
MISTAKE #1: USING THE WRONG BENCH ANGLE
In order to get the front shoulder to do less of the work and allow the pecs to do more, you have to first get the angle of the dumbbell incline bench press correct when you do this simple movement.
So, what is the angle that you want to use on the incline dumbbell bench press exercise in order to hit the upper chest as the prominent muscle? An Upright Shoulder Press is going to maximize the attention that front delts get because the arms move in a straight line up against gravity in an overhead pressing motion.

If I were to back off the angle of the Upright Shoulder Press and set the incline bench press angle to 60 degrees – which is one of the most common angles that people will do incline presses – then you’re going to position your body to shift the focus down a little bit.
But you can see this is a larger muscle and it’s not enough to put the focus down through the mid-belly of the upper chest.
So setting the flat bench to 60 degrees is a bench angle mistake. It’s not a low enough incline bench setting and you might want to go a bit lower.
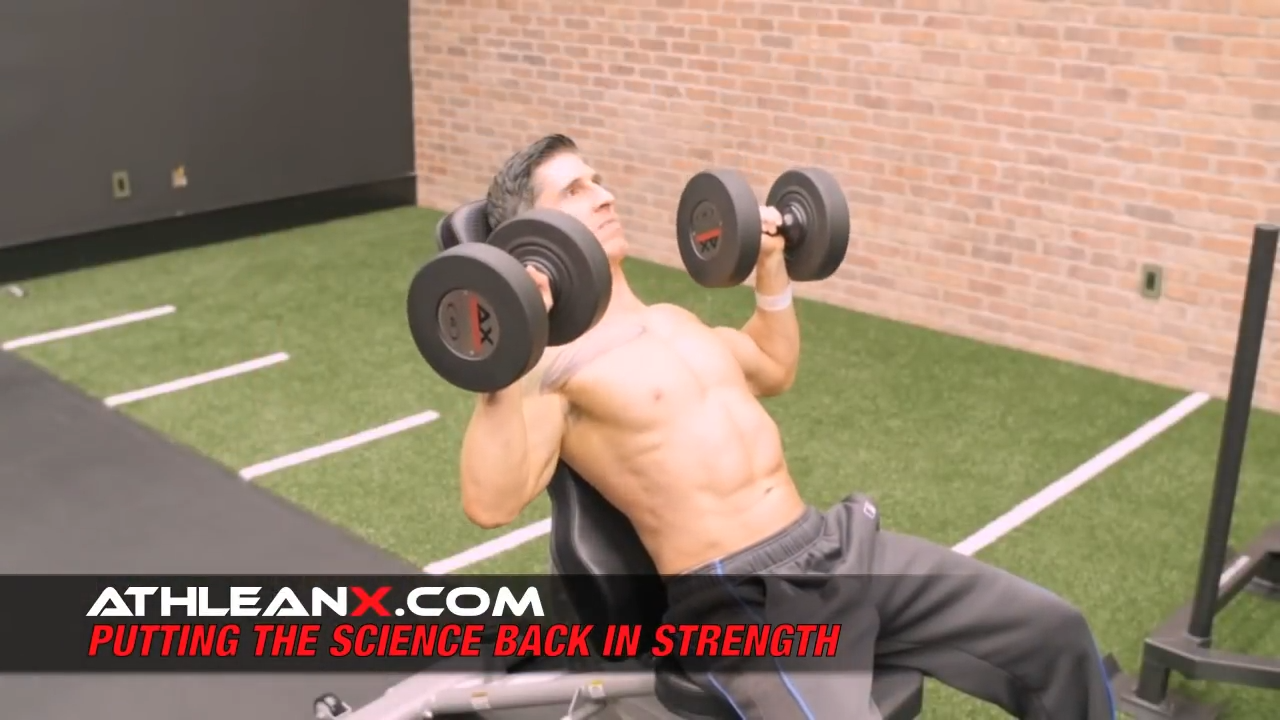
Here we’re setting our adjustable benches down to a 45degree angle, and that’s somewhat better for this dumbbell press.
Anytime you start going lower, you’re shifting that focus down, but at 45 degrees you’re still not really there.
CORRECT INCLINE BENCH PRESS ANGLE
What is the best incline bench press angle for hitting the upper chest?
Research shows that the correct angle of the Incline DB Bench Press should be 30 degrees from flat to target the upper chest for muscle growth.
30 degrees may seem like a very small angle, but it is proper incline bench press form for placing the strain on your upper pecs and minimizing the effect on the anterior deltoid muscles.
Many people will stay much too upright in the starting position when performing this chest exercise, and effectively wind up hitting their shoulder muscles too much.
If you realize that a completely vertical bench position (90 degrees elevated) would primarily achieve shoulder activation, and that a completely flat bench version at 0 degrees (Flat Dumbbell Bench Press, Regular Bench Press or Traditional Bench Press) would hit your middle chest (because your arms are at a 90-degree angle to your body), you understand that you’ll need to lower the bench quite a bit to get upper chest engagement.
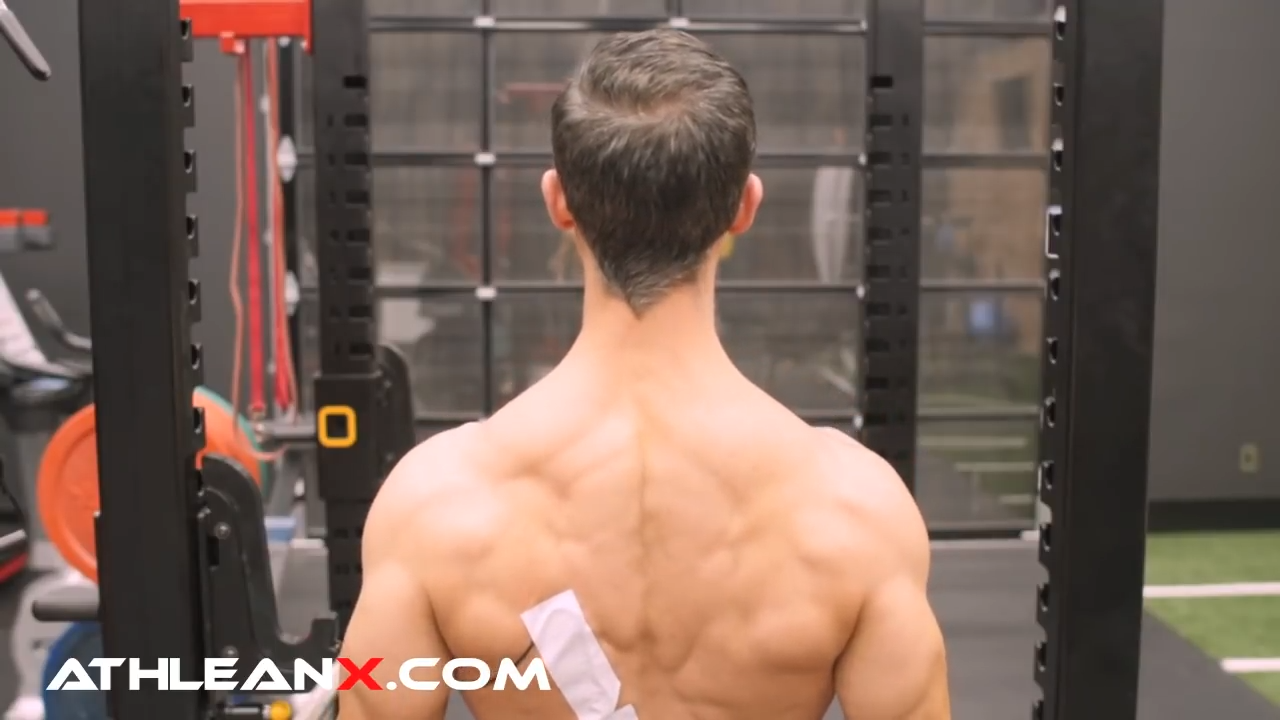
MISTAKE #2: NOT SQUEEZING THE SHOULDER BLADES
As you’ve seen me bang out a couple reps of the dumbbell variation of the Inclined Bench Presses at 30 degrees, notice the position of my shoulder.
When the front delt becomes dominant, our shoulders tend to round forward. A lot of people reading this are probably sitting there right now with shoulders rounded forward.
That’s common, unfortunately.
What happens is, the front delt is actually put in more of a position of power in relation to the chest. It’s actually standing out more, willing and able to push more and spring to action more quickly than your upper chest.
We can silence that by getting it back where it belongs, allowing the chest to now be in a better position to contract. The way to do that is through positioning our shoulders in the right direction.
We want to make sure that whenever we press upward, we contract the shoulder blades back and down.
This back and down position places your shoulder blades backward in a position where they can be less dominant in the Incline Dumbbell Bench Press and put your pecs at the center of the action.
HOW TO DO INCLINE BENCH PRESS CORRECTLY
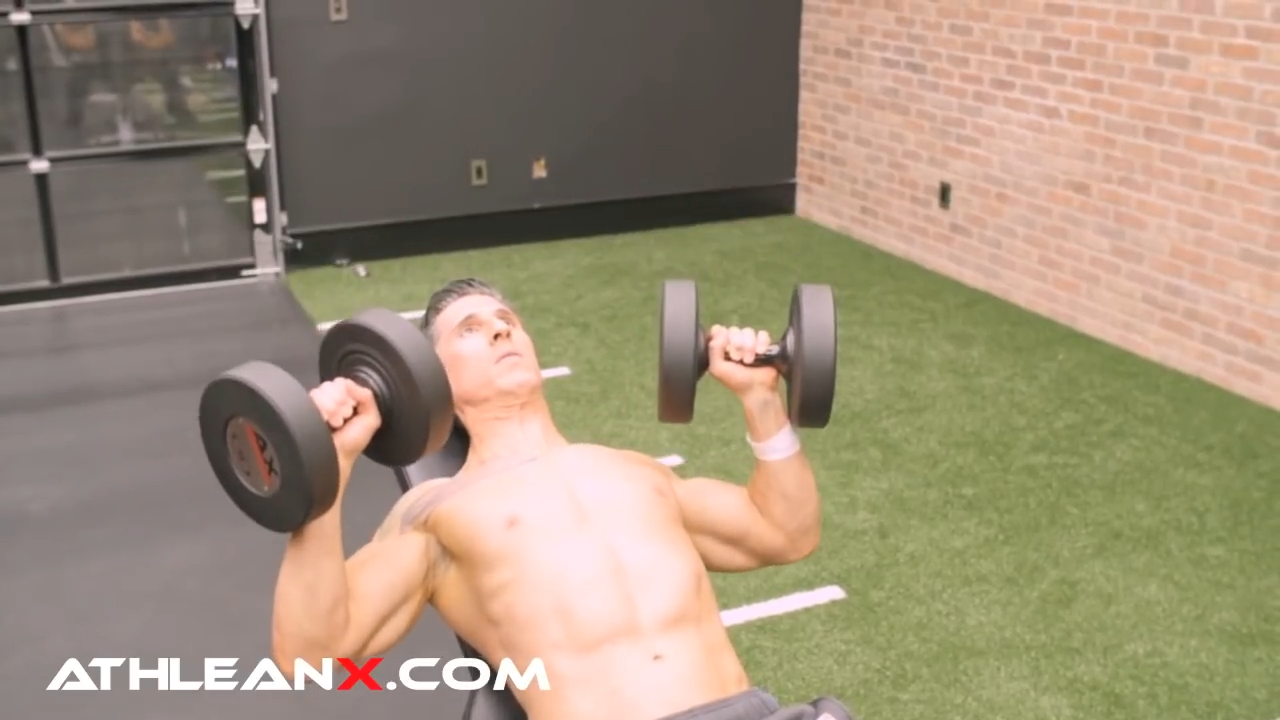
With the 30 degree angle on the bench, gravity helps to position the shoulder blades back and down, but you can’t just rely on the fact that the bench is helping you get there.
You do need to actively contract your shoulder blades as well to ensure that this happens. Squeezing the shoulder blades makes it much easier for the chest to be in a position of power and therefore increase their contribution to the dumbbell Incline Bench Press. This, over a period of time, will lead to greater chest muscle growth particularly in the upper chest.

HOW TO DO THE INCLINE BENCH PRESS
- Set the angle of the incline workout bench to 30 degrees.
- Grab a pair of dumbbells and position yourself in the bench with feet flat on the ground.
- Actively contract your shoulder blades back and down as you press the weight away from your chest to a full range of motion, using a mind to muscle connection to focus on the upper pecs.
- Lower the dumbbells with control to the starting position and repeat.
I hope you’ve found these exercise guides for the dumbbell Incline Bench Press to be helpful. Remember, this is about putting the science back in strength training. When it comes to strength and muscle building I don’t like to just tell you which are the best exercises to do but instead WHY they’re good and how to get the most out of them so you can get better results faster when you follow our training.
You can see how making even the smallest mistakes in your training can cause lost results and lost time. If you’re looking for a complete training plan that puts the science back in strength and muscle growth, helps you avoid common mistakes and gives you workout tips to get the most out of every single exercise you do, check out our ATHLEAN-X strength programs. See how training like an athlete with the best training tips and exercises can help you lose fat and build strength, power and muscle mass throughout your entire body.
- Because the front delt and the upper chest muscles are so close together, the front delt has a tendency to dominate in the Incline Dumbbell Chest Press. Many people don’t know how to incline bench press with proper form, and there are two common mistakes that make this front deltoid dominance more pronounced and two workout tips I’ve given to correct them.
- Mistake #1: Using the wrong bench angle exacerbates this problem. Research shows that performing an incline chest press with a 30 degree bench angle is the best for the upper chest.
- Mistake #2: Not engaging the shoulder blades in your incline presses also makes shoulders round forward which allows the front delt to be dominant. Making an intentional down and back movement of the shoulder blades helps the upper chest to be in a better position to contract.
INCLINE BENCH PRESS FAQS
Some people find that the incline bench press is harder than flat bench presses because the front delt likes to dominate the movement and tends to take away from the action of the upper chest because of how close in proximity these two muscles are. We're trying to hit the upper chest, not do another compound shoulder exercise, so it's important to get the bench angle right. To make the incline bench press favor the upper chest portion of the pectoralis major more, be sure to use the correct bench angle of 30 degrees and squeeze the shoulder blades. However if you want to build a stronger chest, it's important to use effective exercises to target the middle and lower portions of the pectoral muscle as well. To do this, move from an inclined position to a neutral position on the adjustable bench to hit the middle pecs, and use a declined position to hit the lower pecs.
Research shows that the correct angle of the Incline Barbell Bench Press should be 30 degrees from flat to target achieve the best muscular activation in the upper chest. This is one of the best incline bench exercises for upper chest activation, and one that you should definitely focus in each chest day workout.
Incline bench press training is one of the best upper chest exercises for chest strength and muscle mass, but for this bench press variation you need to ensure that you're not allowing your front delts to dominate the movement. To avoid this, be sure to use the correct bench angle and squeeze your shoulder blades during the movement. The incline bench press will preferably hit the upper chest whereas the flat barbell bench press hits the mid-pecs. Done correctly, incline bench press benefits are that it's excellent for targeting the upper pec muscles and helps prevent muscle imbalances (one-sided muscle weaknesses) when performed with dumbbells, because it is a unilateral exercise.
Some people ask whether a 30 to 45-degree bench position is better for upper pec activation in an incline bench press. Research shows that the correct angle of the Incline Barbell Bench Press should be 30 degrees from flat to target maximum upper chest muscle activation during bench press. Adjustable training benches allow you to change the angle of bench incline so that you can achieve the best possible activation of the upper chest muscle fibers.
To do the incline bench press variation, the bench presser should set the incline bench angle on the bench press station to 30 degrees. Sit on the adjustable weight bench and lean against the backrest, taking a pair of dumbbells in each hand. Press straight outward in front of your chest, squeezing the shoulder blades to avoid the front delts taking over the movement. 30 degrees is the best inclined position to help you to achieve the best upper pectoralis activation. Starting weight for this chest press variation should be with a lighter weight instead of heavy weight for strength gains. As you get stronger in this popular exercise, you can increase your rep range and your sets over time. Once you are doing about 3 sets of 10-12 reps with ease, you can move to heavier weight over time for muscle hypertrophy. Done correctly, dumbbell incline bench presses are one of the best exercises for upper body strength gains and muscle growth, and preventing strength imbalances (differences in strength from one side of the pecs to the other).
The incline bench press is one of the best upper chest exercises, but you need to ensure that you're not allowing your front delts to dominate the movement. To avoid this, be sure to use the correct bench angle and squeeze your shoulder blades during the movement. In order to build strong chest muscles, you should be sure to include exercises that activate upper, mid and lower pecs in your workout routine. To focus on the entire chest musculature, you can use exercises like decline bench presses to hit the lower pecs and a standard bench press to hit the mid pecs by setting the bench to flat bench position.
To achieve the best activation of the upper pectoral muscles and for maximum strength gains and muscle growth, the best incline angle for the barbell incline bench press is 30 degrees from horizontal bench position which you can do on an adjustable type of bench.
Some people want to know if 30 or 45-degree incline bench position is best to hit the upper chest. To achieve the best upper pec activation, 30 degrees is a more optimal angle than a 45-degree angle for the incline bench press. In this incline position, you will be favoring the upper portion of the pec major, making this a very effective exercise for upper chest.
The best incline bench press angle for strength gains and muscle growth in the upper chest is 30 degrees. While some lifters make the mistake of adjusting to a 15 or 45-degree angle, research shows that the influence of bench angle on the upper pecs is greatest at a 30 degree position.
REFERENCES


WHAT IS THE BEST WORKOUT SPLIT?
I get this question every day. “What is the best training split?” The answer is so complex that it would take 5000 YouTube videos to answer it.
Guys, there are plenty of options out there for the best training split. But the one that’s right for YOU probably isn’t right for your buddy.
To determine which training split is right for you, the biggest factors to consider are your fitness goals, training frequency, and experience, just to name a few things.
But I don’t want to send you down a rabbit hole, where you’ll inevitably find these so-called hard-and-fast rules that too many of you get caught up in.
I want you to walk away from this article knowing exactly which training split is best for you.
Let’s take a closer look at each of the best training splits that are out there.
We’ll also talk about how to match the right split to your personal goals, timeline, and experience.
TYPES OF TRAINING SPLITS
If you type “best workout splits” into Google, you’re going to get about a dozen options and thousands of opinions.
There might be more out there, but I’m going to focus on the four most popular training splits.
Why only four?
Because most of the other “splits” that are out there aren’t focused on how to separate muscle groups as much as how to adjust the acute variables.
For example, let’s say you want to do a 5 x 5 training “split” – this is when you perform five sets of five reps of an exercise.
Sure, you know your acute variables – sets, reps, weight, rest, etc. – but you still have to figure out how to separate the muscle groups.
And that means you need to break down the muscle groups according to the number of days per week you’ll train.
How many days per week will you train? Maybe a 5-day split? Or perhaps a 3-day split will work better.
See what I’m getting at here, guys?
There are really only four primary ways to separate the muscle groups according to the days of the week.
That’s why we’re only focusing on these four:
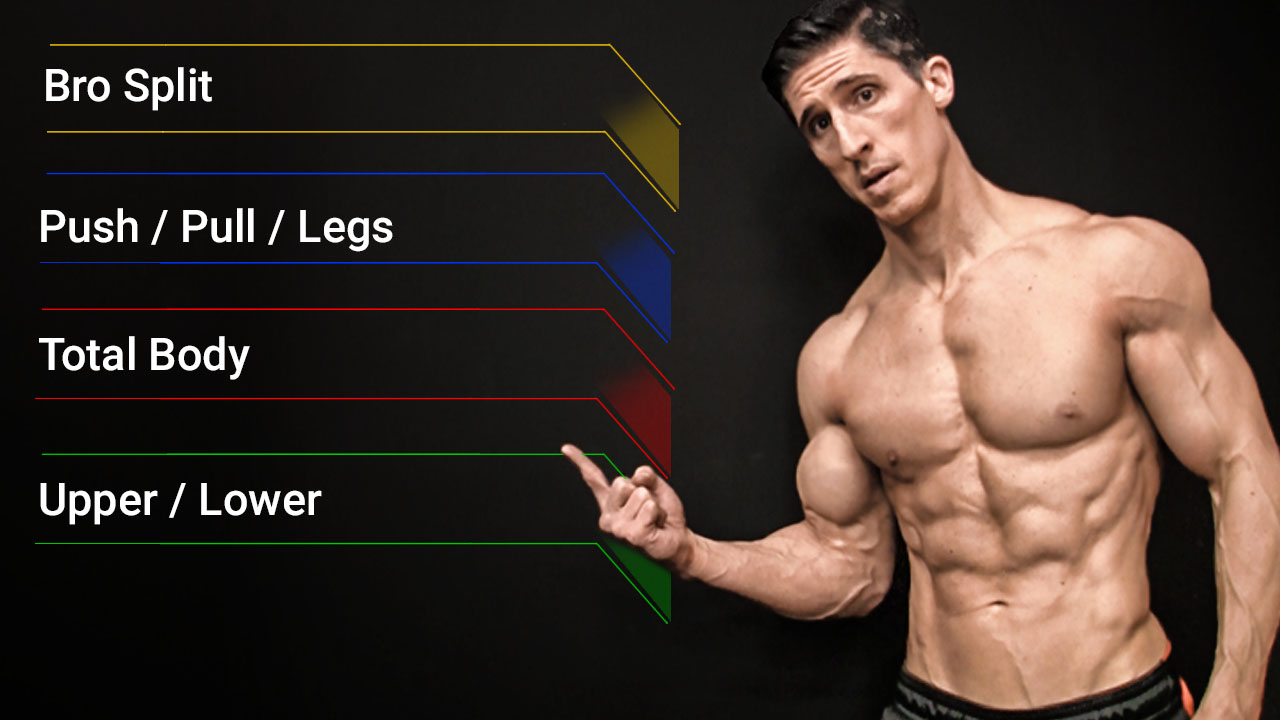
- Total Body Split
- Upper vs. Lower Split
- Push vs. Pull vs. Legs Split
- Bro Split
Let’s jump right into the four common training splits.
For each type of training split, I’m going to describe what it is, why I like it, and why it might not be the best option for you.
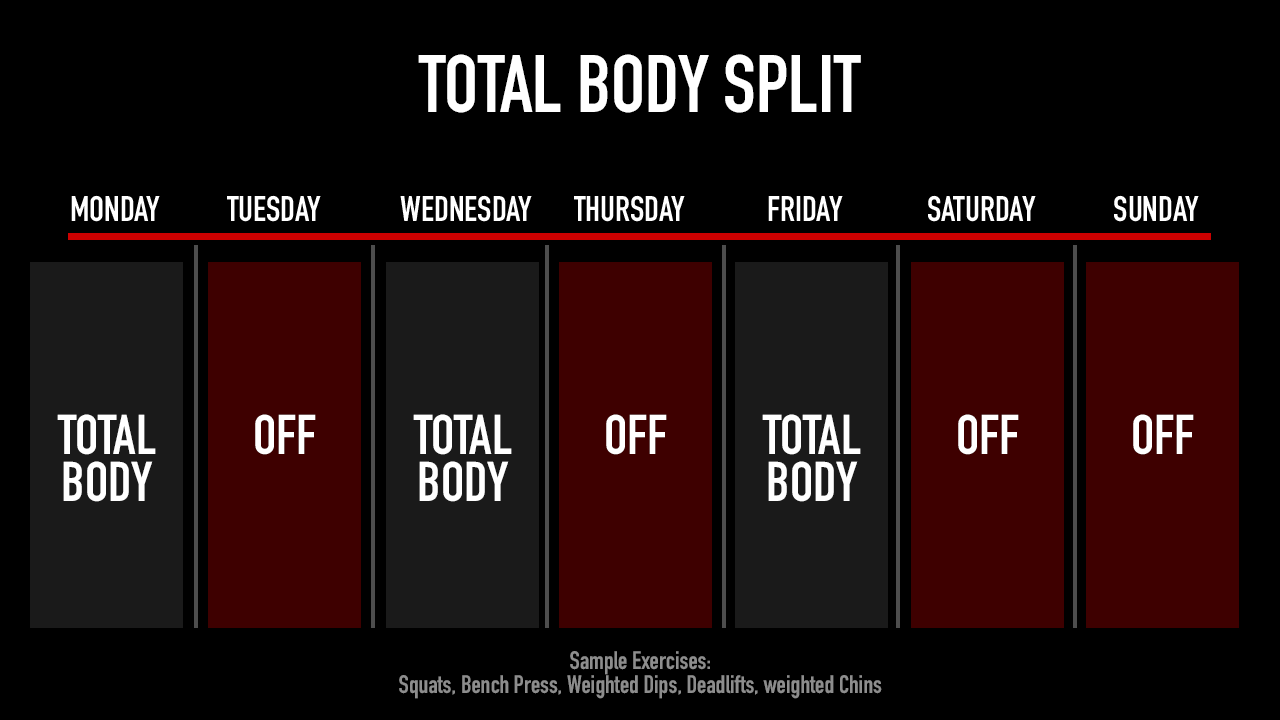
TOTAL BODY SPLIT
An entire body split refers to a workout routine where you train all major muscle groups of the body in a single session.
You’ll usually perform one exercise for each major muscle group. This is typically done with compound multi-joint exercises.
Attention is given to the secondary muscle groups like biceps and calves, but this happens after the larger muscles are taken care of.
HOW MANY DAYS DO YOU TRAIN?
For a beginner full-body split, you’re looking at the classic methodology of training everything on Monday, Wednesday, and Friday – or a similar number of days.
In other words, you’ll break this down into a 3-day workout split.
ADVANTAGES OF A TOTAL BODY SPLIT
Guys like Arnold Schwarzenegger were doing total body splits decades ago!
Here are a few reasons why I like total body splits:
Number one: You get a little more recovery in the week.
More days of rest is music to my ears because it gives your muscles the chance to regenerate and grow.
Number two: You’re getting more frequent stimulation of the muscles in your body – all of them.
You’re getting that opportunity to resume muscle protein synthesis every 48 hours or so, which is what the research is pointing us to.
Finally, number three: Total body workouts can help prevent imbalances since you’re training all muscle groups equally.
DISADVANTAGES OF A TOTAL BODY SPLIT
While I do recommend a total body split for most people, there are a few things that I’m not crazy about.
Full-body workouts can be longer than split routines since you’re addressing every major muscle group in one session.
This might not be ideal for those with time constraints.
There’s also potential for muscular imbalance if your total body program isn’t designed correctly.
If not designed correctly, you might end up giving more focus to certain muscle groups and neglecting others.
Finally, advanced lifters or bodybuilders might require more targeted weekly volume and intensity on specific muscle groups to induce hypertrophy.
In such cases, split routines can be more effective.
UPPER-LOWER SPLIT
An upper-lower split routine is a type of resistance training program where exercises are divided based on the primary muscle groups they target: upper body and lower body.
It’s sometimes called the Arnold Workout Split because he is one of several bodybuilders who popularized this type of split.
You might even hear this one called the Push Pull split, which is not to be confused with the Push Pull Leg split.
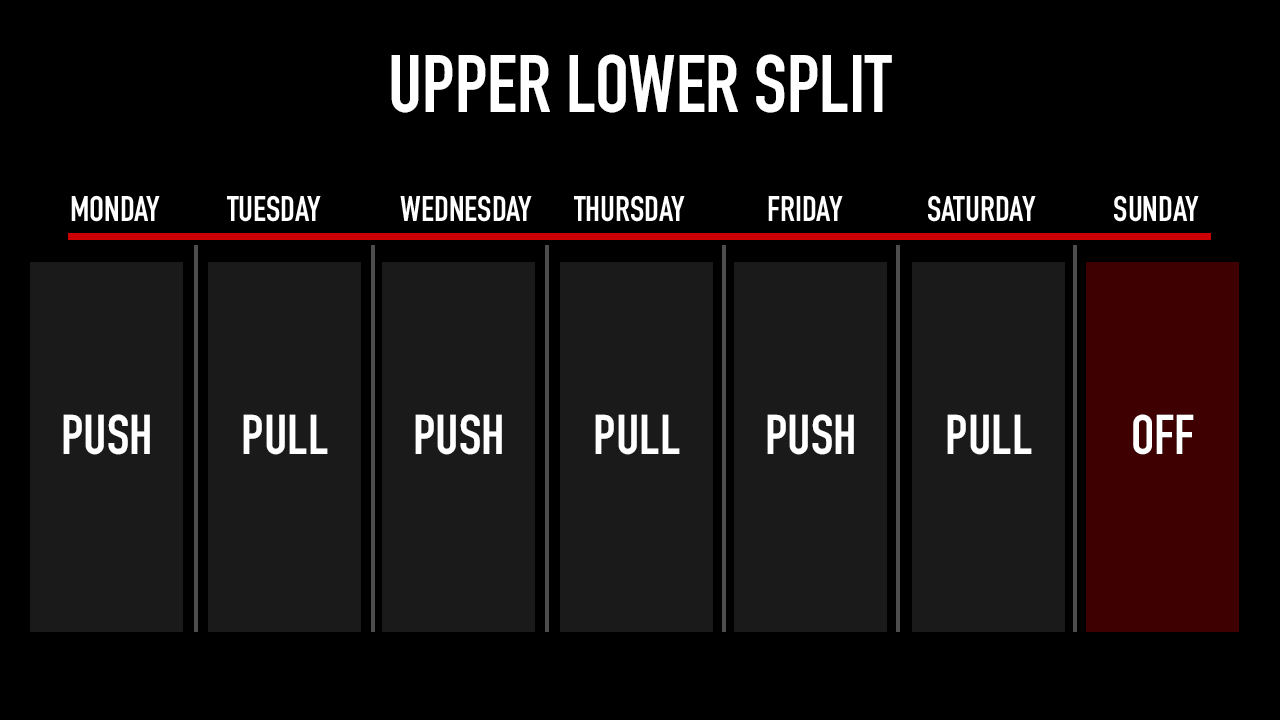
The general idea is to dedicate separate training days to each of these two regions.
HOW MANY DAYS DO YOU TRAIN?
Traditional upper-lower workout splits are quite intensive since they traditionally follow a 6-day split.
So, a push workout would be chest, triceps, shoulders, and quads.
For example, you would focus on the Bench Press, Triceps Pushdown, Lateral Raise, and Bulgarian Split Squat for 10-12 reps.
If you’re doing bodyweight movements, this could include Push-Ups, Diamond Push-Ups, Dive Bombers, and Air Squats.
Then a pull workout would be back, biceps, and hamstrings.
Another example of this workout would be T-Bar Row, Bicep Curls, Stiff-Leg Deadlifts, and Deadlifts. Rep ranges might change here based on your goal.
Again, if you’re choosing bodyweight exercises here, you could do Pull-Ups, Chin-Ups, and Single-Leg Deadlifts.
But you don’t necessarily need to follow this as a 6-day workout split, especially if you’re newer to working out.
You could start with a 4-day workout split, gradually progressing to a 4-6 day split as you get stronger and your recovery improves.
ADVANTAGES OF AN UPPER VS. LOWER SPLIT
An upper-lower split allows you to take one workout, break it down over two workouts and increase the volume of those exercises a little bit.
Yes, the frequency is greatly enhanced here with six workouts per week versus three, but the workouts are a little bit shorter.
The idea is the same because you’re still stimulating muscle protein synthesis every 48 hours.
This split also makes sure one half of your body gets a break while the other works, helping with recovery.
By splitting the body’s workout, you can also do more exercises for each muscle, which can be better for building muscle.
Plus, if you’re short on time one week, you can still give all your muscles some attention with just two workouts—one for the upper and one for the lower body.
The routine keeps things interesting, as you can mix up the exercises more.
By focusing on specific areas, you get a chance to really master the exercises, which is safer and more effective.
DISADVANTAGES OF AN UPPER VS. LOWER SPLIT
One significant issue is that it might not be ideal for those who can’t commit to training multiple days a week.
Since the split requires separate days for an upper and a lower body workout routine, it necessitates at least four days of training for comprehensive coverage.
Additionally, some people might feel they’re neglecting specific muscle groups if they don’t vary their routine enough.
Overemphasis on certain exercises could lead to muscular imbalances, where some muscles become stronger than their opposing counterparts.
There’s also the risk of overtraining; if someone tries to pack too many exercises into an upper or lower day, it could hinder recovery.
Lastly, newcomers to exercise might find it a bit complicated initially, as it requires a good understanding of which exercises target which muscle groups.
In essence, while the split can be effective for many, it might not be the best fit for everyone’s needs and lifestyles.
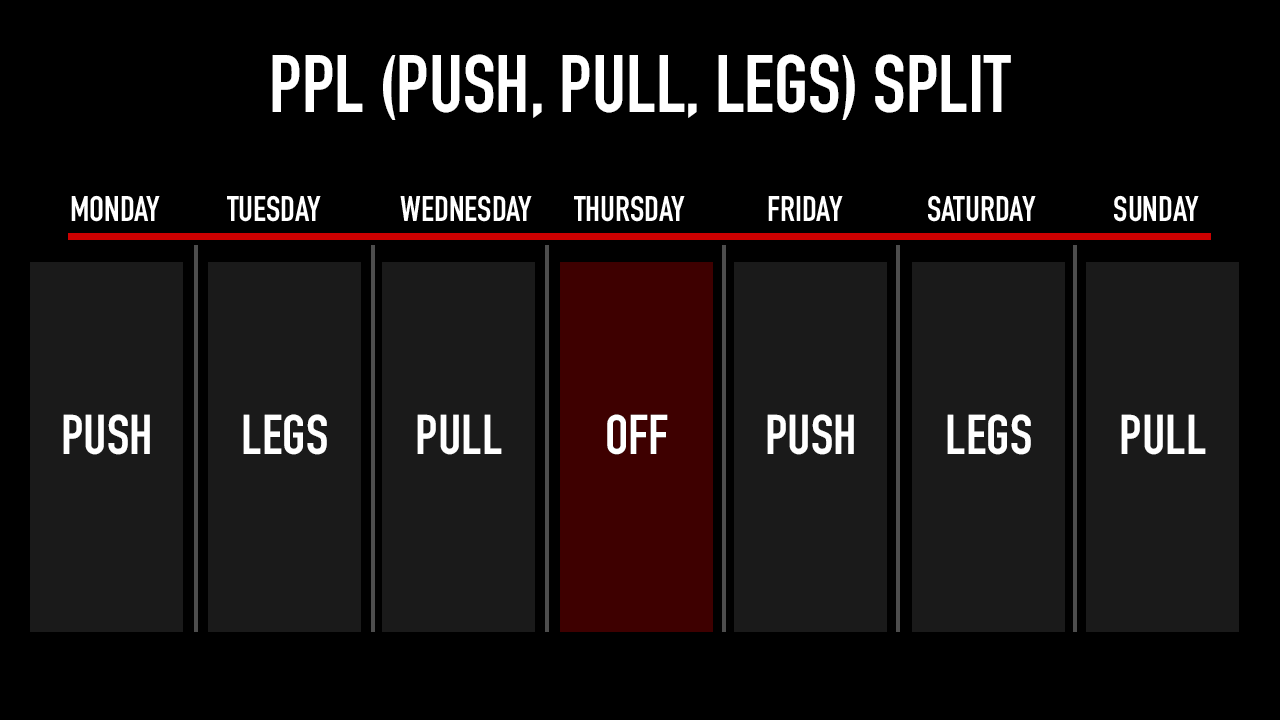
PUSH PULL LEGS SPLIT
The Push Pull Legs split (PPL) split is a popular workout structure that divides exercises based on their primary functions:
Push exercises essentially involve “pushing” the weight away from your body.
They primarily target the chest, shoulders, and triceps.
Common push exercises include Bench Presses, Overhead Presses, Push-Ups, Tricep Dips, and Tricep Extensions.
You’ll usually perform 2-3 movements per major muscle group.
Pull exercises involve pulling the weight towards your body.
Primary movements work the back and biceps.
Examples include Pull-Ups, Barbell Rows, Dumbbell Rows, Lat Pulldowns, and Bicep Curls.
As the name suggests, Leg Day exercises target the lower body, including the quadriceps, hamstrings, calves, and glutes.
Common leg exercises are Split Squats, Deadlifts, Stiff-Legged Deadlifts, Lunges, Leg Presses, and Calf Raises.
Many fitness enthusiasts and advanced bodybuilders favor the PPL split because it allows them to target specific muscle groups with greater intensity and volume per muscle group than a full-body workout.
It also provides adequate recovery time for each muscle group.
HOW MANY DAYS DO YOU TRAIN?
Typically, someone following a PPL routine would cycle through the three workouts consecutively, take a day off, and then repeat.
This makes it ideal for people – usually the advanced trainee – who prefer to hit a 6-day split. However, it’s also flexible enough to be adapted for fewer days.
Let’s say you’re still fresh to working out, especially with body part splits. If you wanted to go more toward a beginner level, you could opt for a lighter training frequency.
We could do a push workout on a Monday, then we could have a day off. We could do a single workout for legs on Wednesday, then a day off. A pull workout Friday, and a couple of days off.
In essence, we’re dramatically decreasing the overall training volume, but at least we’re still maintaining the benefits of those similar and shared functions.
ADVANTAGES OF AN PUSH PULL LEG SPLIT
With a Push Pull Leg split, the benefit is that you’re starting to train more athletically.
My big benefit with this split is that I get to pair muscles together that share similar functions.
So, I’m not thinking about a comprehensive strength training program for the chest only. I’m not thinking about triceps training.
I’m thinking about push training and applying the right training stimulus. We’re grouping muscles that tend to work together because athletically, that’s how we’re going to function.
This shift in perspective simplifies one’s training approach, allowing for a streamlined and purposeful gym session.
Since you’re grouping muscles that synergistically work together, it diminishes the risk of overtraining a particular muscle group.
The versatility of the PPL split is another attractive feature.
It’s moldable, fitting the needs of both novices and seasoned athletes. You can easily adjust the intensity, volume, and types of exercises based on your specific goals.
The design also provides flexibility in terms of frequency. Whether you’re someone who hits the gym almost daily or just a few times a week, the PPL split ensures all major muscle groups receive sufficient attention.
Personally, I’m a big fan of this training approach.
It not only resonates with natural body movements but also offers a strategic, athletic, and functional workout blueprint.
DISADVANTAGES OF AN PUSH PULL LEG SPLIT
One of the primary concerns is the commitment to frequency.
The PPL split often suggests working out six times a week, which might not be practical for those juggling busy schedules.
There’s also a risk of developing muscle imbalances if there’s too much focus on a favored group, like pushing exercises, at the expense of others.
Beginners might find the PPL’s intensity and volume daunting, potentially setting them up for discouragement.
Furthermore, with its frequent workout schedule, ensuring adequate muscle recovery becomes crucial, as failure to do so could lead to overtraining and injuries.
The split’s emphasis on the dominant movement as compound lifts might limit the opportunity for accessory exercises, which could be a concern for those wanting to target specific muscles.
Also, without sufficient exercise variety, there’s a risk of hitting plateaus in progress.
Lastly, the PPL split can be equipment-intensive, often necessitating access to a well-stocked gym.
If you have limited resources or a preference for home workouts, you might find the split challenging.
BRO SPLITS
A “Bro Split” is a classic type of training split that is used more now for memes and TikTok videos than it is taken seriously as a way to exercise.
There was a time when it was considered the classic bodybuilder split!
But here’s the thing… if designed correctly, the Bro Split can be a solid training split.
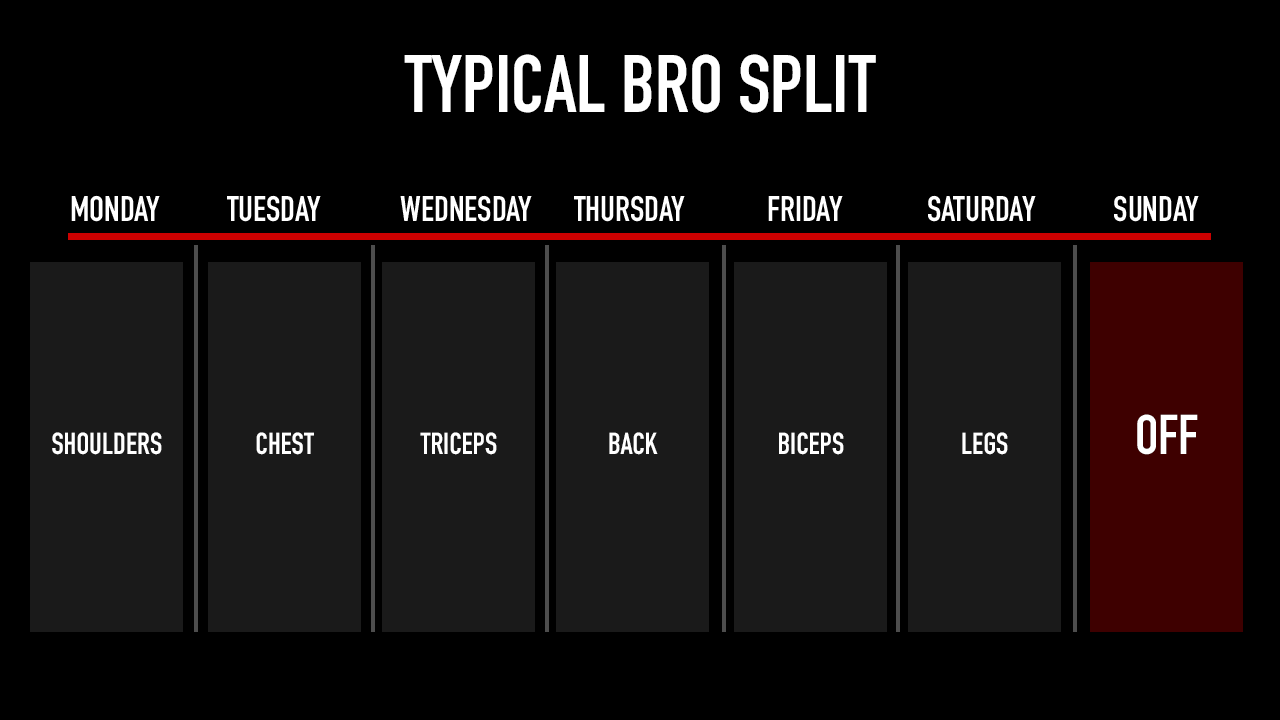
Bro Splits unfairly get a bad name… sometimes. Other times, it’s warranted.
The classic bodybuilding workout split is when you focus on one muscle group per day, but you perform more than one exercise per body part, somewhere in the range of 4-6 exercises.
There’s also a lot of time given to single-joint isolation exercises. Most look like this: shoulders, chest, triceps, back, biceps, legs, and then a day off.
Why is that not so good?
Because you’re sequentially overlapping shared functions. I’m going with a push muscle – shoulders – and then another push muscle with chest. And then another push muscle with triceps.
Where’s the recovery?
We know that when we do chest exercises, we’re going to impact the shoulders. If you do a Barbell Bench Press, you know you’re working the shoulders. Where’s the recovery from your shoulder training from the day before? You’re going from right a bench movement like the Incline DB Bench into a shoulder exercise.
Especially as a natural athlete, adequate rest and recovery is paramount.
But this is where the correct design can save the Bro Split. You can opt for something different.
HOW MANY DAYS DO YOU TRAIN?
There’s a different way to do Bro Splits that would actually make it a functional workout allowing for proper recovery and results.
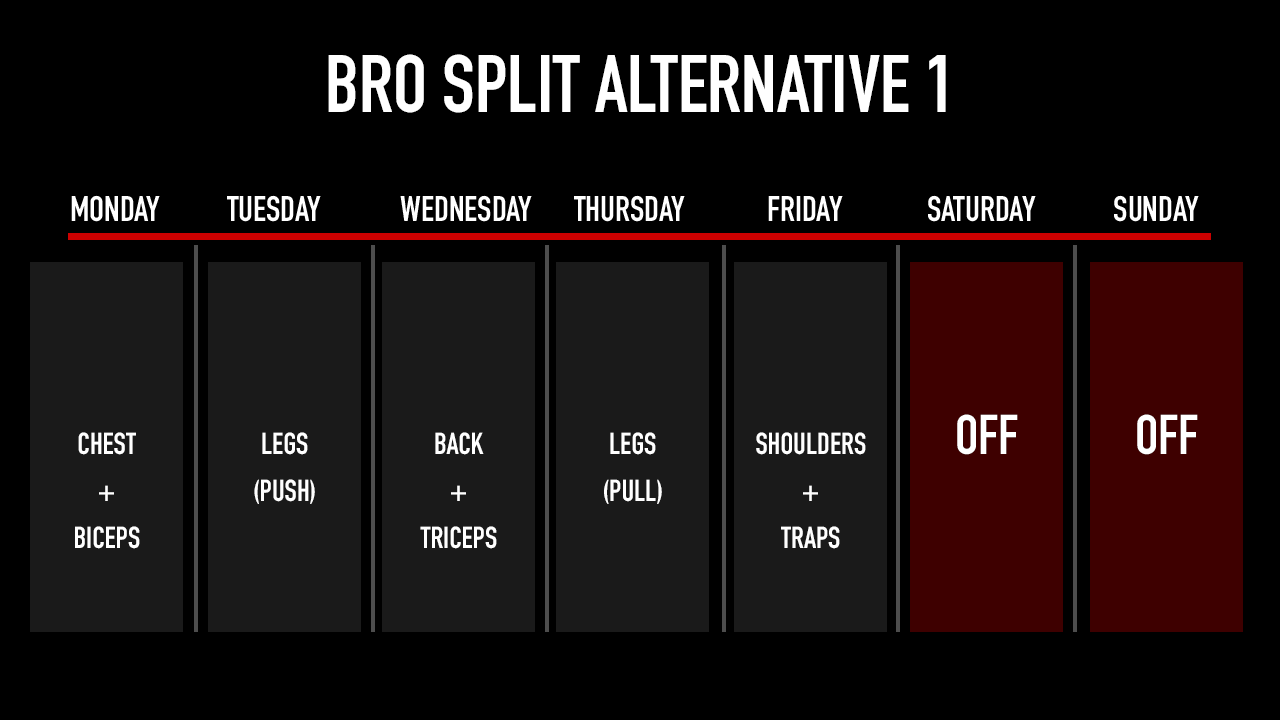
Here’s how I’d recommend breaking down a Bro Split:
- Chest and biceps
- Legs
- Back and triceps
- Legs
- Shoulders and traps
- Rest
- Rest
We’ve got this other version here:
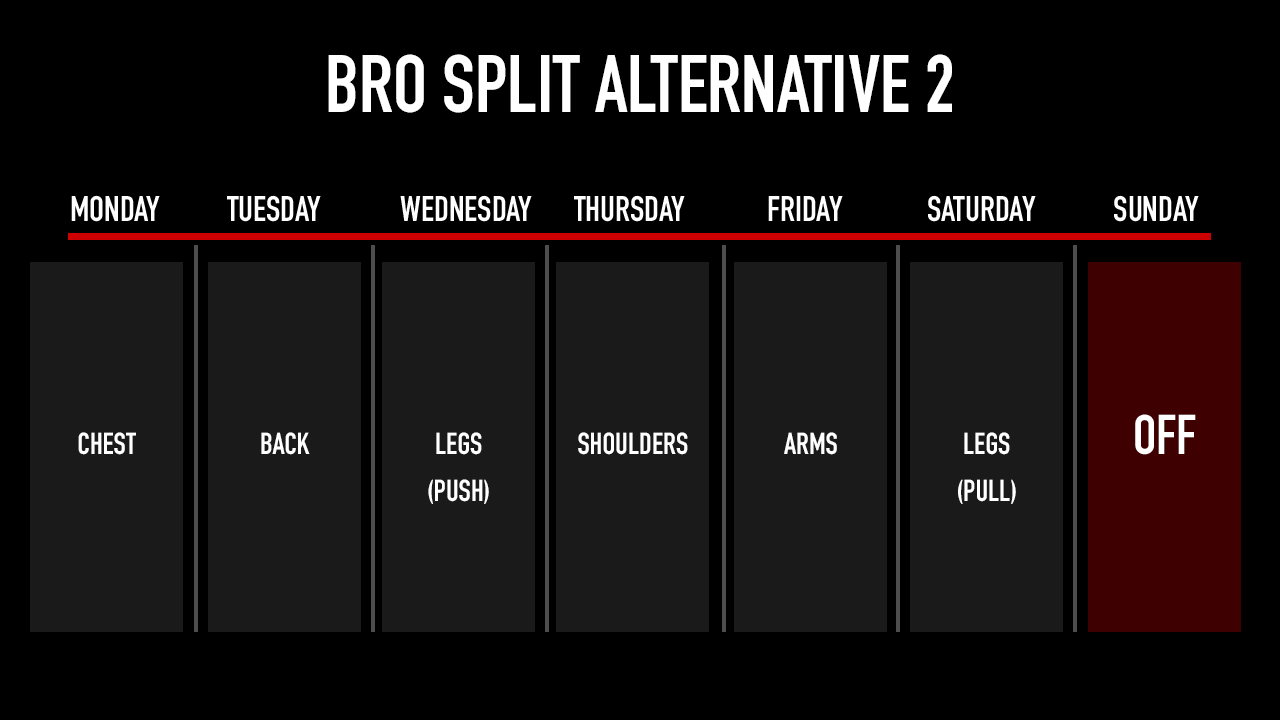
This is another popular one: Chest, back, legs, shoulders, arms, and then legs.
In essence, you can treat it as a 4-day split, or 5-day workout split, depending on your goals and experience.
If this isn’t your first rodeo in the gym, you could do a 6-day workout split.
A 7-day training split might seem tempting with a Bro Split, but you need to remember that your recovery is just as important.
As you can see, it is possible to make a Bro Split actually work.
The way you make it work for you is based on exercise selection and then putting the workouts in the right sequence.
You avoid the negatives and benefit a bit more from the principles of what we established back with the total body workout split.
ADVANTAGES OF A BRO SPLIT
I’m going to talk about the pros of a Bro Split as it relates to the two versions I mentioned above.
One of its primary advantages is the intense focus it allows on individual muscle groups during each session.
By dedicating an entire workout to a single muscle, you can ensure a comprehensive and varied training experience, stimulating the muscle from different angles.
This approach not only offers the muscle an entire 48 hours of recovery, reducing the risk of overtraining but also allows for a diverse range of exercises, making workouts more engaging.
Many individuals appreciate the motivational boost they get from the pronounced “pump” of thoroughly working a muscle, enhancing their overall workout satisfaction.
Also, the Bro Split’s structure is clear-cut, which can be particularly appealing to beginners or those who value simplicity in their routines.
Despite requiring frequent gym visits, the Bro Split’s focus on individual muscles means that each session might be shorter, catering to those with time constraints.
A typical workout usually lasts around 45-50 minutes.
DISADVANTAGES OF A BRO SPLIT
One significant concern is the reduced training frequency of individual muscle groups, with most being addressed just once a week.
This infrequency might not capitalize on optimal muscle growth opportunities, especially given emerging research suggesting benefits from more regular stimulation.
Likewise, there’s a tendency within the Bro Split approach to focus heavily on “mirror muscles,” potentially sidelining less visible but equally crucial muscles.
This oversight can lead to muscular imbalances and even postural issues.
Timewise, dedicating an entire session to one muscle might not be the most efficient, particularly for those with limited weekly gym availability.
Additionally, the intense focus during that single session poses a risk of overworking a muscle.
From a functional fitness standpoint, the isolation-driven nature of the Bro Split may not always mimic real-world movement patterns, thereby limiting functional strength development.
The format might also feel monotonous to some, impacting long-term motivation.
Despite these cons, don’t just resort to Bro Split hate unless you’re talking about the classic (and comical) version of the split.
HOW TO PICK THE BEST TRAINING SPLIT FOR YOU
Now that you have some examples of how to think about splitting up your workouts, how do you decide which split is right for you?
Well, I’ve boiled this down to a few simple principles to consider and questions to ask yourself.
WILL YOU STICK TO IT?
For me, the first rule is, will you stick to it. The best training split is the one you’ll actually do with commitment.
For example, I don’t particularly like full body splits. I don’t necessarily like to have to train everything in a single session.
What if you don’t look forward to your workout because you’re dreading having to do everything in one session and feeling maybe too fatigued by the time your workout is over? Chances are, you’ll eventually give up on it or you won’t give your all.
I don’t care how effective the split is, a split not done is not effective.
So, you need to find one that fits your preferences – one you actually enjoy doing.
IS IT PREDICTABLE?
Another thing to consider is the predictability of the routine and whether or not that fits your schedule.
Take the Push Pull Legs split as an example. It can have either a day off in between the three days or at the end of the six days.
If you put that rest day in between the three days, it’s good because you’re giving yourself an extra rest day in between, but the rest days and training days shift every week. For some, this won’t be an issue, and they might actually prefer it.
For others, they like to keep the rest days and training days predictable.
Consider what you can do and what you prefer and see which training splits align with that.
WHAT IS YOUR GOAL?
The training split you pick should align with your fitness goals.
So, what are you trying to accomplish? Is muscle size your training goal? What about losing body fat? Or maybe you want to develop explosive power and athleticism?
Each of these goals can align with a different training split.
For example, if you’re a beginner, you might be best served with a total body split so that you’re able to build the all-too important neuromuscular connections.
After doing this for a few months, you might want to focus on muscle growth and strength gains. In this case, you might want to graduate to a Push Pull split.
What if you want to train more athletically? In that case, I’d recommend a Push Pull Leg split.
Think about what you want to accomplish and compare it to each of the effective training splits and what they can provide.
DON’T BE A SLAVE TO YOUR SPLIT
You know why splits are killing your gains, guys?
Because you’ve fallen in love with the same one too often and you stick with it for far too long.
We’ve all done this… we follow the same split much longer than we should. The other muscle groups that aren’t responding as well may not be getting enough stimulation.
So, you need to make sure you change your split up and then closely monitor what happens.
Do you continue building strength? Do you see development continue? Or do you see the opposite?
Do you start to become less strong in your training? Do you start seeing development taper off, or not look as good anymore?
If that’s the case, you should modify the split.
If you’re not making gains in strength, not making gains in hypertrophy, not changing in the mirror, or not satisfied with where you’re at, then it’s time to try a different split.
When you do start mixing up your routines and your splits, pay attention. Maybe you start to see changes and improvements in some areas, and maybe regressions in others.
This is how you become more educated as to how you need to put that workout together for yourself to allow for the best gains everywhere going forward.
The most important thing you can do in your training is make sure you are strategically varying your common workout splits.
Never listen to someone that tells you the ‘best training split’ to do unless they are aware of what your goals are and where in your training plan you currently are.
You should know what your goal is and have a purpose behind your training.
Remember, training without a purpose is just working out. If you want to get the fastest results, you need to have a clear game plan and some science behind what you do. Check out our ATHLEAN-X programs to see which ones best meet your fitness levels and goals!
- While there are many training split options available, the best one for you depends on various factors such as your fitness goals, training frequency, and experience, and what’s right for you may not be right for your buddy.
- There are four main types of training splits: the Total Body Split, the Upper vs. Lower Split, the Push vs. Pull vs. Legs Split, and the Bro Split.
- The Total Body Split involves training all major muscle groups in a single session. This method typically follows a 3-day workout routine. It offers the benefit of better recovery and ensures balanced training of all muscle groups. However, it can be time-consuming and might neglect specific muscles if not designed correctly.
- The Upper-Lower Split categorizes exercises based on whether they target the upper or lower body. This routine can be structured around a 4 to 6-day workout plan. It allows for concentrated training on specific body regions, but beginners might find it a bit intricate. Moreover, it necessitates a commitment to working out at least four days a week.
- The Push Pull Leg Split (PPL) organizes exercises by their fundamental actions: push, pull, and leg-centric movements. This method is often executed as a 6-day split. It groups muscles based on their shared functions, making workouts more functionally aligned. Despite its benefits, it may demand frequent training sessions and can be equipment-heavy.
- The Bro Split, when designed correctly, can be an effective workout regimen. It allows for an intense focus on individual muscles during each session, offering comprehensive training and a 48-hour recovery period. However, it may lead to issues such as reduced training frequency for individual muscles, risk of overworking, and potential neglect of less visible but crucial muscles, leading to imbalances.
- When choosing a training split, it’s essential to consider personal preferences, predictability to match one’s schedule, and alignment with specific fitness goals, ensuring long-term commitment and efficacy.
- Above all, be sure to change up your training split, watching your results (or regressions) closely and modifying accordingly.
BEST WORKOUT SPLITS FAQS
The most effective workout split depends on individual preferences and fitness goals.
The best training split is one that you can commit to consistently, aligns with your schedule, and meets your specific fitness goals, whether it's muscle growth, fat loss, or developing athleticism.
The four most popular training splits to choose from include the following:
- Total Body Split
- Push Pull Split
- Push Pull Leg Split
- Bro Split
If you’re willing and able to exercise during a 5-day split, you can consider the Push Pull split, the Push Pull Leg split, or the Bro Split.
All of these programs can be designed to fit a 5-day workout schedule, providing you with two days of rest and recovery time.
If you’re new to working out, it might be best to stick with a 3-day split such as a Total Body workout program.
The best 6-day split is going to be one of the following:
- Push Pull Split
- Push Pull Leg Split
- Bro Split
Each of these training splits can be designed in a way that allows for six days of training broken up or concluding with a day of rest.
What’s more, these workout sessions allow you to hit multiple muscle groups two times per week.
The traditional Bro Split is a training program where each workout session focuses on one specific muscle group.
It involves dedicating each day to one muscle group like shoulders, chest, or legs, followed by a rest day at the end of the week.
While once a popular bodybuilder routine, its efficiency is debated, but when designed correctly – pairing functional muscle groups together – it can be a legitimate workout approach.
The traditional Bro Split workout is not good because it doesn’t allow for proper recovery. This is because you’re performing the same function for days in a row.
However, if you switch up the Bro Split to separate and pair up functional muscle groups together, allowing for optimal recovery and 48-hour protein synthesis, then it can be a very useful training split.
For example, you can pair chest and biceps, legs, back and triceps, and shoulders and traps.
A good gym schedule is one that aligns with an individual's fitness goals, availability, and allows for adequate rest and recovery.
It should provide a balance of strength training exercises for each muscle group.
Consistency, variety, and regular progression are key components of an effective gym schedule.
The best workout split is determined by an individual's goals, experience, and how many days they can commit to the gym.
It ensures each muscle group gets adequate attention and recovery time.
Common splits include total body workouts, upper-lower splits, and push pull leg split routines.
The best 3-day workout split often – but not always – involves a total body approach, targeting all major muscle groups during each session.
Another option is the push pull leg split routine, where each day focuses on either push exercises, pull exercises, or leg workouts.
Both ensure a balanced training approach with ample recovery.
The best four-day split typically involves an upper-lower split routine, where two days target the upper body routine and two days focus on the lower body routine.
Another effective approach is to divide the days into specific muscle group combinations, like chest and back, arms and shoulders, and two leg days.
This provides a balance of volume per session and recovery between sessions for each muscle group.
REFERENCES

CAN YOU TRAIN CHEST AND ABS TOGETHER?
I pride myself on designing workouts that deliver fast, effective results by encouraging your muscles to work in harmony, just as they’re meant to.
Sometimes, there’s a pair of muscle groups that are so perfect for each other, but people often overlook them.
In this case, I’m talking about the chest and the abdominals.
Surprisingly, the chest and abs – both belonging to the anterior chain – make for an excellent team when trained correctly.
Today, I’m going to introduce you to a workout that simultaneously engages your chest and abs in each exercise.
This powerful combination not only helps you sculpt a strong, impressive chest, but also reinforces your core strength and aesthetics along the way.
ANATOMY OF THE CHEST AND ABS
Just like usual, I want to take a closer look at the muscles that we’ll be covering in this chest and abs workout.
Here’s the groups for muscle activation that you should familiarize yourself with:
PECTORALIS MAJOR

The pectoralis major, a prominent and essential muscle within the pectoral muscle group, is the largest of the pectoral muscles.
Its anatomical structure spans from the sternum and clavicle to the humerus, covering a significant portion of the chest.
This muscle plays a vital role in various upper body movements and is primarily responsible for adducting and medially rotating the shoulder joint. Consequently, the pectoralis major facilitates the smooth motion of the arm across the body.
To effectively target and strengthen the pectoralis major, consider incorporating compound exercises such as the Bench Press. You can also incorporate some of my favorite chest exercises like the Incline Dumbbell Bench Press and the Cable Crossover.
These exercises are great for muscle building and development, especially when muscle growth is your primary focus.
PECTORALIS MINOR
The pectoralis minor, though smaller and lesser known than its counterpart, the pectoralis major, is an essential muscle that plays a significant role in the stability and functionality of the shoulder girdle.
Located beneath the pectoralis major, this fan-shaped muscle extends from the third to the fifth rib and attaches to the coracoid process of the scapula.
The primary function of the pectoralis minor is to stabilize the scapula by depressing and protracting it, which aids in the overall movement and control of the shoulder joint. Additionally, it assists in downward rotation of the scapula when the shoulder is elevated.
To target and strengthen the pectoralis minor, I’d recommend the Push-Up Plus exercise along with the Low-to-High Cable Crossover. Try adding these into your pecs workouts for serious gains!
ANTERIOR DELTOID
The anterior deltoid is located at the front of the shoulders, covering the head of the humerus.
This muscle plays an indispensable role in maintaining stability and mobility within the shoulder joint, making it essential for various upper body movements.
The primary functions of the anterior deltoid include shoulder flexion, horizontal adduction, and internal rotation. These actions allow for a range of motions, such as lifting the arm forward and across the body, as well as rotating the arm inward.
To get after and strengthen the anterior deltoid, I’d recommend the Overhead Press, and Push-Up.
RECTUS ABDOMINIS
The rectus abdominis, commonly referred to as the “six-pack” muscle, is the central muscle of the abdominal region.
It extends vertically from the pubic symphysis to the lower ribs and sternum, playing a vital role in core stability, balance, and posture.
The primary functions of the rectus abdominis include spinal flexion, lateral flexion, and stabilization of the trunk during various movements. It allows for actions such as bending forward at the waist and assisting in maintaining an upright posture.
I’m a fan of V-Ups, Hanging Leg Raises, and Reverse Crunches for my abs combo workout.
EXTERNAL OBLIQUES
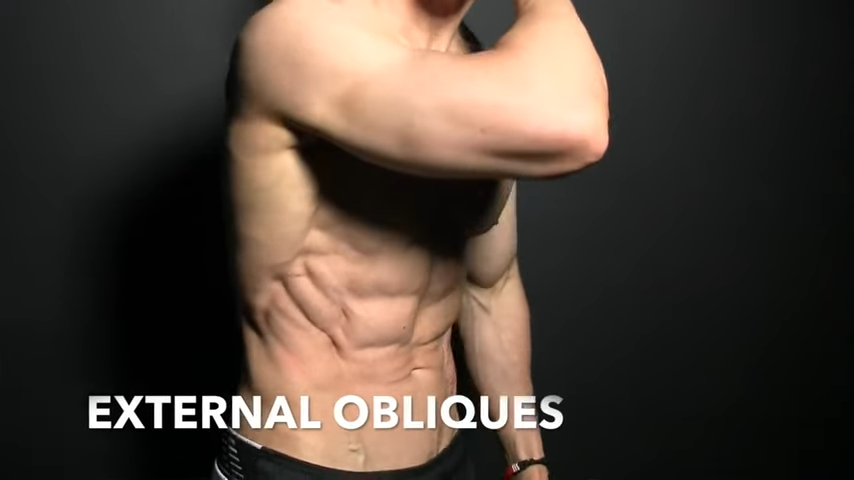
The external obliques are situated on the sides of the abdomen, extending from the lower ribs to the iliac crest of the pelvis.
These muscles are critical for maintaining core stability and facilitating various trunk movements.
The primary functions of the external obliques include trunk rotation, lateral flexion, and stabilization during core engagement. They enable actions such as twisting the torso, bending sideways, and providing support during dynamic movements.
Elbow to Knee Tucks and Side Bridges are excellent for targeting this muscle. I’d also get into the Side Plank position and dip your hips.
INTERNAL OBLIQUES
The internal obliques, an essential component of the abdominal muscle group, are located deep within the sides of the abdomen, beneath the external obliques.
They extend from the inguinal ligament and iliac crest up to the lower ribs, playing a crucial role in core stability and various trunk movements.
The primary functions of the internal obliques include trunk rotation, lateral flexion, and stabilization during core engagement. They enable actions such as twisting the torso, bending sideways, and providing support during dynamic movements, often working in tandem with the external obliques.
I’d recommend Windshield Wipers, Crossbody Mountain Climbers, and Side Bridges with Rotation if you want to target this muscle.
SERRATUS
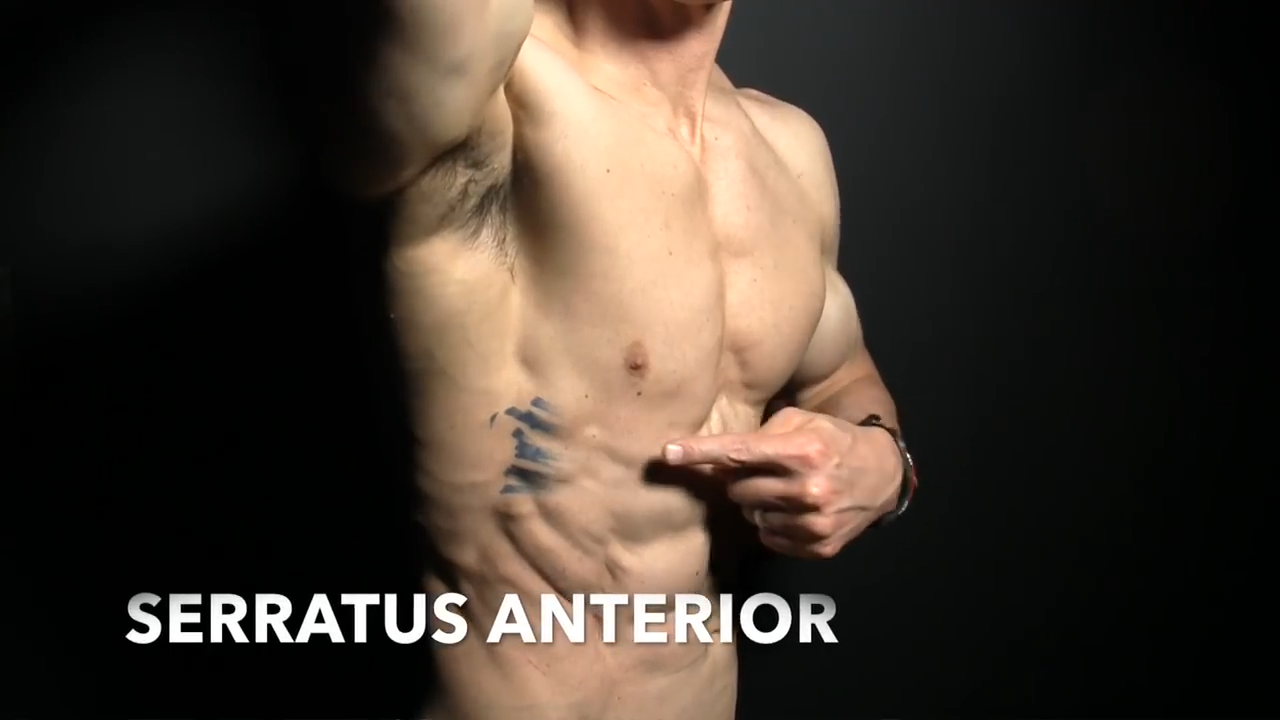
The serratus anterior, often simply referred to as the serratus, is a unique, serrated-shaped muscle located on the lateral aspect of the rib cage, beneath the scapula.
This muscle plays a crucial role in the stabilization and movement of the scapula, contributing to the proper functioning of the shoulder girdle.
The primary functions of the serratus anterior include scapular protraction, upward rotation, and stabilization during various upper body movements. These actions enable activities such as pushing, reaching, and maintaining proper scapular alignment, especially during overhead movements.
If you want to target this muscle, I’d recommend doing the Push-up Plus, Dumbbell Punches, and Overhead Press with Protraction.
TRANSVERSE ABDOMINIS
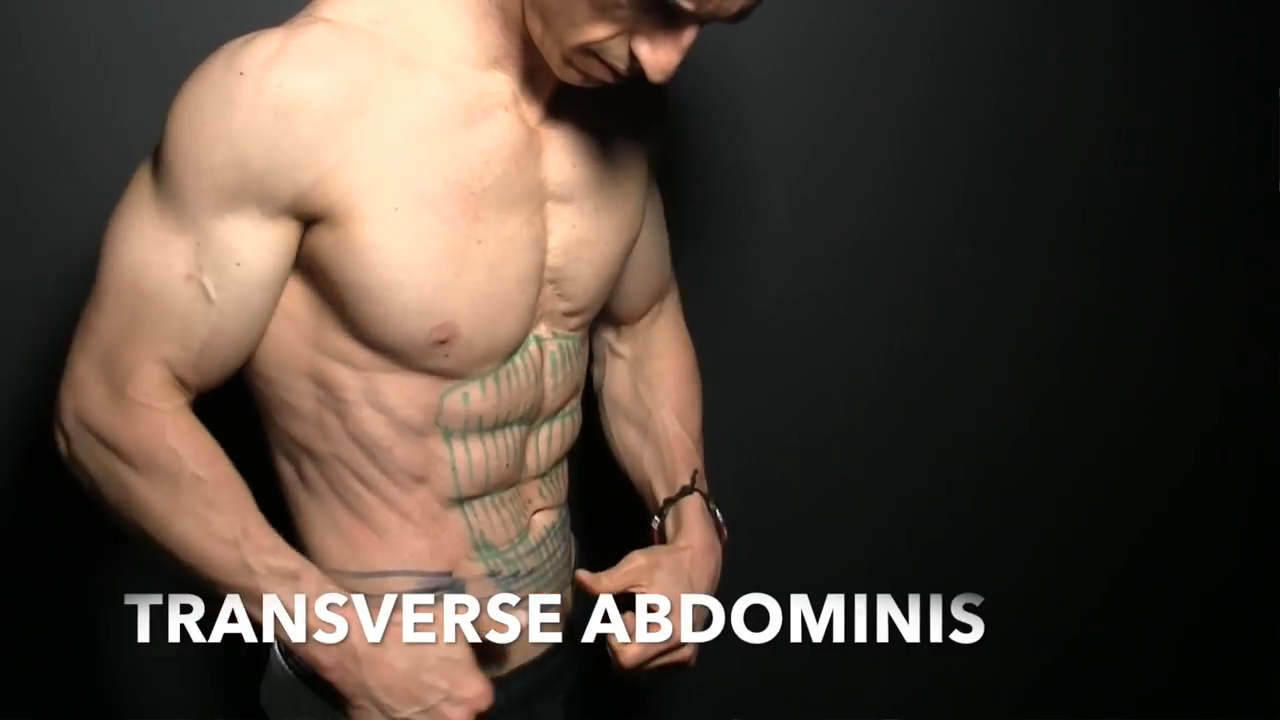
The transverse abdominis, often considered the body’s natural corset, is a deep, internal abdominal muscle that wraps horizontally around the torso.
It plays a critical role in core stability, posture, and supporting the spine during various movements.
The primary function of the transverse abdominis is to provide trunk stabilization by compressing the abdominal contents and maintaining intra-abdominal pressure. This action helps support the spine and maintain proper posture during dynamic and static activities.
CHEST AND ABS WORKOUT
Now that you know which muscles you’ll be targeting in this chest and abs workout, it’s time to learn the exercises.
Each chest exercise also targets the abdominal muscles so don’t be surprised when you feel it in both muscle groups.
And don’t worry, these aren’t super advanced ab exercises. They are all very moderate exercises that don’t have a steep learning curve.
Let’s get started with this step-by-step workout!
GYMNAST DIPS
HOW TO DO THE EXERCISE: Imagine doing a Chest Dip with a hip hinge thrown in at the end and you have the Gymnast Dip exercise. Start strong on a dip station, holding yourself up. Engage your core, bend at the elbows, and let yourself lower towards the floor. Watch the position of the arms by avoiding flaring out the elbows. Once your upper arms are parallel with the floor, pause and go back into the press-up position. At the top of the movement, contract your lower abs and lift your hips up, similar to an inverted V position. Pause for a moment before moving back to the starting position. Perform 3-4 sets per workout.
WHAT MAKES IT EFFECTIVE: Gymnast Dips are an excellent upper-body exercise that hit all the upper body anterior muscle groups. It combines the benefits of a Chest Dip with a hip hinge, adding an extra challenge for your lower abs. You can turn this into one of your new favorite weighted exercises with a dumbbell at your feet or a weight belt.
ONE-ARM INCLINE PRESS
HOW TO DO THE EXERCISE: Begin by adjusting an incline bench to approximately 45 degrees. Sit on the bench with your feet flat on the ground and your back pressed against the pad. Grab a dumbbell in one hand and hold it at shoulder height with your palm facing forward and your elbow bent at a 90-degree angle. Take a deep breath and engage your core. Press the dumbbell upward in a controlled motion until your arm is fully extended. Be sure to keep your wrist stable and maintain the dumbbell’s alignment above your shoulder. Pause briefly at the top of the movement, and then slowly lower the dumbbell back to the starting position, maintaining control throughout the descent.
WHAT MAKES IT EFFECTIVE: The One-Arm Incline Press is one of my go-to upper chest exercises. It’s an effective exercise due to its ability to isolate the chest, shoulder, and triceps muscles while engaging the core for stabilization just like the previous exercise. This unilateral exercise allows for a greater range of motion, helps identify and correct muscle imbalances, and adds an element of challenge to your workout routine.
ARCHER PUSHUPS
HOW TO DO THE EXERCISE: Start by getting into a standard pushup position with your hands wider than shoulder-width apart and your feet close together. Turn your hands slightly outward to accommodate the wider stance. Shift your body weight to one side while bending the elbow of that same side. Simultaneously, keep the opposite arm straight and slide it outward, mimicking the motion of drawing a bow. Lower your chest towards the ground, keeping your body in a straight line from head to heels. Push through the bent arm to lift your body back to the starting position while sliding the straight arm inward. Remember to keep your core engaged throughout the movement. Do as many Pushups per workout as you can with good form.
WHAT MAKES IT EFFECTIVE: This type of exercise is effective due to its ability to isolate one side of the chest, shoulder, and triceps muscles at a time. This unilateral exercise helps develop strength and balance, increases the range of motion, and addresses potential severe muscle imbalances. Moreover, the movement engages the core for stability, making it an excellent full-body exercise for your workout regimen.
3-D CROSSOVERS

HOW TO DO THE EXERCISE: Set up a resistance band on a stable surface like a cable machine. Stand next to the band with your side facing it. Grab the band with the same side. Tighten your core and keep a slight bend in the elbow as you pull the band across your body. Pause and squeeze the chest muscles and core and then slowly return to the starting position. Repeat all the repetitions on the other side. You can also do this exercise with cables or a Cable Crossover machine if you don’t have access to resistance bands.
WHAT MAKES IT EFFECTIVE: The 3-D Crossover combines a chest and abdominal exercise and does so in the transverse – or rotational – plane of motion. This one is a must for your workout schedule.
HOW TO GET MORE OUT OF THIS WORKOUT
Getting the most out of these chest and abdominal movements is crucial for both time efficiency and achieving your fitness goals.
Try implementing the following tips and tricks to enhance the quality of your training sessions.
MOVE SLOWLY AND DELIBERATELY
Focusing on slow, controlled movements during strength training exercises helps activate and engage the targeted muscles more effectively.
By focusing on time under tension (TUT), you’ll ensure that your muscles work harder throughout the entire range of motion. This will promote strength, endurance, and muscle growth.
PRIORITIZE INTENSITY
Instead of focusing solely on the number of repetitions, prioritize an intense workout.
Choose weights that challenge your muscles to the point of fatigue but allow you to maintain proper form throughout the exercise.
In other words, trade in your heavy weights for more intensity, especially if the heavy lifts make you sacrifice your form.
TRY SUPERSETS
Supersets involve performing two exercises back-to-back without any rest in between, targeting the opposing muscle group.
For example, perform a set of Gymnast Dips and then do a Lat Pulldown.
You can also target the same muscle group. This is called a compound set.
For example, after a set of Bench Press, you perform the 3-D Crossover.
This technique increases workout intensity, saves time, and promotes muscle growth.
REST STRATEGICALLY
Rest periods between sets are essential for muscle recovery and preventing burnout. However, the optimal rest duration depends on your goals and the type of exercise.
Generally, shorter rest periods (30-60 seconds) are suitable for endurance and hypertrophy-focused workouts, while longer rest periods (2-5 minutes) are recommended for strength and power training.
FOCUS ON PROGRESSIVE OVERLOAD
To keep improving and avoid plateaus, consistently challenge your body by gradually increasing the resistance, volume, or intensity of your workouts.
Keep in mind that you wouldn’t increase all three at the same time!
This principle, called progressive overload, ensures continuous progress and adaptation, ultimately leading to enhanced performance and results.
MAINTAIN PROPER FORM
Proper form is crucial for preventing injuries and maximizing the effectiveness of each exercise.
Always prioritize maintaining good form over lifting heavier weights or performing more repetitions.
If needed, seek guidance from a fitness professional to ensure you’re executing each movement correctly.
Guys, if you’re already targeting lower and upper chest exercises anyway, why not tweak the movements a bit to incorporate your abs?
These two-for-one exercises will help you strengthen and build your chest while sculpting those core muscles.
Looking for more chest workouts or core workouts? We can help! Check out our ATHLEAN-X programs to see which is the best fit for your goals and fitness level!
- The chest and abs make a perfect pair. Best of all, they are right next to each other so you can incorporate one while training the other.
- Here are four chest exercises that also act as a perfect abs workout:
- The Gymnast Dip exercise combines a chest dip with a hip hinge at the end of the movement. Begin on a dip station, lower yourself by bending the elbows, push back up, and at the top, contract your lower abs while lifting your hips up before returning to the starting position.
- The One-Arm Dumbbell Press starts with an incline bench set to 45 degrees, holding a dumbbell at shoulder level with a bent elbow. Engage your core and press the dumbbell upward until your arm is fully extended, then slowly lower it back down, maintaining control throughout the movement.
- Archer Push-Ups begin in a standard push-up position with hands wider than shoulder-width and turned slightly outward. Shift body weight to one side while bending the elbow, slide the opposite straight arm outward, and lower your chest to the ground, then push back up and slide the straight arm inward, engaging your core throughout.
- In the 3-D Crossover, stand beside a resistance band attached to a stable surface like a cable station, grabbing it with the same side hand. With a tight core and slightly bent elbow, pull the band across your body, pause and squeeze chest muscles, then slowly return to the starting position and repeat on the other side.
CHEST AND ABS WORKOUT FAQS
Yes, you can do abs after a chest workout. As most of you might already know (and do), it is a common practice to combine muscle groups in a single session.
By working on your chest first, you will have the energy and focus required for the primary compound movements.
Then, you can finish with ab exercises to target your core muscles.
Always prioritize proper form and technique to avoid injury.
Absolutely, working out chest and abs on the same day is a popular approach, especially for those following an upper/lower body split or a push/pull/legs (PPL) workout routine.
This allows you to save time and hit multiple muscle groups in one session.
Combining these muscle groups can also help improve overall strength and stability.
Just make sure to give your muscles enough time to recover between sessions to reduce the risk of injuries like muscle tears.
There is no single "best" workout for abs and chest, as individual preferences, goals, and fitness levels will vary.
However, here are some effective exercises that target both muscle groups at the same time:
- Gymnast Dips
- One-arm Incline Press
- Archer Pushups
- 3-D Crossovers
- Focus Hollow Body Floor Press
- Push-Ups
You can also superset a chest exercise with a core exercise. For example, try performing Weighted Leg Lifts followed by an explosive movement like Plyo Push-Ups.

WHAT’S THE BEST WORKOUT FREQUENCY?
You want bigger biceps, powerful pecs, and tree-trunk legs. Your current workout isn’t getting you these things so what do you do?
Work out more, right? Wrong!
If there’s one decision that can singlehandedly halt your progress and send you backward on the road to your ideal physique, it’s this.
Guys, more workouts don’t necessarily mean more (and better) results.
What it could mean is burnout, fatigue, over-training, muscle loss, and injury. And no one wants that.
So, the question is, “How many times a week should I work out?”
Let’s take a look at your experience with fitness, individual goals, and the type of training you’re doing, because all these factors are important.
We’ll also dive into the essential role that the right amount of intensity has in these strength training sessions.
WHAT DETERMINES WORKOUT FREQUENCY?
Right now, you’re thinking, “Jeff, how many days per week should I work out?”
The short answer to that is, “It depends.”
The number of workouts per week of strength training will depend upon a few key factors including:
- Current fitness level
- Fitness goals
- Type of training split
Individual goals matter a lot! For example, a beginner with a fitness goal of muscle hypertrophy who is doing a push-pull-legs split will have a much different training program than someone who is experienced and training to be a powerlifter.
And then we have to consider the occasional “exception to the rule” such as your abs, since you can safely train those almost every day of the week.
Before we review each of those factors, I want to discuss the relationship between homeostasis, volume, and intensity – all factors that directly influence how many days you should work out.
FIGHTING HOMEOSTASIS
Most of us hate change, and we feel very comfortable in our own little routines.
Your body is the same way! It strives for what is called homeostasis, which is a big word that means no change.
It constantly seeks homeostasis, and it will adapt to your current environment and stimuli to make those the new norm.
When you’re trying to elicit a change, such as getting a muscle to grow, the body prefers just the right amount of stimulus to provoke what we see as an improvement. In this case, you notice more muscle.
In reality, your body is seeking an adaptation so that the next time it experiences this stimulus, it can better fend for itself and resist yet another change.
We are trying to force change on our bodies with every workout and our bodies are trying to keep things status quo.
Guess who wins most of the time?
To make things worse, a lot of people will see that they aren’t getting results – that the body has entered a plateau – and they will decide to work out more.
They’ll use the same intensity and volume, but the difference is that they’ll just do it longer or for more days.
And this is where you totally ruin your chances to see progress.
Thankfully, there’s a better way to restructure your workout schedule so you don’t have to spend hours upon hours, days upon days in the gym.
It all has to do with intensity and volume.
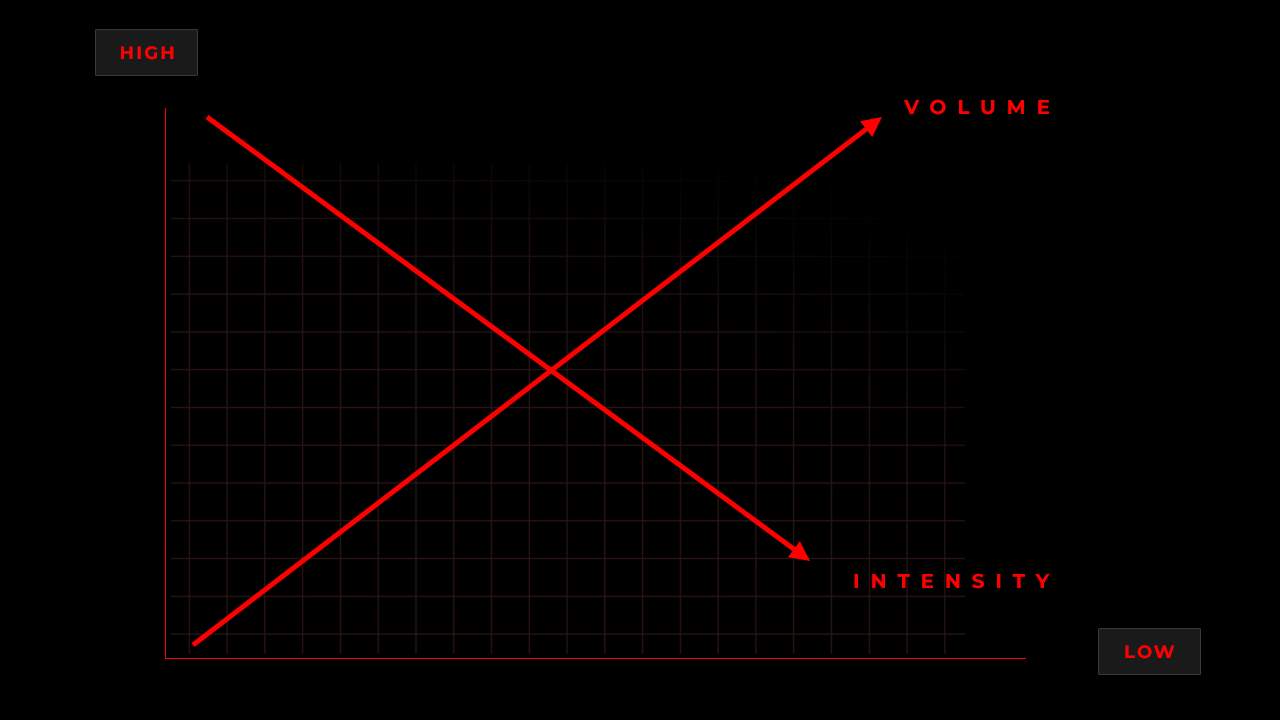
INTENSITY VS. VOLUME
Continuing with the example above, a lot of guys will not see the results they want and assume it has to do with the number of sets and reps they are doing.
In response, they will dramatically increase these acute variables to a point that is downright insane, such as 24 sets per muscle group!
I don’t care who you are, if you’re a natural lifter and you’re adding that kind of volume to your program, something is going to suffer.
The quality of the sets that you’re doing is going to go down over the course of that workout.
What might have been good in the first several sets is not going to look the same way when you get to set number 16. And certainly not when you get to set number 24.
Most importantly, there is no way that you can maintain a high level of intensity for each and every one of those sets. Not naturally anyway.
This is what I like to call “junk volume.”
And this perfectly illustrates the lie that most of you have been fed:
If you increase volume, you need to decrease intensity. And if you increase the intensity, you need to decrease the volume. It’s not that simple, guys.
Sure, volume is important, but what’s more important is high-quality intensity.
The irony is that research shows you really don’t need that many quality sets to create muscle protein synthesis.
As you probably already know, protein synthesis is the spark for muscle hypertrophy. You need somewhere between 4 to 10 sets of high-quality work per muscle group.
I can’t stress this enough: High quality has nothing to do with volume.
The quality is driven by the intensity of the exercise.
And the way to tap into good, old-fashioned intensity is to truly train to failure. And as I just mentioned, you don’t need a ton of sets and reps to do that.
HOW TO TRAIN TO FAILURE
Too many people have been told that in order to train properly, they better watch out for the intensity of their training.
They’re told if they train to failure, they’re going to interrupt the body’s ability to recover 48 hours later.
They’re told that they are going to create too much damage and too many problems.
So, what happens is they stick to a moderate-intensity exercise and hold back in the number of repetitions they perform as they approach failure.
In other words, they stay below failure. They feel like it’s getting too difficult, so they take an interval of rest before doing another lackluster set.
And guess what? That’s not true muscular failure.
What’s happening is the intensity is suffering so much.
These people are told that they’re doing the right thing by adding more and more volume. Unfortunately, their intensity is not adequate to create change.
That’s a problem.
WHAT IS MUSCULAR FAILURE?
Let’s talk about muscular failure, the moment when you’ve pushed your muscles to their absolute limit.
It’s the point where you’ve given it your all and your muscles just can’t take it anymore. You’re sweating, you’re breathing hard, and you’re feeling that sweet burn.
It’s that magical moment when you know you’ve given it everything you’ve got and left nothing on the table.
Are you really even training to true, momentary, concentric failure?
This means you truly cannot lift this thing for one more rep. You go all the way, as hard as you can until you can’t lift it anymore.
Is that actually happening, or are you stopping just because it’s getting difficult?
If I had to bet, I’d say a lot of you are stopping short. Most of you aren’t realizing your true potential. Instead, you’re stopping because the exercise is getting a little tough.
And here’s the thing: You don’t need heavy weight to reach muscular failure.
You need intensity. Results are not driven by volume if there’s no presence of intensity.
There’s an epidemic now of too much junk volume out there and I want to give you tips to make sure you’re not falling into this trap.
Training to complete muscular failure can be an effective way to stimulate muscle growth and improve strength.
Here are some tips for training to complete muscular failure:
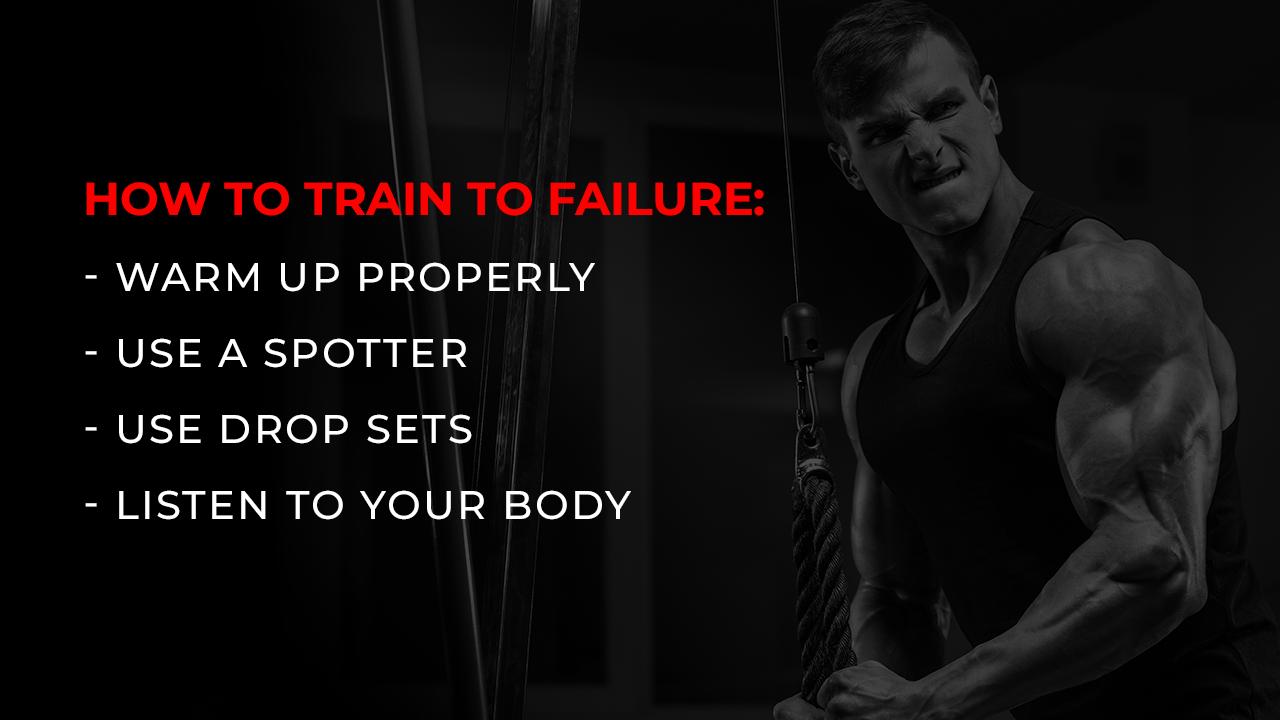
WARM-UP PROPERLY
Before starting your workout, perform a dynamic warm-up to increase blood flow to your muscles and prepare your body for the upcoming stress.
Aerobic activity followed by light movements that mimic the exercises you’ll be doing can help prevent injury and improve overall performance.
Aim for about 10 minutes of warming up with light aerobic exercise and dynamic stretches.
USE A SPOTTER
When training to failure, it’s essential to have a spotter, especially when performing compound exercises like the bench press, squat, or shoulder press.
A spotter can assist you when you reach your limit and help prevent injury from losing control of the weights.
USE DROP SETS
Drop sets are a popular and effective training technique for pushing your muscles beyond their usual limits, promoting muscle growth and endurance.
This method involves performing a set of an exercise to failure or near failure, then immediately reducing the weight and continuing to perform additional reps until failure is reached again.
Drop sets are a good reason to have a spotter nearby as activity levels can be really intense.
LISTEN TO YOUR BODY
Training to failure requires you to have a strong mind-to-muscle connection especially during weight-bearing activities.
That means you need to feel what’s going on inside the muscle, so you know whether to increase the weight or pump out another five reps.
During vigorous activity like a drop set, listening to your body will help you know whether you’ve truly achieved failure.
HOW MANY TIMES A WEEK SHOULD I WORK OUT?
With all that said, now that you know how to work out, it’s time for a solid number of days of strength training.
The catch is that I’m going to break this down based on two key factors: experience with fitness and type of training.
These training recommendations will also focus on strength training exercises and how many days you should find yourself in the weight room or in your home gym.
FITNESS LEVEL
Here’s how many workout days you should consider based on your fitness experience level and your exercise history.
BEGINNER
If you’re new to working out or just getting back into an exercise program, it’s best to start with three days of exercise per week.
This allows your body to acclimate to the new physical demands and reduces the risk of injury.
I’d recommend focusing on a mix of strength training with cardio.
This mixture of weight training with moderate-intensity cardio activity is going to do a lot for basic health and fitness.
More specifically, as a beginner, you get to reap all the benefits simultaneously including lean muscle building and weight loss.
Perform full-body workouts three days per week with one day or two days of cardio per week. This will help you build a solid fitness foundation.
INTERMEDIATE
As an intermediate fitness enthusiast with some experience under your belt, you can aim for three-to-four days per week.
This allows for a balance between training and recovery, while still providing enough stimulus for progress.
You may choose to continue with full-body workouts or transition to a split routine, depending on your goals and preferences.
Again, save a day or two for cardiovascular exercise, but only if it makes sense for you. You can opt for moderate-intensity physical activity, which will require more minutes of exercise.
Or you can go for something that has more intensity and takes less time like high-intensity interval training.
ADVANCED
For advanced fitness pros who have been training consistently for an extended period, five or six exercise days per week can be beneficial.
At this stage, you may need a higher training frequency – along with increasing workout intensity – to continue seeing progress.
Your plans will probably incorporate a mixture of heavy weights with moderate weights along with varying workout length. This will depend on how hard you’re working that day.
This is especially true if you’re following a split routine, which targets specific muscle groups each day.
Again, your intensity is high throughout each and every workout, regardless of the total time.
Remember, though, that adequate recovery and rest days are still crucial to avoid overtraining and injury.
TYPE OF TRAINING
Here’s how many days per week you should consider exercising based on the type of training you’re doing.
PUSH-PULL-LEGS (PPL)
We kick off our list with one of the most popular muscle splits: Push Pull Legs or PPL.
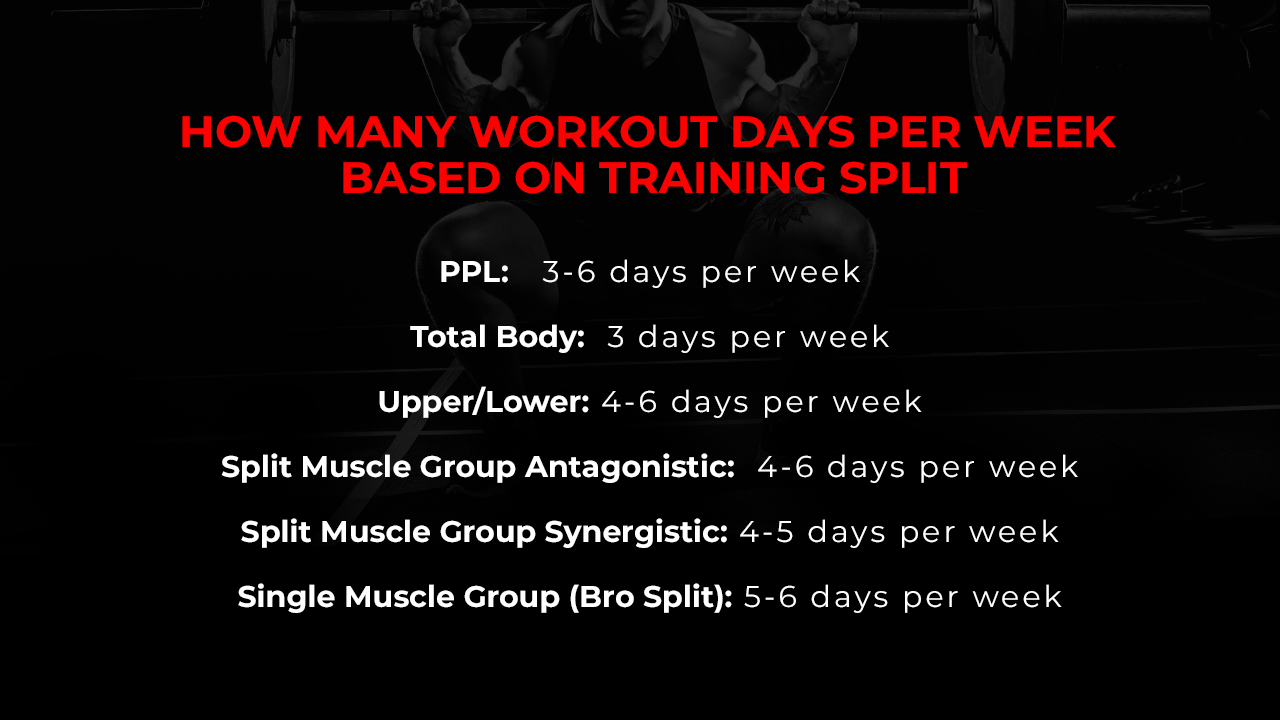
For a Push-Pull-Legs routine, you can aim for three or six days per week. Here’s how:
You can do each workout once per week (three days total) or twice per week (six days total) depending on your level of fitness, recovery abilities, and goals.
Naturally, if you’re a beginner, I’d say to stick with three days per week for this exercise routine. You can throw in some moderate-intensity aerobic exercise in between the days for strength training.
If you’re a more advanced trainee, you can try out the six-day training schedule.
If you’re doing the six-day schedule, most people will have a rotating day off that falls between the two PPL blocks.
For example, if you finish the first block with a legs workout on Wednesday, you would take Thursday off then perform the push workout on Friday. Your next day off would be Monday.
TOTAL BODY
With a total body workout (or full-body workout), the focus is on compound movements with cardiovascular exercise sprinkled in between.
The type of exercise you tend to do will involve squats, bench presses, deadlifts, overhead presses, and other compound movements. In other words, you’re looking at intense full-body workouts for each of your strength training days.
For total body workouts, it’s generally recommended to work out three to four days per week.
This allows for adequate recovery and days of rest between sessions while still providing enough stimulus for progress.
Again, beginners should stick with three days per week while those with experience can throw in one more day.
Beginners will see the most results from this type of program because they’ve never done weight training for lean muscle mass before. What’s more, they are hitting every major muscle group three times per week.
Don’t forget to include some moderate-intensity aerobic physical activity in between those strength training days.
The muscle gains are going to surprise you if the most physical activity you’ve ever done involved just your body weight.
With that said, keep in mind that muscle will not keep growing over time unless you make a plan to keep challenging yourself.
You need to keep cycling through periods of time where the acute variables – sets, reps, etc. – are new and challenging.
Muscle growth happens because the intensity is paired with the ideal weekly workout plan.
UPPER/LOWER
As the name suggests, this type of split separates the upper body and lower body into their own strength sessions.
For an upper/lower split, you can go between four and six workout days per week, alternating between upper and lower body workouts.
For example, one of your days of training for the upper body might look like this:
- Chest Presses
- Lat Pulldown
- Chest Flies
- Landmine Rows
- Leg Raises
- Cable Crunch
This ensures each muscle group gets trained for two sessions per week while allowing for recovery days.
It also ensures you can squeeze in some cardio exercise.
Cardio activity could include interval training such as high-intensity interval training, which is an effective workout that also saves time.
Beginners should first complete a total body or PPL workout routine for at least two months before moving to an upper/lower split.
If you have a lot of experience under your belt, you can try alternating these strength workouts six days per week, giving yourself one glorious rest day.
SPLIT MUSCLE GROUP – ANTAGONISTIC
An antagonistic split muscle group routine means that you’re working out muscle groups that are in direct opposition to each other.
For example, the following muscle groups are antagonistic:
- Chest and back
- Quads and hams
- Biceps/triceps
A series of exercises might include a Barbell Bench Press followed by a Bent Over Row.
When following an antagonistic split muscle group routine, you can work out four-to-six days per week, assigning one muscle pairing per day.
Again, I’d recommend that beginners hold off doing this type of workout until they’ve done a total body or full-body workout with a balance of cardio exercise for a couple of months.
SPLIT MUSCLE GROUP – SYNERGISTIC
On the opposite side of the spectrum, the synergistic muscle pairings include muscles that work together such as chest and triceps, back and biceps, and hams and glutes.
For a synergistic split muscle group routine, aim for four-to-five days per week.
SINGLE MUSCLE GROUP
You might wonder if I suggest a Bro Split, and my answer is, “Depends on the Bro Split.”
Guys, there is a way to do a Bro Split correctly.
However, unless you’re a bodybuilder, I might initially steer you away from the Bro Split, especially if you’re a beginner.
With that said, if you’re doing a Bro Split like I discuss in my article on the best workout split, then I’d say you can work out between five and six sessions per week.
ROLE OF NUTRITION
There’s no way I can talk about how many times a week to work out without mentioning nutrition. After all, without good nutrition, your strength workouts won’t produce any results.
The deal is, we can all trick ourselves into getting to the gym for an hour a few times a week.
But the real work happens during the other 23 hours when you’re supposed to be following a solid nutrition plan and sleeping between seven to nine hours.
In other words, training is easy compared to nutrition and sleep.
The responsibility is so much greater and that’s why so many people struggle with nutrition.
It is essential to understand that nutrition plays a pivotal role in achieving your fitness goals. Proper nutrition can help support muscle growth, maintain a healthy weight, and fuel your body with the energy it needs to perform at its best.
Below are some fundamental guidelines to keep in mind as you plan your workout program.

NUTRIENT BALANCE
Incorporating a balanced diet consisting of carbohydrates, proteins, and fats is crucial.
Carbohydrates provide the energy needed for your workouts, while proteins aid in muscle repair and growth.
Fats, on the other hand, are essential for hormone production and overall health.
TIMING OF MEALS
Eating at the right times can make a significant difference in your progress.
Consuming a meal or snack containing both protein and carbohydrates within 30-to-60 minutes after your workout can help with recovery and muscle growth.
Unless you’re following a specific fasting or meal timing schedule, try to eat a well-balanced meal every three to four hours.
HYDRATION
Proper hydration is vital for optimal performance in the gym and overall health.
Drinking enough water throughout the day isn’t enough though. You also need electrolytes.
This can help to regulate body temperature, maintain proper digestion, and prevent fatigue during your workouts.
MEAL PLANNING AND PREPARATION
Taking the time to plan and prepare meals in advance can make it easier to stick to a healthy diet. This can also save you time and money.
CHOOSE WHOLE, UNPROCESSED FOODS
Prioritize consuming fresh fruits, vegetables, whole grains, lean proteins, and healthy fats over processed and sugary foods.
PORTION CONTROL
Be mindful of your portion sizes, as eating too much of even healthy food can lead to weight gain and hinder your progress.
ACCOUNTABILITY
Enlist the support of friends, family, or a professional nutritionist to help keep you accountable and motivated.
“How many times per week should I work out?” It’s an important and, admittedly, annoying question.
It’s all going to depend on your fitness level and type of training, but assuming you’re getting at it and revving up that intensity, here’s a quick wrap-up:
Beginners should focus on three days per week, intermediate lifters can lift between three to five days per week, and advanced lifters can go for four to six days each week.
Don’t have an exercise plan to follow or maybe you’re looking to change up your current one? We can help! Check out our ATHLEAN-X training plans to see which one is the best fit for your goals and fitness level, regardless of where you are in your fitness journey. Let me be your personal trainer and strength coach and you’ll be amazed at your results.
- How many days you should work out will depend upon a few key factors including fitness experience, fitness goals, and types of exercise or training split.
- First, you want to make sure you understand that the focus during your training should be on the intensity – not the volume.
- You don’t need much volume to trigger protein synthesis, but you do need high-quality intensity. Training to muscular failure ensures you’re able to achieve this intensity.
- As far as how many times a week you should work out, you should consider your fitness level. Are you a beginner? Three days per week will be good for you. Intermediate and advanced lifters can opt for longer training weeks at three to five and four to six, respectively. More training days does not mean you should skip on the intensity.
- Next, consider what type of training you are doing. Thankfully, you’ll realize that the type of training that’s right for you usually coincides with experience with fitness.
- For example, a beginner should start with the total body workout, which should be performed three days per week.
- Other workouts like the Push-Pull-Legs (PPL) and split muscle group workouts can be done between three and six times per week.
- Don’t forget to support these intense workouts with good nutrition and plenty of sleep.
HOW MANY TIMES A WEEK SHOULD I WORKOUT FAQS
This depends on your fitness level and type of training. If you are a beginner, I’d recommend exercising three days per week.
If you have some experience, try lifting between three and five days each week. If you’re an advanced lifter, go for four to six days a week.
For general fitness, aim for at least 150 minutes of moderate-intensity aerobic exercise or 75 minutes of vigorous-intensity aerobic exercise spread out over three to five days per week.
Additionally, perform strength training exercises targeting all major muscle groups at least two days per week.
Adjust your workout frequency based on your specific fitness goals and listen to your body to avoid injury or burnout.
REFERENCES

HOW TO EAT FOR ABS
Can you handle the truth about how to get a 6-pack?
It’s not about sit-ups, crunches, or special exercises for abdominal muscles. The best ab workouts won’t get your abs to show if your diet isn’t dialed in.
The truth is, getting visible abs is all about your nutrition plan, but I don’t mean some fad diet.
Many people over-complicate their nutrition whether they know it or not, and don’t do what they must to make their abs visible.
They need a long-term sustainable nutrition plan of action to help them lose excess belly fat and keep it off long term.
Remember, restrictive fad diets are short-term and even if you can stick them out for a few months, your results disappear when you fall off the wagon.
Today I’m going to show you a simple 5-step plan on how to get your abs showing and growing.
I didn’t have abs when I started this very same 5-step plan I’m sharing with you now. I know this works because I did it myself. Simplicity and consistency are the key.
STEP ONE: CUT THE CRAP
You already know what your problems are!
When I say “Cut the Crap” I mean to stop lying to yourself about your diet and cut out the junk food you’re eating for meals now.
Your six-pack diet can’t include junk food. There are things you’re going to have to sacrifice.
That’s probably not the answer you WANT to hear but it’s the answer that you NEED to hear.
Speaking from experience, I had the absolute worst diet on the planet. I once ate packaged and fast food for almost every meal. Donuts, cupcakes, cookies, you name it…all kinds of rich, sugary, processed, high calorie stuff.
I realized I had to cut it out immediately if I wanted to change. And so do you!
You have to start right now and get rid of whatever it is, whether it’s excess alcoholic beverages, fast food, you name it.
You know what it is already. If you have to ask if it’s excess, it’s probably excess.
Once the crap is out of your diet, the second step might shock you. Get ready.

STEP TWO: EAT MORE OFTEN
Space your meals out through the day, eating smaller portions but getting sufficient calorie intake in the process.
If you eat more often, three things happen that allow you to start seeing that 6 pack faster.
- It forms a habit. It teaches you to view nutrition as fuel–like an athlete would–instead of a reward like you might have received when you did something good as a kid. That can’t happen anymore, guys.
- It stabilizes our blood sugar levels because we are eating more frequently. Forget about the implications of eating x number of grams of protein in the morning, or we divide it between breakfast and lunch, or about how anabolic it is. Those finer details aren’t going to matter much and there are studies that show that. It’s more about blood sugar’s effect on how you feel and achieving a consistent energy level without peaks and valleys.
- It helps control portion sizes. If you’re supposed to eat every 2½ to 3 hours you won’t be hungry enough to overeat, and it’s likely you won’t crave or indulge in the food you shouldn’t be eating.

STEP THREE: TAKE A SECOND CLOSER LOOK AT YOUR NUTRITION
Once you’re eating a healthy diet, and you’re eating more often, go back and take a second pass through your diet, find the less obvious stuff that’s not so good for you and replace it with more nutrient-dense, whole foods.
When I transitioned my junk food diet to a healthy one, I started eating chicken and oatmeal more often and drinking more juice instead of soft drinks. I knew these were healthier choices.
That diet plan was definitely an improvement, but it fell short. I was eating fried chicken and packaged oatmeal that had sugar added to it. I had to take a closer look.
Side note: there’s some disagreement among nutrition specialists about whether white meat chicken–like chicken breast–is healthier and less fattening than the dark meat, like chicken thighs. Guys, it’s a matter of preference. If you like chicken thighs, eat chicken thighs. Consider removing the skin and excess fat around chicken breasts, thighs, or wings. (Chicken breast probably is the best choice for avoiding excess fat.)
Once I took a closer look at my diet, I educated myself to learn even better and healthier ways to eat nutritious foods like chicken. Once I started applying that knowledge, I could immediately see differences in gains. It encouraged me so I kept going.
The next thing I did was change the way I prepared my oatmeal. I traded the packs for whole grain slow-cooked oats with none of the added sugar or flavorings. I made more progress without sacrificing anything. I loved what I was eating!
And finally, I traded juice for plain water. Your muscles thrive on plenty of water. Other beverages aren’t a good substitute. Water is the crowned king of beverages if building lean muscle mass is your goal. The rule of thumb is 8 16-oz. glasses of water per day. If you’re going to occasionally drink a beverage that is not water, condition yourself to check the labels on beverages. Avoid drinks that have high fructose corn syrup, even if the label says the drink is “healthy”. Stay away from sugar-sweetened beverages, even sports drinks or pre-workout that contains high calorie sweeteners.
Refining the diet is where people who aren’t skilled at evaluating food choices need the most help. Again, keep it simple. Start by eliminating fried foods and food with added sugar.

STEP FOUR: EAT MORE OF THE GOOD STUFF!
Now that you’ve made two passes through your diet and are eating more often, you should then start eating more good nutrient-dense, whole foods.
You’re going to want to pack on some muscle, not just focus only on a six pack.
The goal is to get abs while building lean muscle. To do that, you’re going to have to eat nutritious foods that support muscle growth.
Take your healthy meals and make them healthier meals.
Lean protein found in foods like fish and leaner cuts of steak are great, but it goes beyond protein intake. You need balance. Don’t forget the nutrients found in vegetables like beans and broccoli.
By this point, you’ve locked in on the food you should be eating while selecting the proper nutrition to fuel your hard resistance training and support your new muscle growth.
One note of caution. Frequently, when guys make this type of radical change to their eating style, they consume fewer calories than before because the foods they removed from their diet were loaded with fat, sugar, and lots of extra calories. Don’t get yourself into a big calorie deficit that sacrifices muscle growth just to make your abs visible. In other words, make sure you’re eating enough!

STEP FIVE: SUPPLEMENT FOR CONSISTENCY
Consistency for life–not just a few days–is the key to reaching your goals.
I travel a lot for my job and so I supplement my diet to stay consistent.
Traveling means I might not be within access to all the proper nutrition that I need at any given time. If I have my supplements available, I can get what my body needs right then and there, in a very convenient, travel-friendly way.
Even if you’re not a traveling professional, supplements are something you can have on-hand so you can be confident you’re getting the proper nutrients, getting protein to your muscles, and not needing to stress out about sabotaging the nutritious diet program you’ve started.
We also have the added benefit of supplementation providing us with the ability to take our bodies to the next level by delivering things like creatine.
Creatine is a well-researched ergogenic supplement that’s shown to have the muscle-building benefits of high-protein foods like steak.
But we can’t eat steak every single day, even if it’s in the budget. Steak is great but red meat has been shown to increase cardiovascular disease risks (such as elevated triglyceride levels) if not eaten in moderation. Study after study has demonstrated this.
Supplementation is an answer unless you’re sitting at 30-40% excess body fat. If you are, forget about the supplements for right now, and focus on nutrition first.
So, repeating for emphasis, start with step one: get rid of the junk foods from your diet, even if those foods make you happy. Eating nutrient-dense, whole foods is the most important thing…it’s Step 1 for a reason.
Combining a well-balanced diet with exercise can lead to excess body fat loss and can help remedy a number of health conditions.
Follow this simple 5 step plan, and don’t be fooled by how simple it is. Getting in shape doesn’t need to be complicated.

Your rate of weight loss–the number of pounds per week you drop–will depend on how quickly your body responds to these changes and how much you commit to the plan. Some of it also depends on your training, and strength training is the way to go because muscle burns fat even while you’re at rest.
Use the mirror and how your clothes fit as your primary gauges of progress.
It’s not hard. It just takes desire and dedication to make the necessary changes.
If you are looking for a step-by-step workout and meal plan that will get rid of belly fat, get you more ripped than ever and help you to build athletic muscle, check out our ATHLEAN-X programs to find one that best matches your current goals.
- A Six-Pack Diet doesn’t have to be complicated. You only need to follow 5 simple steps for your abs diet.
- Step 1. Cut the junk food and sugary beverages out of your diet forever, replacing them with nutritious food. Drink plenty of water and eliminate as many other beverages as possible, including alcoholic beverages, sugar sweetened beverages, and even diet soda. Be picky about sports drinks too. They often contain added sugar.
- Step 2. Eat more often so that you can maintain your energy, blood sugar levels, and control portion sizes.
- Step 3. Take a second look at your diet and challenge “how” you’re eating your new good food choices. Change the way you prepare them so that they’re even healthier.
- Step 4. Eat more of the nutritious foods you should be eating so that you’re fueling muscle growth and supporting your weight training.
- Step 5. Keep supplements handy to ensure you’re getting enough protein in your diet.
- Consistency is key. I don’t subscribe to fad diet trends which carry risk of weight gain once discontinued.
- Use this Six-Pack Diet as a way to develop a healthy relationship with food so you can achieve long-term weight management.
DIET FOR ABS FAQS
There’s no such thing as an “Abs Diet” or a “Six-Pack Diet”. You do however need a healthy diet in order to lose abdominal fat and get your abs to show. By “healthy”, I mean a balanced diet of lean proteins like fish or leaner cuts of steak or chicken breasts, cruciferous vegetables like broccoli and cauliflower, legumes like black beans and kidney beans, and starchy carb sources like brown rice. Fruit is great also of course.
Pay attention to how you prepare your foods, too. Be very stingy with added fats like butter.
You also need to drink plenty of water and eliminate sugary beverages.
Eat more meals of smaller portion size spaced evenly throughout the day. Keep supplements handy if you travel and don’t have ready access to your usual dietary choices.
You don’t need a “strict” diet for abs as much as you need a healthy diet that you follow strictly. You have lots of options in your food selections. You just need to make good choices and stick to those, and eliminate junk foods.
Stay away from fad diet trends, like If It Fits Your Macros (IIFYM).
Diet is even more important for abs than abdominal exercises. Getting 6-pack abs requires getting rid of the excess body fat that covers them. All the abdominal exercises in the world won’t make a six pack visible if your diet isn’t in check. If your midsection is lean enough, you’ll be able to see your abs.
To make sure your metabolism stays running strong and you don't experience any energy highs or lows, you should eat 3-6 meals per day for abs. You'll also want to incorporate core strengthening exercises into your exercise regime so that you can build abdominal muscle. Unlike other muscles in the body, you can train the abs as many as 5-6 times per week because they are involved in so many of your daily movements.
If your goal is to get abs you'll have to focus on two things: healthy nutrition and building the abdominal muscles. Nutrition is particularly important because even if you have strong abs, if there is a layer of fat covering them, they won't be visible. If you need to achieve a lot of weight loss, consuming healthy foods and creating a daily food plan should be your main focus because this is what will help most with reduction of fat throughout the body. It's important to note that the concept of spot reduction is totally false - you cannot burn belly fat with abdominal exercises. To achieve fat loss in the belly, you'll need to lose fat throughout the entire body. Including strength training for the abs in your exercise plan is also important, as is getting regular exercise in the form of total body resistance training and high-intensity cardiovascular training.
If you are trying to build six pack abs, it's ok to eat some white rice because your body does need carbohydrates to function. Brown rice or other whole grains may be a better high-fiber foods for a healthy lifestyle because they are complex carbohydrates and they take a bit longer to digest (thereby helping stabilize insulin levels) and contain nutrients and health benefits that white rice lacks.
If one of your fitness goals is having six pack abs, you'll want to avoid overeating simple carbohydrates and avoid sugary drinks altogether. It's also important to be sure that you're meeting your daily protein requirements for muscle growth and that you include exercises to train the abdominal region in your exercise plan.
If you are not sensitive to dairy, fat-free or low-fat milk is a great food for abs because it will help you to meet your protein requirements for muscle growth. In fact, many people use protein powder with dairy as a source of protein in their diets. If you are striving for six-pack abs you'll want to be sure that you adopt a nutrition plan full of healthy foods and that you incorporate regular exercise for the abdominal region into your training plan.
Unless you are sensitive to dairy, it's not necessary to avoid dairy for abs. In fact, most people trying to build muscle in their abs and throughout the body may consume a daily protein smoothie made with protein powder mixed with water or fat-free or low-fat milk to help with muscle growth. Low-fat yogurt or Greek yogurt are also great ways to meet your protein requirements.
Chicken is one of the best sources of protein for muscle growth, so it is a good food for your abs. For example, chicken breast contains 9 grams of protein per ounce, so it it's a great food to help you meet your daily protein requirements. Other lean sources of protein include fish, egg whites, and dairy.
REFERENCES