

HOW TO WORK YOUR CHEST AT HOME
Building your upper, mid and lower chest from home with NO equipment may seem impossible.
But, I’m here to show you it’s definitely not!
Once you’ve got an understanding of the biomechanics of the chest muscles, you can adapt gym chest exercises to the home environment, and I’ll show you exactly how to do it.
Want to target your upper pecs but don’t have access to an incline bench?
Need to work on a saggy lower chest but can’t get to a gym to do your dips?
Don’t worry. I’ve got you covered!
Now…
You might think bodyweight chest exercises aren’t as effective as their gym chest workout counterparts.
But after you try the chest workout routine I’m showing you here, you’ll be absolutely convinced that you can hit every angle of your chest from home!
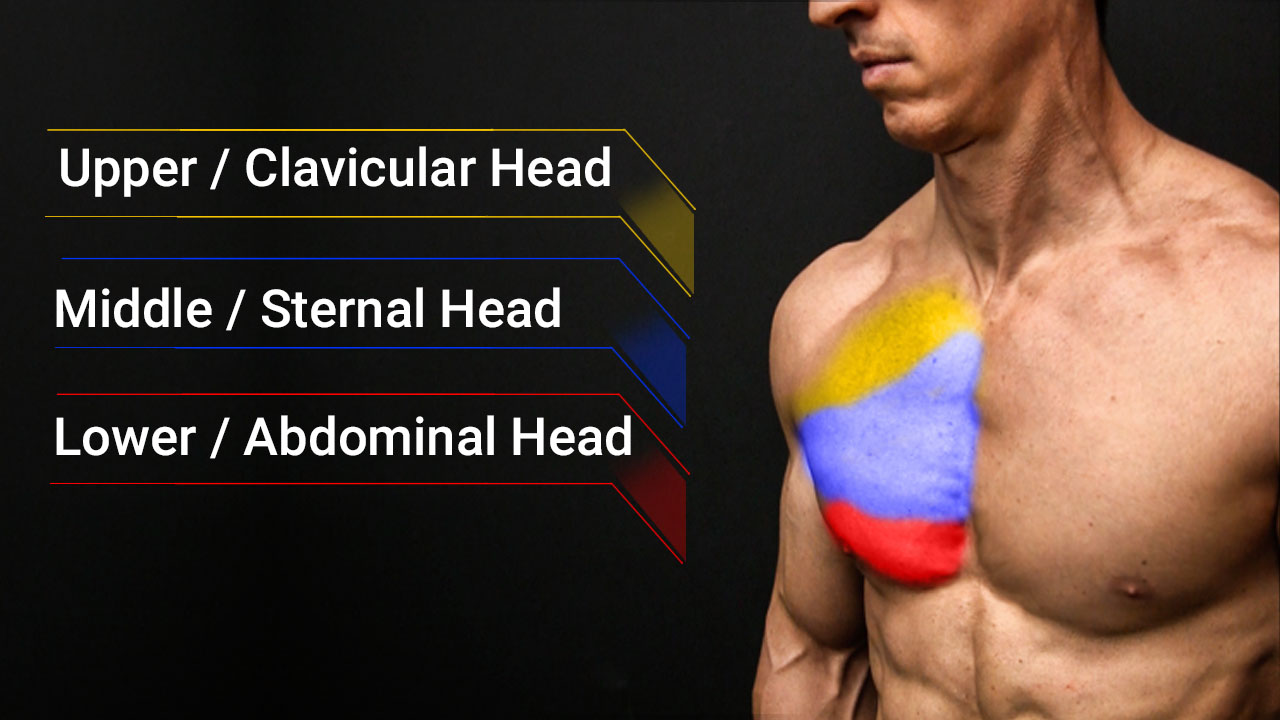
CHEST MUSCLE BIOMECHANICS
There are two important factors you need to understand to be able to translate chest exercises with weights to bodyweight versions.
First, let’s look at the direction of the fibers from the different areas of the pectoral muscles.
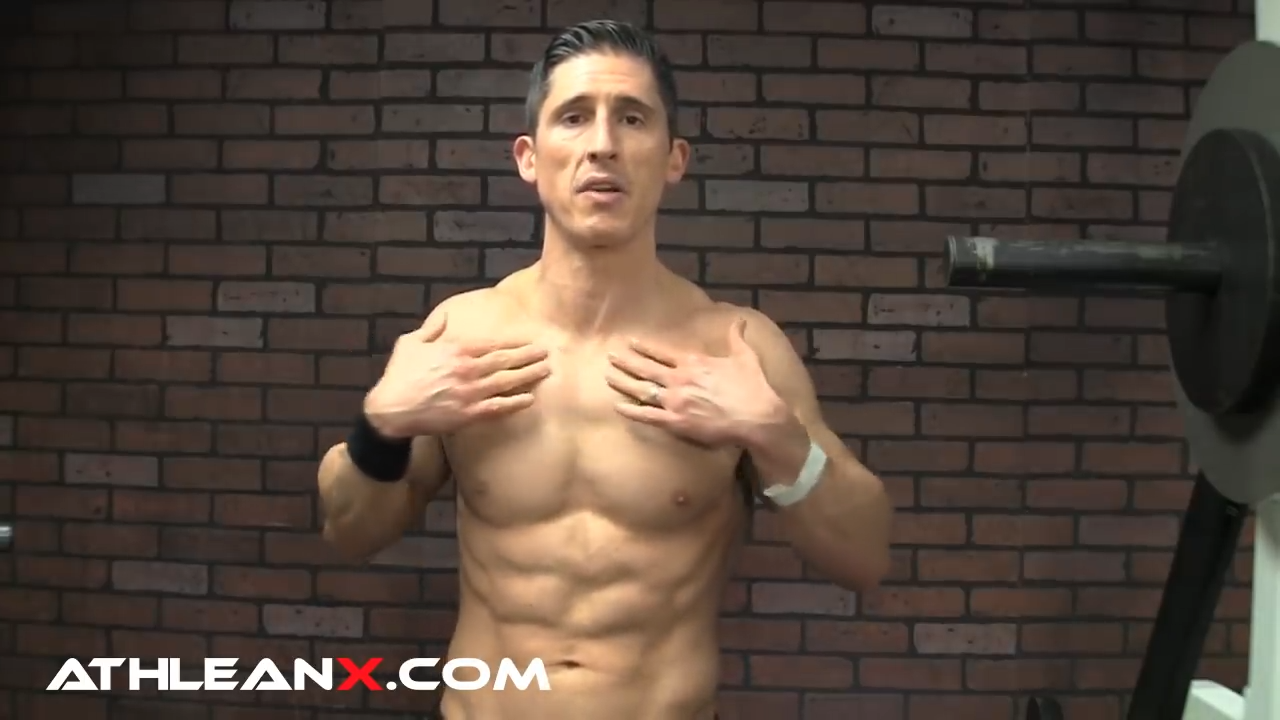
UPPER CHEST CLAVICULAR FIBERS

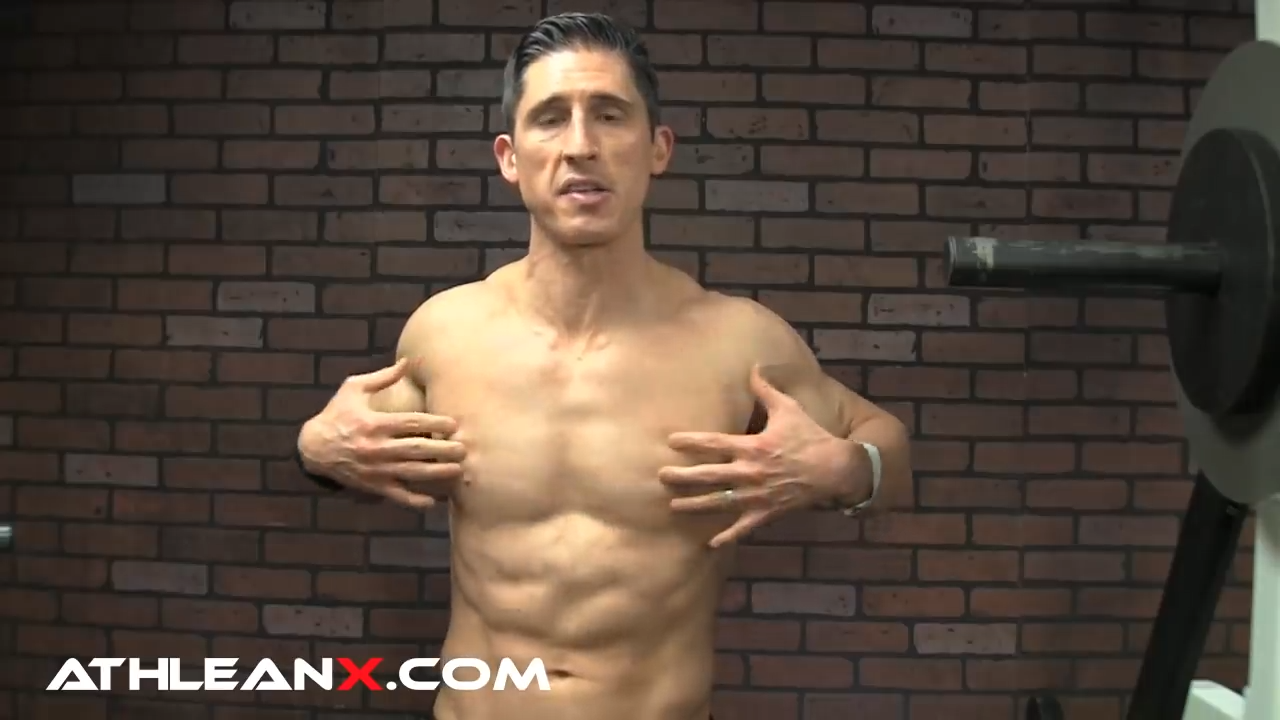
MIDDLE CHEST STERNAL FIBERS
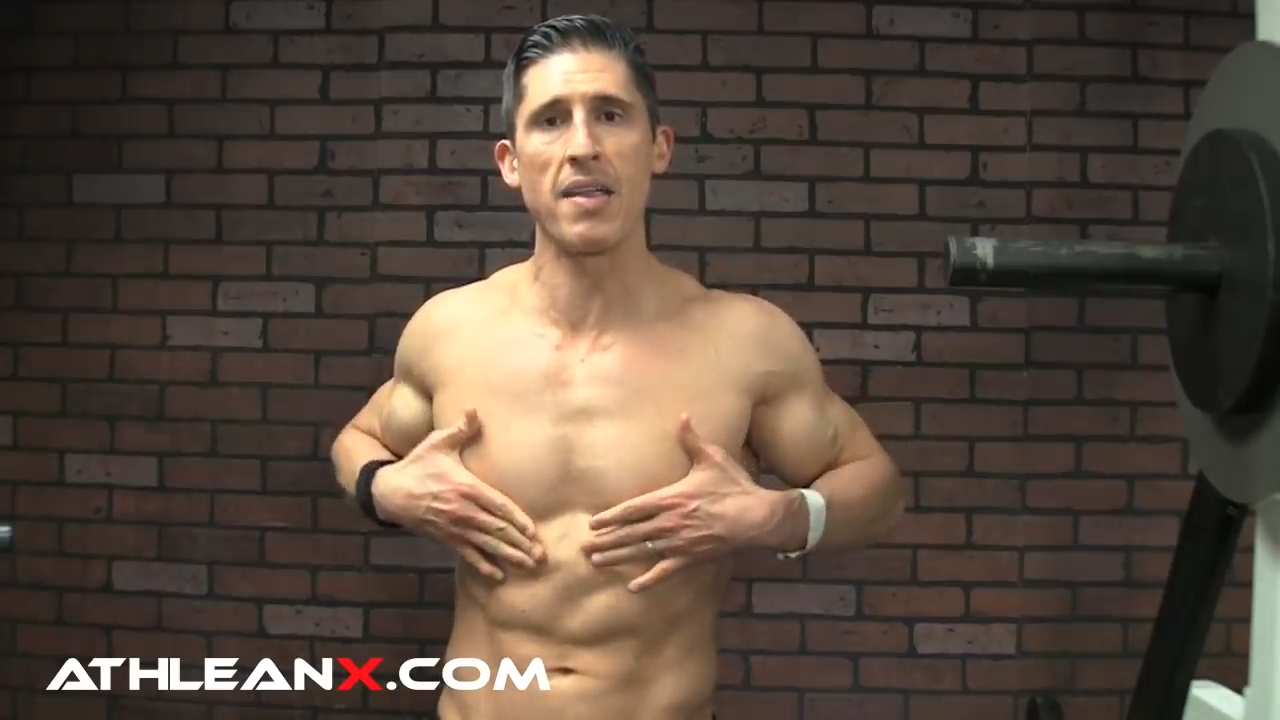
LOWER CHEST ABDOMINAL HEAD FIBERS
The second important thing to understand is what’s happening with the upper arm in relation to the rest of your torso in your chest exercises. We need to be able to translate the angle of the arm position in each gym chest exercise into our home exercise choices so we can hit the upper, middle and lower chest without weights.
You’ll see that even though the body weight exercise option may look completely different from its gym counterpart, the position of the arms in both is the same.
Let’s take a look at the most common gym exercise with weights for each area of the chest, and how we can convert it to an effective home chest option by replicating the arm position.
BEST BODYWEIGHT HOME UPPER CHEST EXERCISE
If you look at the classic incline bench press, you will see that your upper arms are aligned not directly in front of your torso but at a 120 degree angle upwards from that position.
This gives focus to the clavicular fibers of the upper pecs.
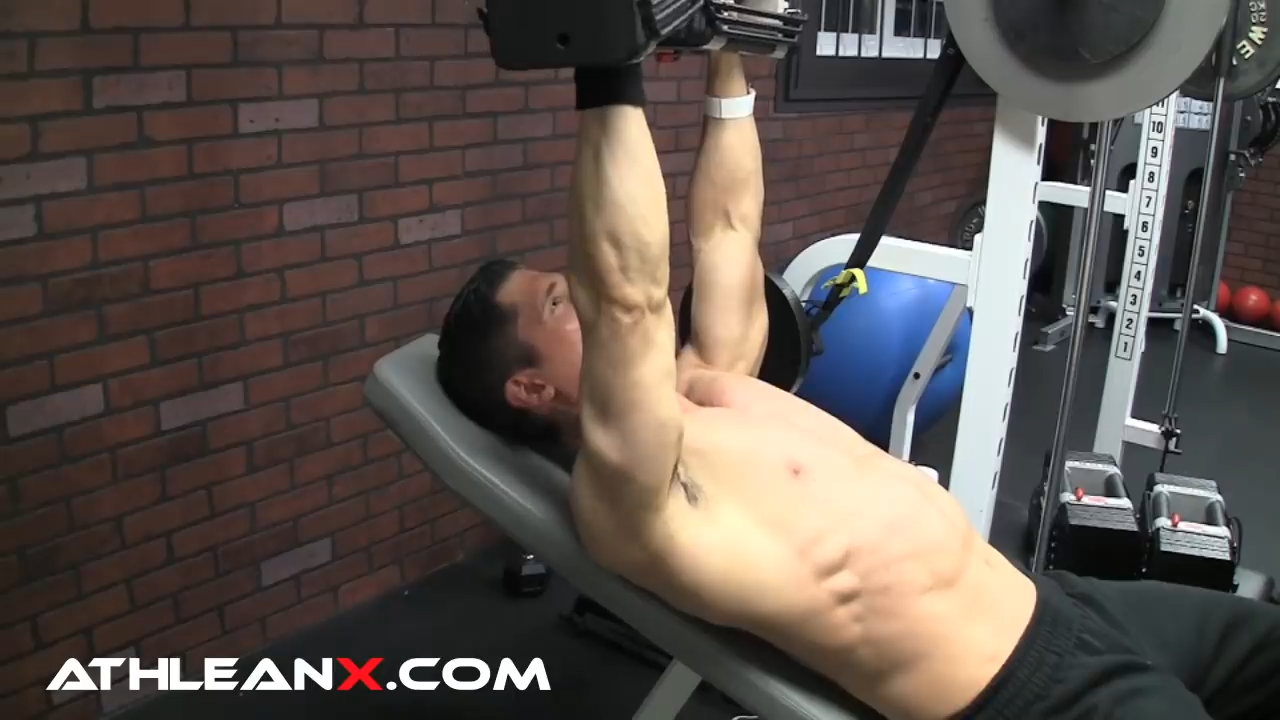
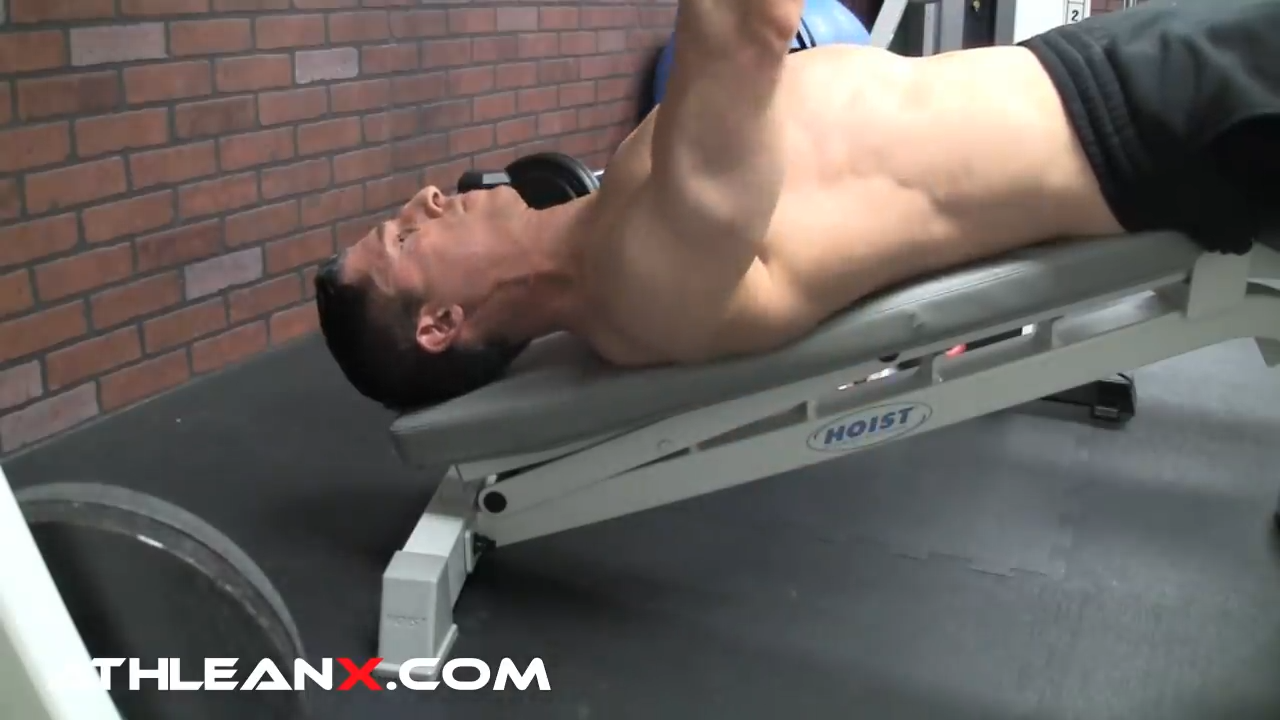
If we want to translate that 120 degree angle to a bodyweight movement, we can do that with a Decline Pushup.
DECLINE PUSHUP
When I position myself upside down with my feet on the wall you can see that even though my body is facing down (as opposed to face up in an incline bench press), the arm positions of both exercises are the same.
Decline Push-ups are the ideal way to target the upper chest if you don’t have access to equipment.
BEST BODYWEIGHT MIDDLE CHEST EXERCISE
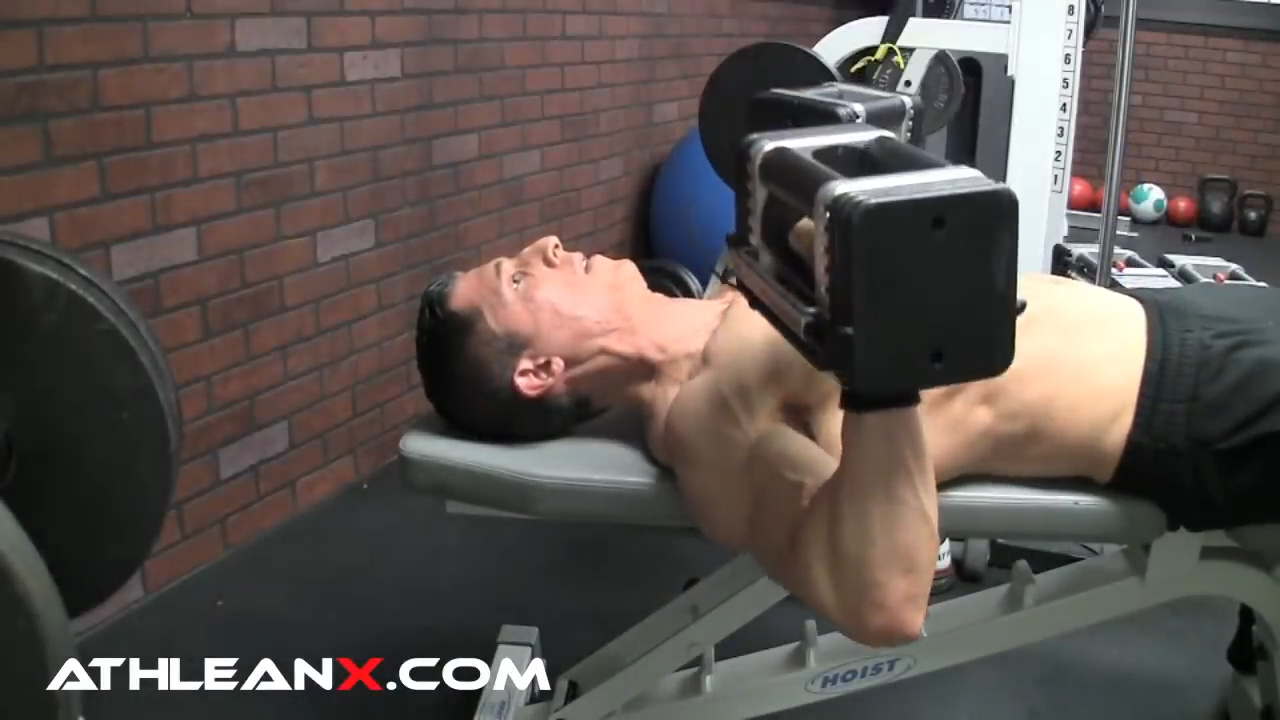
The flat bench press is an exercise that targets the sternal fibers of your middle chest by placing your arms at a 90 degree angle to the chest.
You can see what I mean here.
This one is easy to convert to a bodyweight option!
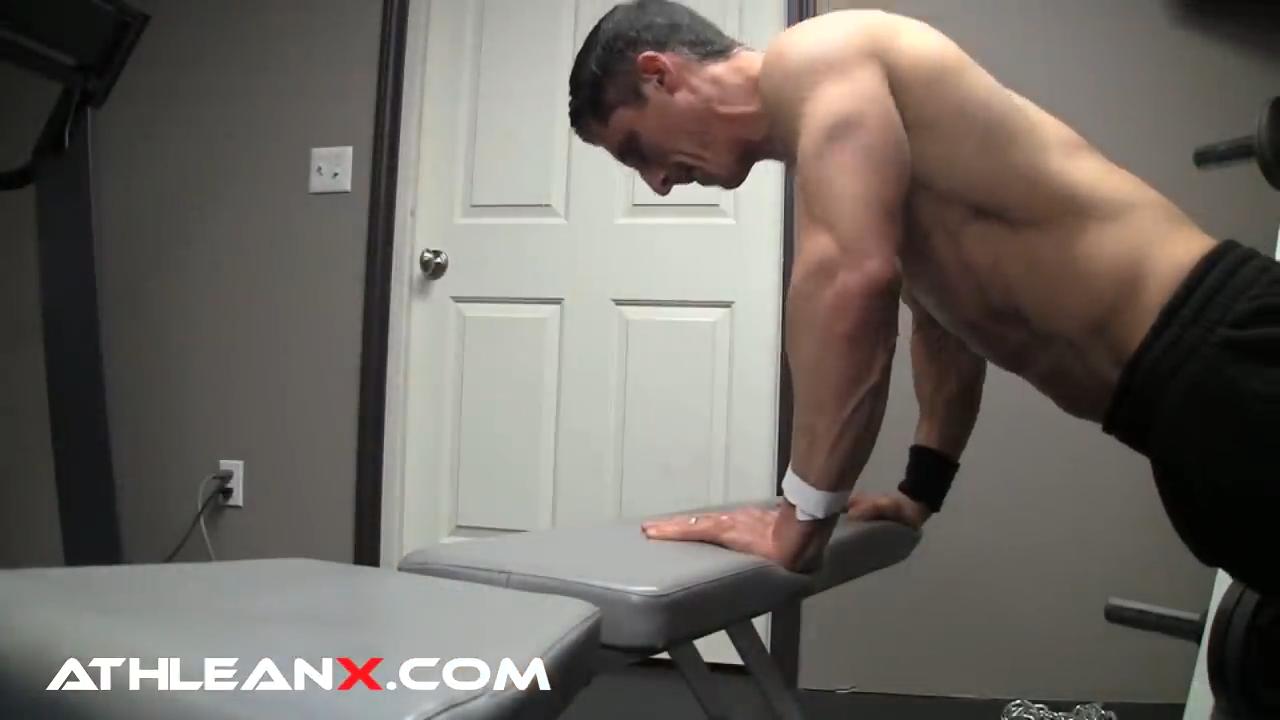
The Classic Pushup is going to put the arms in that same 90 degree position to the chest as a flat bench press would.
CLASSIC PUSHUP
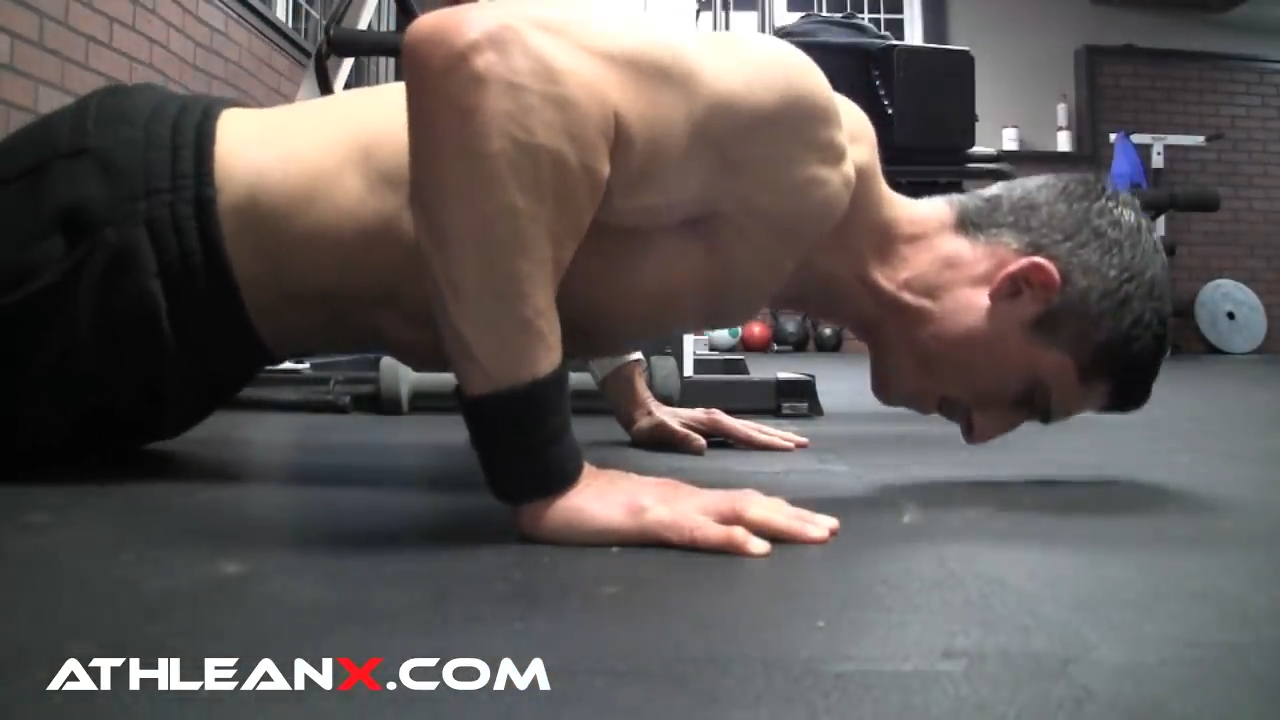
There is no better bodyweight exercise to target the middle area of your chest than good old fashioned classic push-ups!
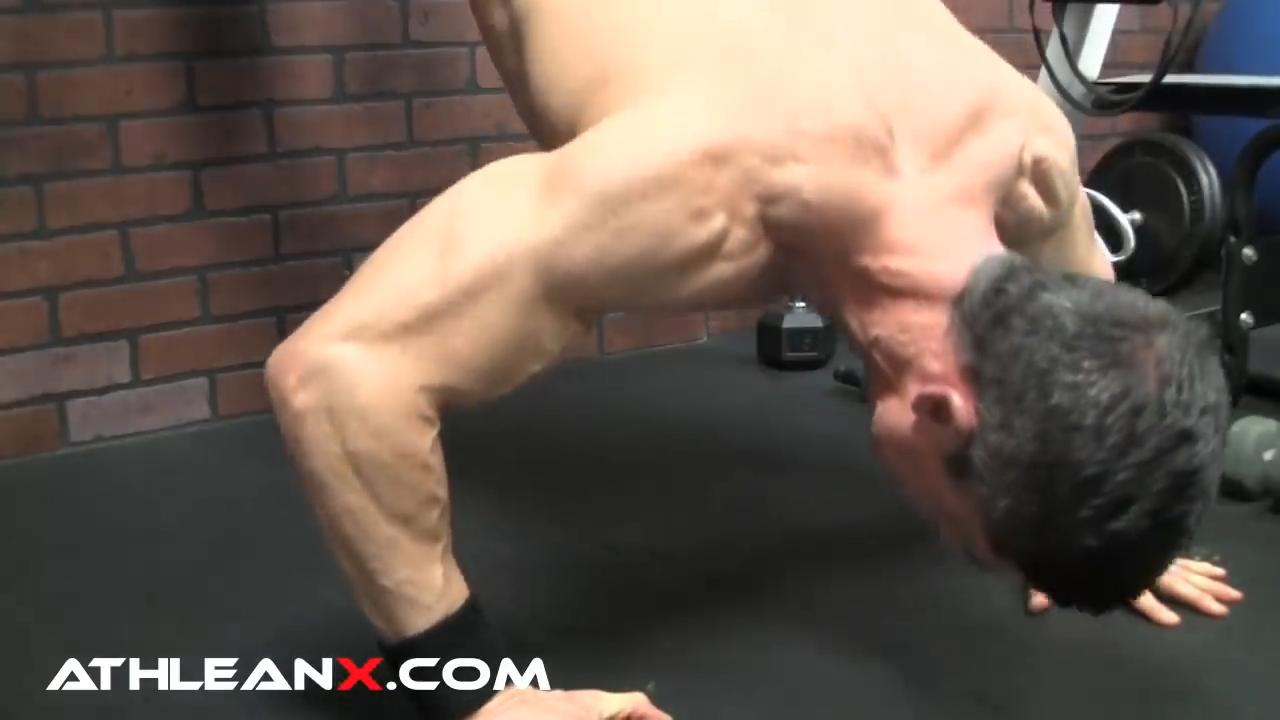
BEST BODYWEIGHT LOWER CHEST EXERCISE
The decline bench press hits the lower pecs by placing the arms below the chest at about a 45 degree angle.
You can see that angle below.
How do we translate this to bodyweight?
We’ve got to flip it over one more time!
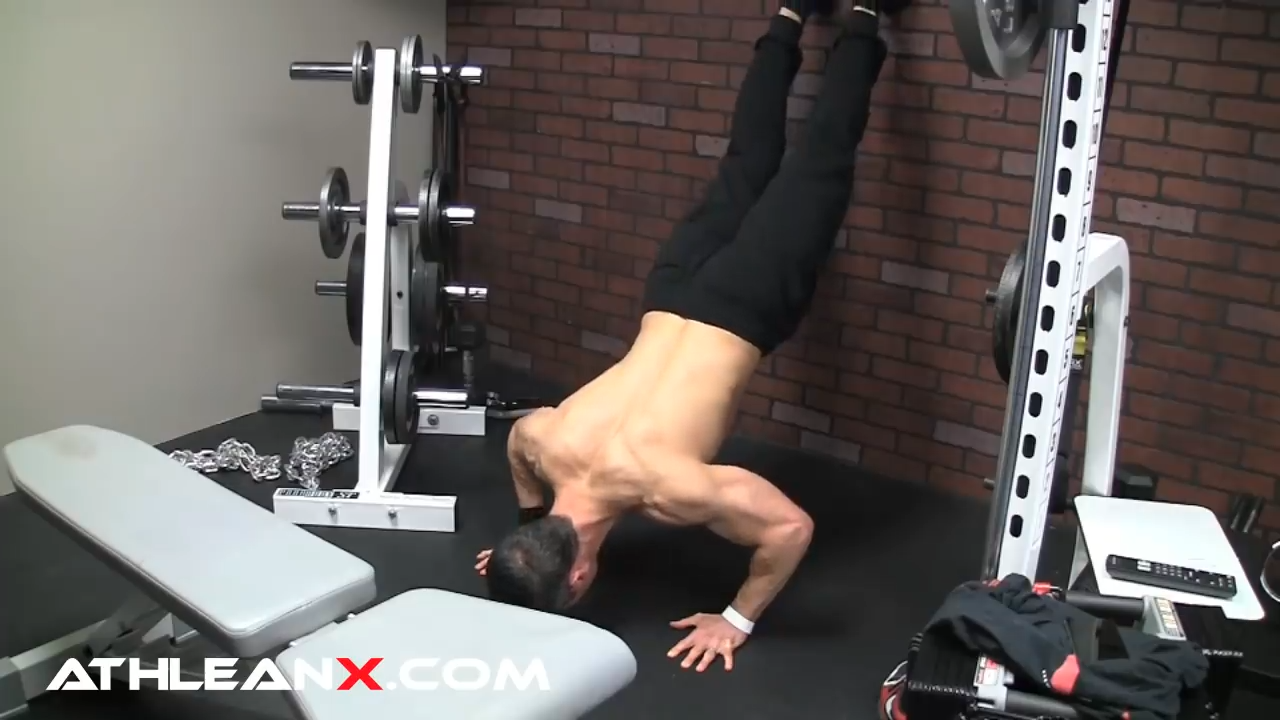
The Incline Pushup angles your body upward, but angles your arms downward into that 45 degree angle to allow you to target your lower chest fibers.
INCLINE PUSHUP
The line of push is down and across in the decline bench press, and the same thing happens in the incline push-up. This is because the body placement is a little bit ahead of our arms, which positions our arms down and across the torso as we lower.
HOW CAN YOU WORK YOUR CHEST WITH NO EQUIPMENT?
When we put these 3 effective chest exercises together we can create the ultimate bodyweight chest workout that hits all three areas of the upper, middle and lower chest.
To do this, set up a bench or other piece of furniture about 5 – 6 feet from a wall depending on your height.
Starting position is with your feet on the wall, hands shoulder width apart on the floor to perform the Decline Pushup for three reps. Make sure to keep your core tight throughout the movement.
Then you walk your hands forward and your feet down the wall until they are are flat on the ground in a plank position. Do three reps of the Classic Pushup with proper form keeping the core tight.
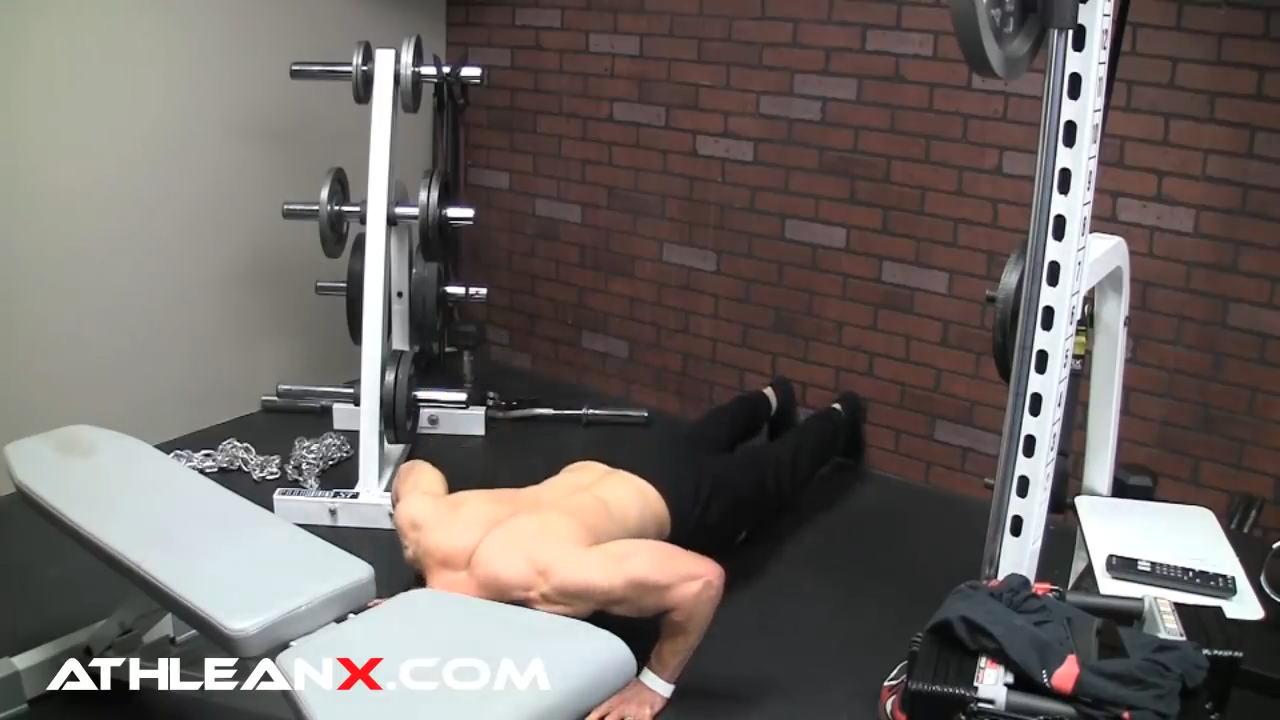
Then immediately walk yourself over into an Incline Pushup. Starting position is with your hands on the bench and feet on the floor. Do 3 reps here and then go back to the standard push-up.
Keep going back and forth from Decline Pushup to Classic Pushup to Incline Pushup, back to Classic Pushup and back to Decline Pushup, following this sequence with correct form until you fatigue.
Building chest strength and muscle growth is going to require that you push yourself to the point of failure on this bodyweight chest routine.
If you’re training at home and you have a weight vest that you can use, you’ll be able to create that overload even faster.
Regardless of which area of your chest you’re working on or which chest exercises you decide to do, you have to be sure that you load them heavy enough to create change and growth.
That doesn’t have to come in the form of heavy weight!
You can increase the load you feel in your chest muscles by simply slowing down the exercise, making sure to keep the contraction of the chest going with every rep, and working until you hit failure.
As you can see, it’s totally possible to work the upper, middle and lower chest from home using no equipment and body weight exercises. It’s just important that you understand the orientation of the chest muscle fibers and how arm placement influences which portion of the pecs you’re working. Once you’ve got those concepts down, it’s easy to translate your classic barbell or dumbbell chest exercises into their bodyweight alternatives!
If you’re looking for a complete workout program that helps you build muscle from home with minimal to no equipment, we’ve got you covered! Check out our ATHLEAN-X programs to see which is the best fit for your goals and fitness level.
- Some people think that bodyweight chest exercises aren’t as effective as barbell and dumbbell chest exercises, but that doesn’t have to be the case.
- To be able to translate chest exercises with weights over to bodyweight variations it’s important to understand the orientation of chest fibers in the upper, middle and lower chest, as well as how arm position relative to the chest helps us hit them.
- We can best hit the upper chest with exercises that put the arms at a 120 degree angle to the chest. The Decline Pushup performed upside down with feet against the wall is the best bodyweight exercise to accomplish this.
- For the middle chest, you want the arms to be oriented at a 90 degree angle to the chest, and the Classic Pushup is the perfect bodyweight exercise for this.
- For the lower chest, the arms should be at about a 45 degree angle to the chest, and the Incline Pushup places them in this position.
- To overload the chest muscles using these bodyweight exercises it’s important to slow down the movements in your chest training, emphasize the contraction of the chest and do the exercise sequence until failure.


THE IMPORTANCE OF PLYOMETRIC TRAINING
If you’re a serious lifter, you’ve already figured out that bodyweight training deserves to play a role in your overall training program.
However, serious lifters and even performance athletes often don’t appreciate the importance of explosive, plyometric training to their workout routines.
We typically train at a slow, controlled pace. That’s good for certain applications, but we also need power training to be explosive so that we’re not just strong, but also functional and athletic.
Here are seven of the best explosive bodyweight exercises you can do anywhere (using just your bodyweight and a pullup bar) that you should start incorporating into your workout routine now.
I’ve included less-challenging “step-down” variations you can use to work up to the more difficult version. There’s no use hurting yourself or only squeezing out one or two reps, because you need more reps to get the benefit.
Choose the exercise variation that works best for you and your current fitness level.
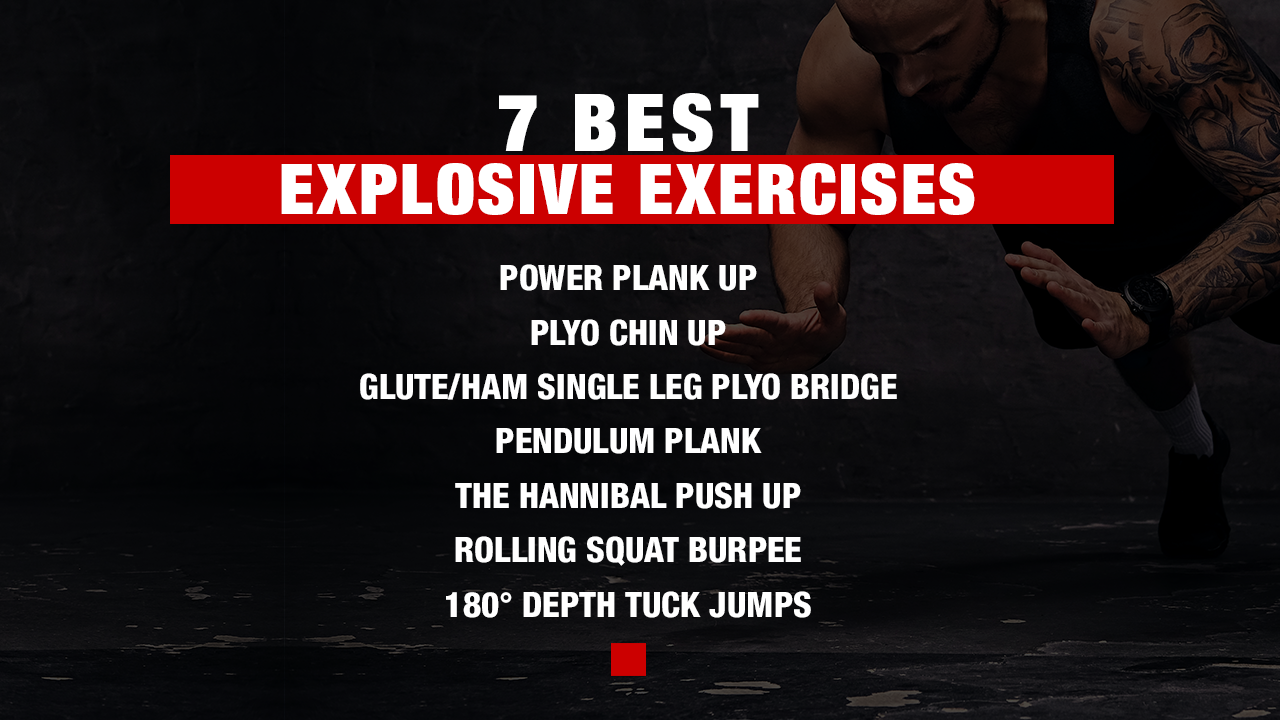
BEST PLYOMETRIC EXERCISES
Let’s take a look at these seven explosive exercises one by one and their beginner variations.
We’ll start with a bodyweight powerhouse that hits your entire upper body including your core.
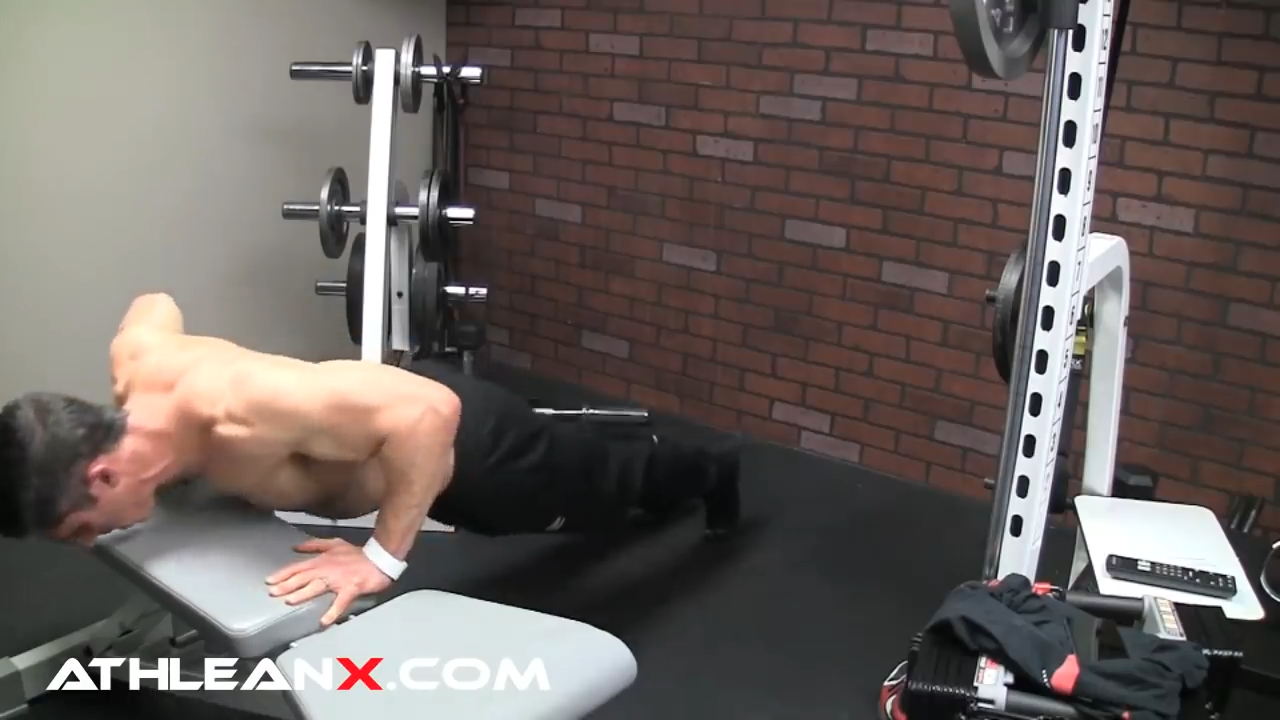
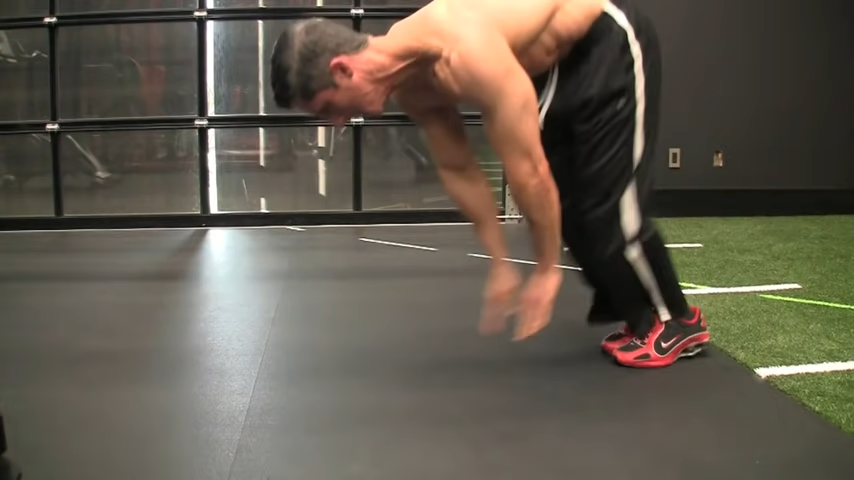
1) POWER PLANK UP
This bodyweight exercise is the perfect way to hit your triceps, chest, shoulders, and core at once. It’s great for training at home since it requires very little space and can be done either on your toes or from your knees.
Get in a plank position on your toes and elbows then explode up in one motion, driving up hard with your elbows, landing on your hands. You need stability in the shoulders, triceps, and chest, and adequate core strength to perform the move.
POWER PLANK UP STEP-DOWN VERSION
If you can’t do this as-described right now, use the elbow-knee starting position and build up from there. As you get stronger you’ll be able to get up on your toes to keep the progression going.
2) PLYO CHIN UP
All you need is a bar and an underhand grip to build “pull-through strength” with this awesome bodyweight exercise.
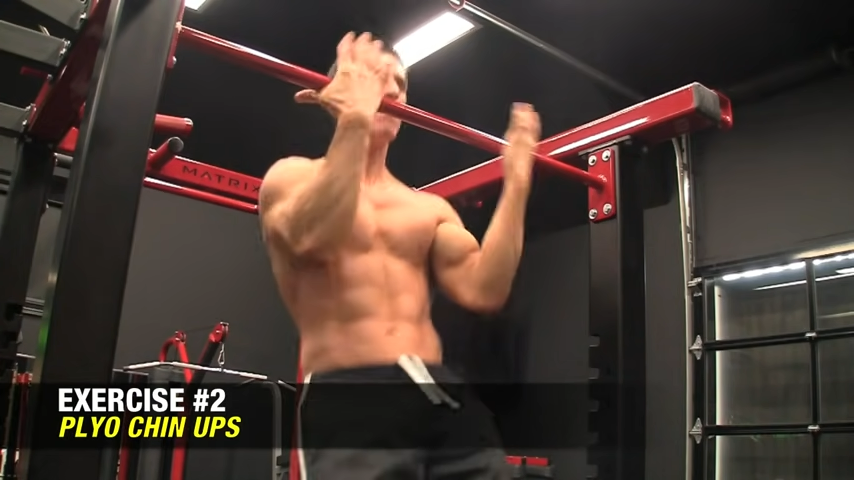
To do the Plyo Chin Up, you grip underhanded and release the bar at the top. You have to pull high enough to allow you to let go for a second. That develops “pull-through” strength.
This exercise could easily be confused with a Clapping Pull-Up. The big difference is the underhand grip of the Plyo Chin Up.
The underhand position for this chin up recruits your biceps and gives you that extra eccentric contraction when you re-grip the bar and slow down your descent before the next explosive concentric contraction.
PLYO CHINUP STEP DOWN VERSION

If you can’t do this extreme version with the full release, you can try the step-down version where one arm stays on the bar.
Use one hand to continuously grip the bar, maintaining control so you can let go with the other arm. Release one hand’s grip when you reach the top.
Work each side individually until you build up the strength to be able to release the bar entirely with both hands. You could do several reps in a row with the same side, or alternate hands.
3) GLUTE/HAM SINGLE LEG PLYO BRIDGE
Explosively train your glutes and hamstrings with this single leg plyometric exercise for the lower body and reduce the risk of hamstring pulls in the process.
This exercise is a plyometric variation of the bridge we often do. A traditional bridge would take you to a line parallel to the rest of your torso but would not add the explosive component.
For the plyometric variation, thrust through your hips enough to get ground clearance, and eccentrically control your glutes and hamstrings when you hit the ground, which activates those Type II fast-twitch muscle fibers.
GLUTE/HAM SINGLE LEG PLYO BRIDGE STEP DOWN VARIATION
Straighten your lower leg out a bit and just go for a little bit of clearance, even if it’s just 1″ off the ground.
This version is going to target a little more of your hamstring and a little less glute.
Work to get the glutes to take over to avoid hamstring injuries. If you allow the glutes to be dominant, it will work those glute/hamstring tie-ins.
4) PENDULUM PLANK
Build a solid, explosive core with this incredible bodyweight exercise.

From a plank position on your elbows, swing both your legs in a wide pendulum motion, side to side. Swing both feet far out to the left, push off with your toes and swing back to the right side. Swing back and forth, left-right-left.
Try to get as much clearance as you can without piking at the hips. Make sure you’re keeping your torso as steady as you can for core stability.
PENDULUM PLANK STEP DOWN VARIATION (SWIPERS)
The step-down version is called the “Swiper”. From that elbow plank position, use one leg at a time, returning to the midline on each rep instead of swinging all the way to the other side. Sweep left landing on the left foot, come back to the midline, then sweep right.
The Swiper creates a three-point plank position, so your forearms get the support of one leg. It alleviates a little bit of the stress on the core, but still makes a great exercise for explosive core strength.
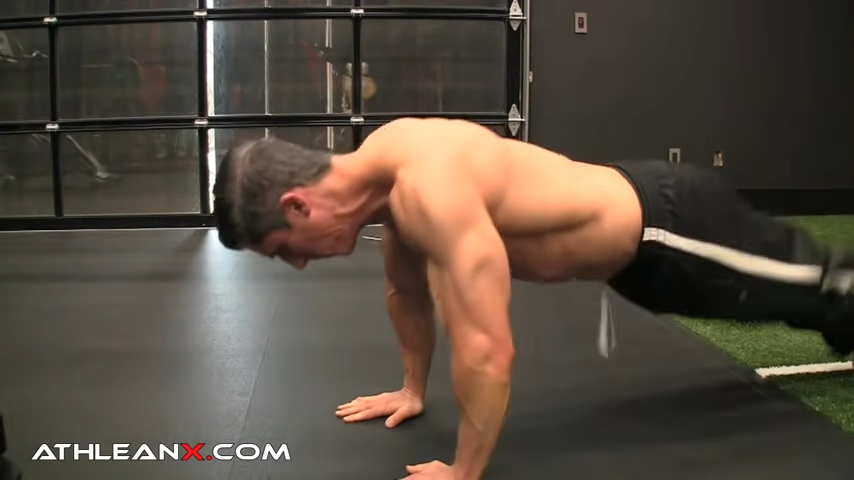
5) THE HANNIBAL PUSH UP
Get back on your feet like a pro athlete with this next exercise that builds upper body explosiveness.
I train a lot of performance athletes: major league baseball players and MMA fighters who have to get off the ground fast. They can’t make a living laying on the ground.
The Hannibal Push Up is a little like the Superman push up but a little less showy and more functional. To do the Hannibal, press up hard so that your hands leave the ground, then try to touch your toes.
This upper body builder is one of the best ways to build bigger, explosive chest and triceps muscles at home.
Even the average guy needs to maintain that ability to get off the ground as fast as possible for the rest of their life or they’re going to be using a Life Alert.
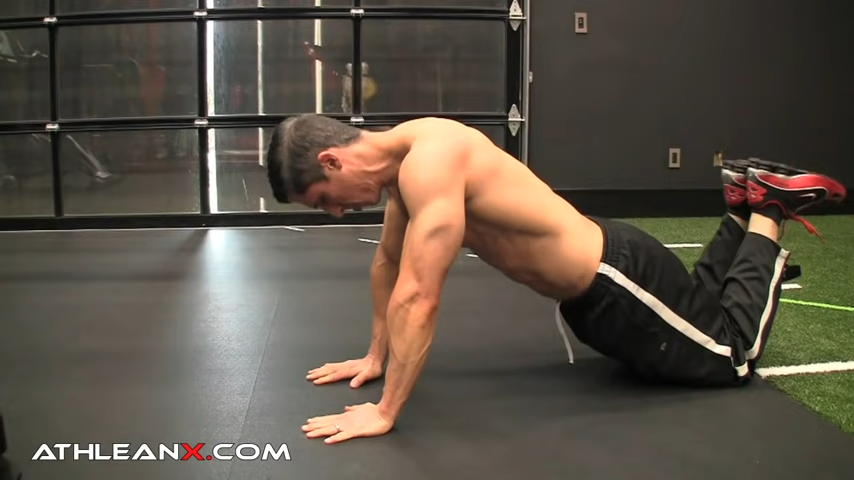
HANNIBAL PUSHUP STEP DOWN VARIATION
If you’re unable to do the full Hannibal right now, leave your hands on the ground and swing your feet forward keeping your legs straight, similar to a pike. Touch the ground with your toes and then drop down for another.
You’re still going to get a lot of upper body work. Just the act of pulling your feet off the ground builds explosiveness.
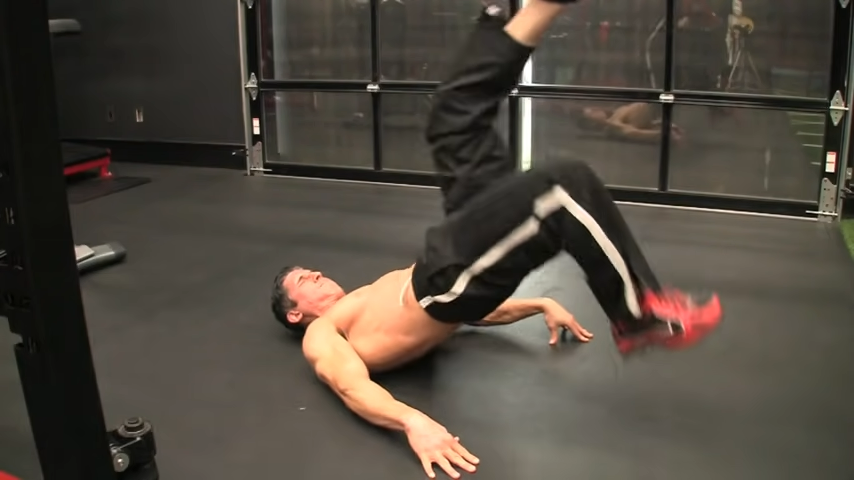
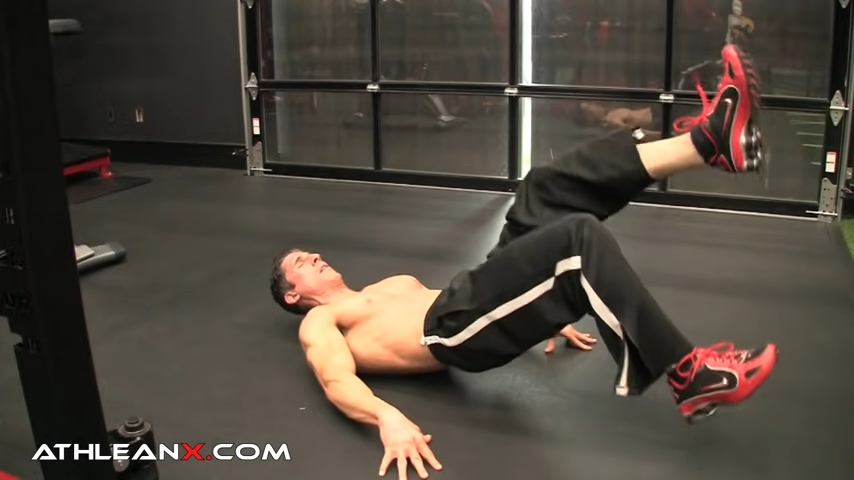
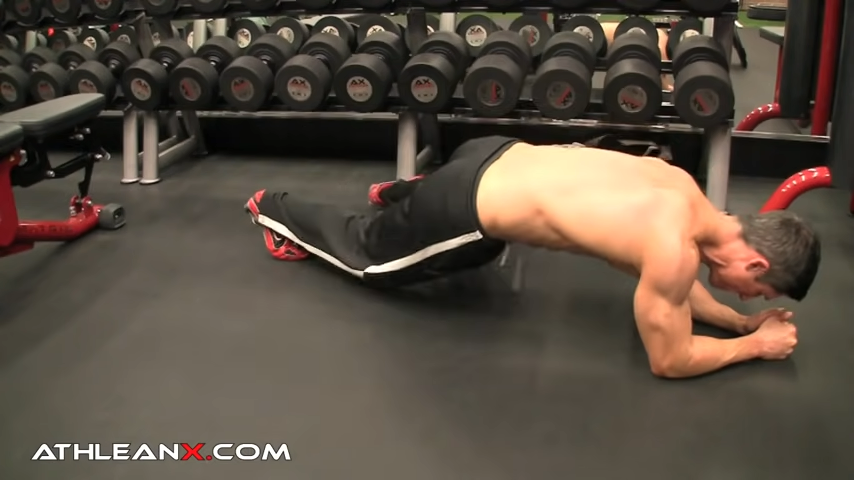
6) ROLLING SQUAT BURPEE
This two-part exercise is a great way to train how to explosively get off the ground while building upper and lower body strength.
Get on your back with legs curled, knees to chest, then thrust your legs forward so that you roll up on your feet and then straight down into a burpee, then roll back down.
This is a progression from your back to your stomach to back to stomach using your bodyweight explosively.
ROLLING SQUAT BURPEE STEP DOWN VARIATION
If you can’t do the entire squat-burpee combo, just break it in half and do just the squat burpee part without the roll-up on your back.
Get down on the ground in a push up position, push off explosively like a burpee, and jump up to the squat. Alternate the burpee and squat position as quickly and explosively as you can.
Learn to get quick with your feet to get them back underneath you for the next rep.
7) 180° DEPTH TUCK JUMPS
Let’s hit our lower body one more time with our depth tuck jumps with a 180° twist.
The 180° Depth Tuck Jump demands that you have a little more control of your body in space, which is called proprioception. It also requires you to have enough explosiveness to execute the squat jump.
You can use a bench or a plyo box for this. Any sturdy elevated surface will work. You just need something that provides the right amount of height. Nothing crazy.
To do the move, step off the box so that you hit the ground naturally and cause an equally natural recoil. This stretches the quads and generates elastic energy. Then you do the 180° turn, change directions, and jump back up as fast as possible.
The space of time between the end of the lowering phase and the beginning of explosive ascent is called the Amortization Phase.
The amortization phase is the transition between centric lowering and explosive ascent. It’s not limited to jumping. Competition lifters train for rapid amortization phases in the chest and shoulder movements as well. We try to shorten the amortization phase in athletes to improve overall quickness.
DEPTH JUMP STEP DOWN VARIATION
If you can’t quite do the 180 turns you can work on depth tuck jump only. Step off with one foot, land, and quickly descend into that Amortization Phase and pop up.
Start with one leg for five to ten repetitions, and then switch to the other leg. You might notice a difference in the explosiveness of one leg over the other. It’s not uncommon to have a dominant side. Put in the work to equalize explosive strength between right and left sides.
Don’t think bodyweight means just doing as many push-ups or sit ups as you can. Use your own bodyweight in a challenging way and you can start building muscle without any equipment, in any environment.
These exercises aren’t easy to perform, but nobody ever got anything worthwhile by making it easy. Use the step-down versions as needed, master them, then move up to the more difficult versions.
If you’re looking to build a stronger more athletic and functional physique, we’ve got you covered. Check out our ATHLEAN-X programs to see which one is the best fit for your goals.
- The need to train with bodyweight is widely accepted and practiced, but not everyone appreciates the importance of power training with explosive, plyometric exercises in their workout routines.
- Plyometric training, like other bodyweight training, can be done from home, or pretty much anywhere.
- Professional athletes train explosively for performance, but plyometric exercises are useful to anyone for general health, physical fitness, and activities of daily life.
- These exercises are challenging. Step-down versions are provided as a way to work into the difficult versions while getting the benefits in the process.
- Rapid eccentric and concentric contraction of the muscle builds quickness and fast-twitch muscle fibers. The interval between eccentric and concentric contraction is called the Amortization Phase.
- These seven exercises work the upper body, lower body, and core. Some are more specific than others. For example, the Hannibal Push Up focuses on chest and triceps primarily, while the Rolling Squat Burpee hits upper and lower body.

HOW TO WORK YOUR BACK AT HOME
Effective bodyweight back workouts are not very common, at least not those that don’t require a pullup bar.
People say it can’t be done…
That it’s impossible to get a good back workout without equipment.
That you need to use heavy weight to build muscle in your back.
NOT SO.
I’m about to show you how to hit your upper, middle and lower back with three bodyweight back exercises that together make up one ultimate bodyweight back workout!
No bars, no bench, no nothing!
You’ll see that it’s totally possible to get a great back workout routine, without machines, without without pull ups and without an inverted row.
Before we get started, let me tell you why incorporating bodyweight exercises into your training plan can actually ACCELERATE your back gains.
Like any muscle group, you want to be sure that you maximize the contraction of the key muscles you are trying to work to get them to grow. In the case of the back muscles, many people tend to heave the weights up using momentum and don’t fully use their muscles to move the weight.
When we switch to upper body exercises with no equipment, we can control them better and ensure a proper contraction, which translates into improved gains.
Let me show you the best bodyweight back exercises of all time using no equipment at all!
BEST BODYWEIGHT UPPER BACK EXERCISE
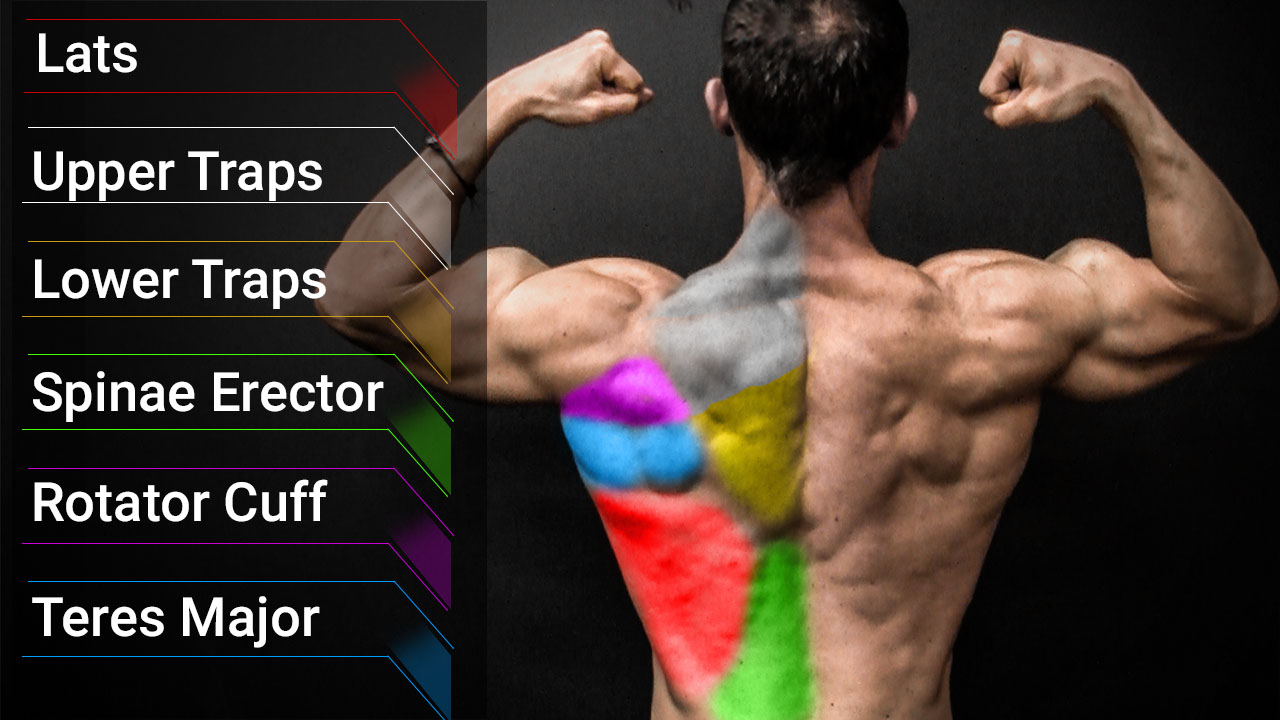
First we’ll target the upper back muscles including the traps, rhomboids and posterior delts, using what I call the Back Widow.
To do this simple exercise, starting position is face up on the floor and bending your elbows on the ground with fists up in the air. Push hard through the upper back to engage the rhomboids, traps, and posterior delts to get your upper body and spine up and off the ground, and pull your shoulder blades in, keeping your knees bent with feet on the floor. Pause at the top, and then return to starting position lowering your body toward floor, and then push yourself up again.
If you need an easier variation, you can do a self spot by incorporating a bit more push from the feet on the floor. If you don’t need the help, maintain the push through the elbows and contract the back muscles to power off the floor.
BACK WIDOW
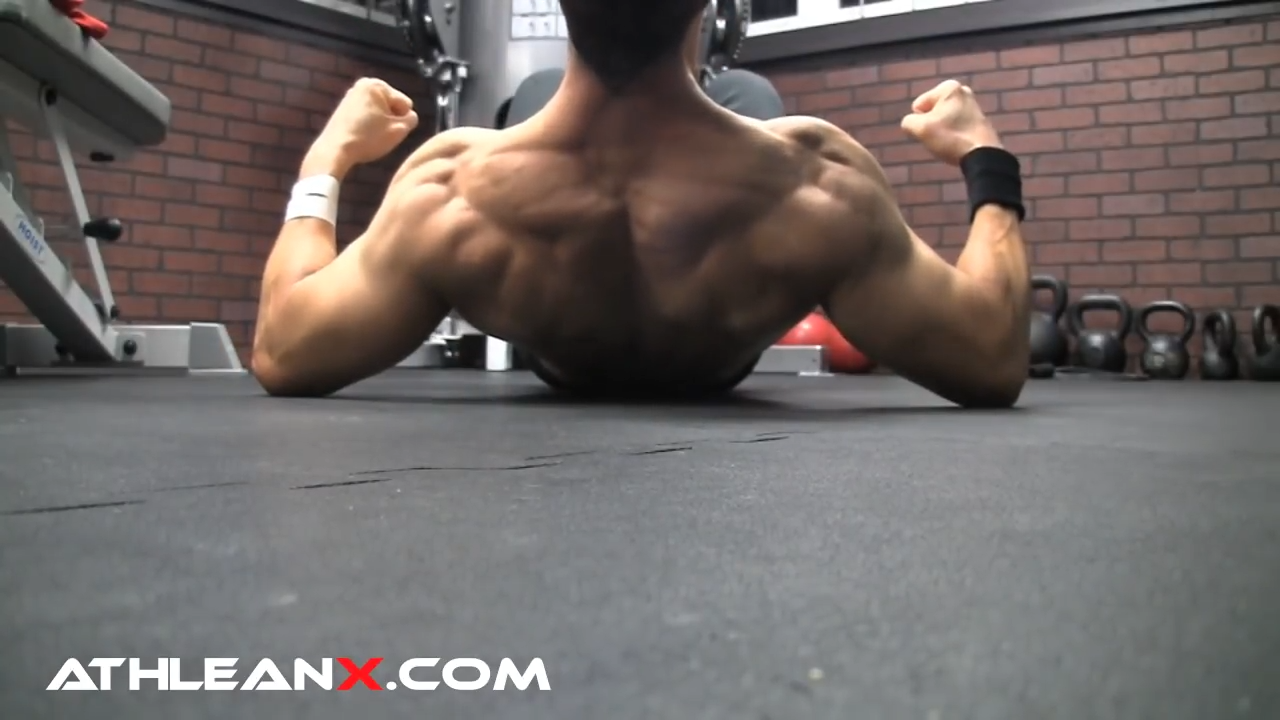
The pro tip here is to hold the contraction on each repetition, and make sure you get yourself up by using your back muscles and not momentum!
BEST BODYWEIGHT MID BACK EXERCISE
Next we’ll target the middle back and primarily the lat muscle by performing the Sliding Lat Pulldown.
The lats are challenging to hit with no equipment.
But if you look at your surroundings and use some creativity you can get the job done!
For this, all you’ll need is a pair of pants and a slick floor. I’m doing it on concrete which isn’t all that slick, so it gives me even more friction.
Starting position is with your body outstretched lying facedown on the floor with your feet back behind you, and a neutral spine, extending your arms straight out in front of you, hands shoulder width apart on the floor. Engage your core muscles and initiate a complete total body prone pull down. You’ll pull your chest off the floor by pushing your arms up into plank position and then lower yourself back down, belly toward floor, to slowly return to the starting position.
SLIDING LAT PULLDOWN
You can see that this effective exercise very much mimics a pullover or a straight arm pull down, one of my favorite exercises for lats.
To make this more difficult, try to stay on your toes as you extend out to the start position and remain on your toes as you pull down.
If you need a slightly easier variation, you can unweight some of your body by allowing your knees and shins to drag on the ground for the first one third of the move and lift them when you have the strength to lift.
BEST BODYWEIGHT LOWER BACK EXERCISE
Finally we’ll hit the lower back with the Reverse Superman exercise, which will also incorporate a number of other muscle groups.
When working the lower back, it’s important to train it with the muscles it prefers to work with.
It likes to get some help from the glutes and lower body, and from the lats that tie into your lower back.
This Reverse Superman exercise will incorporate all of these muscle groups, and because it’s done with the arms behind the body, you’ll pull your shoulder blades, rotating them back with each repetition. That means the rotator cuff is getting involved, too.
REVERSE SUPERMAN
Start position is lying face down with hands facing up towards the ceiling, elbows tucked into your sides with arms and legs in a straight line. Squeezing your glutes, lift arms and legs simultaneously. Using a rotating motion, pull the shoulder blade in, and as you do so, hands will turn toward the ground.
Aim for a solid two to three second contraction on each rep to really work the strength and stamina of the lower back muscles. Then return to the starting position and repeat.
As you can see, using no equipment doesn’t mean you have no options when it comes to performing back exercises at home. You don’t even have to compromise on the difficulty of the upperbody exercises. In fact, a few of these exercises may even require you to dial them back! Being without access to the gym definitely doesn’t mean you have to give up on stronger healthier shoulders.
If you’re looking for a complete bodyweight workout program that actually helps you to BUILD MUSCLE, look no further! Check our our ATHLEAN-X programs to see which is the best fit for your goals and fitness level.
- Many people think it’s impossible to build muscle in the back with only bodyweight exercises. I’ve shown you that not only is this false, you can actually see better gains by incorporating no equipment options into your back exercise routine, because it is harder to use momentum when you’re doing bodyweight exercises.
- For the upper back, the Back Widow exercise will allow you to hit traps, rhomboids and posterior deltoids.
- The Sliding Lat Pulldown will hit your middle back, and especially the lats.
- The Reverse Superman hits not only low back but also the glutes, lats and even the rotator cuffs, which are weak underactive muscles for many people.

WAGING WAR ON YOUR ABDOMINALS
You’ve likely heard about the “300” workout. It was the famous workout used by the cast of the movie “300” during training for their roles.
But that workout wasn’t so tough on the abs.
So I fixed it!
I didn’t want anyone to miss out on this one, so I created both a beginner and advanced version.
The structure of the ab workout is similar but scaled depending on your ability level. In the beginner version of this abs workout you will use nothing but your own bodyweight and the floor.
For the advanced version, we’re breaking out the barbell! If the 300 reps don’t get you in the beginner version, perhaps the weighted ab workout in the advanced version will! I’d like to challenge you to see if you can complete the 300 Abs Workout with the best form and minimal to no rest between moves.
This routine is going to WAGE WAR on your obliques, upper abs and lower abs. Ready to get started?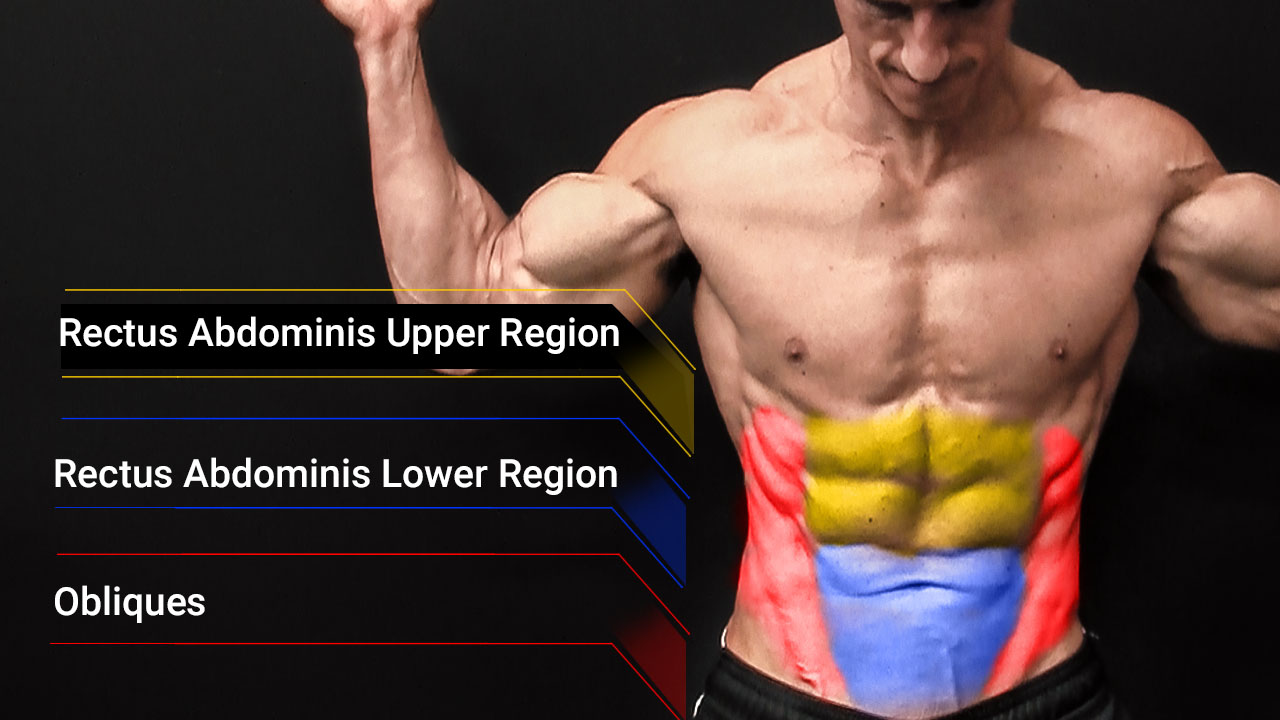
THE 300 ABS CHALLENGE
The goal with every ab exercise in this workout is to try to get through all of the reps without resting.
That said, I realize that this may be very difficult for many who will attempt this routine. In that case, do as many as you can and keep your rest to a minimum in an attempt to get through all the reps without sacrificing form.
When you are ready to step up the challenge, remember to move onto the advanced version. This one incorporates a barbell and weighted ab training, making it perfect for the gym.
You’ll never under train your abs again with this new weapon in your ab workout arsenal!
THE “300” ABS WORKOUT: BEGINNER VERSION
1.) Sit Up Reach Ups for 50 reps

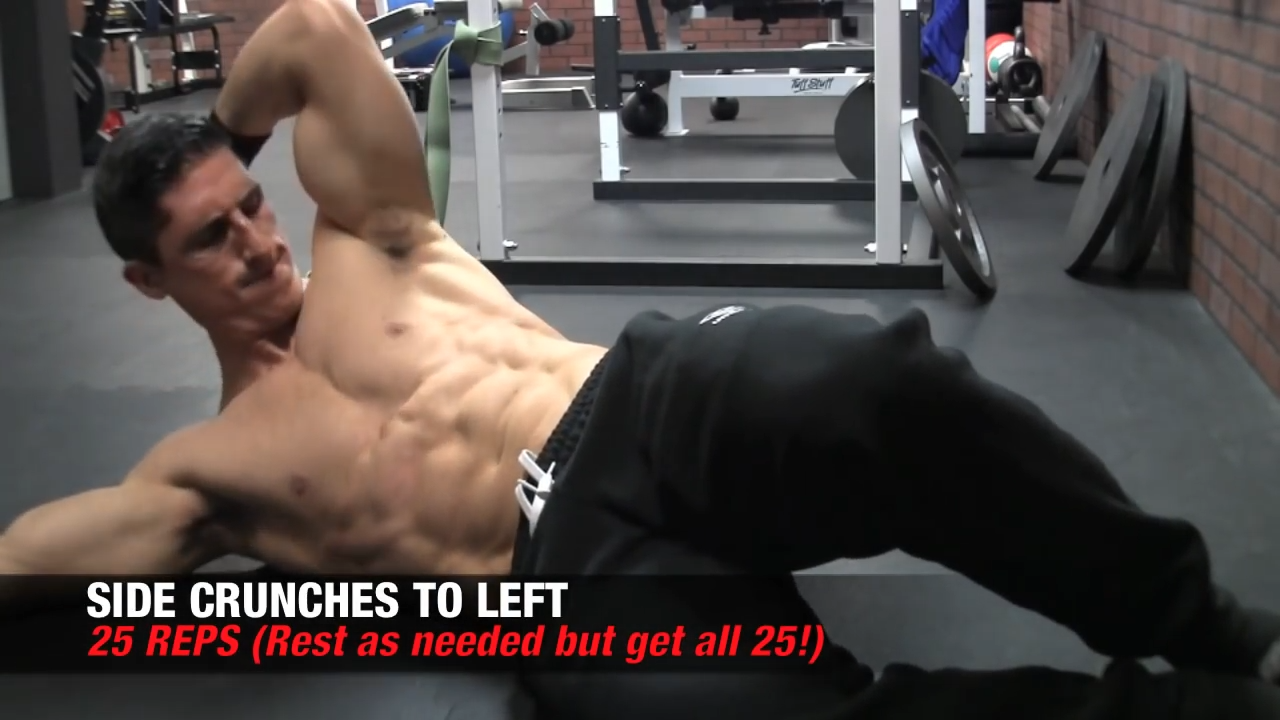
2.) Side Crunches To Left for 25 reps
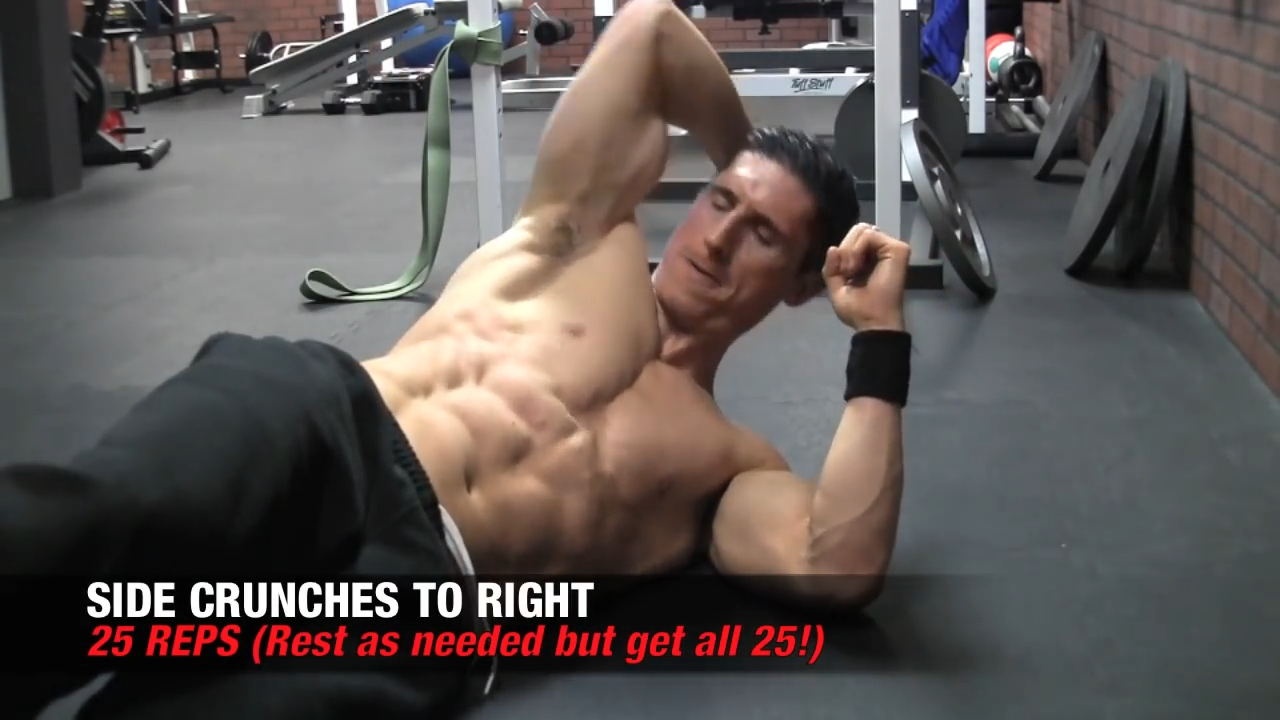
3.) Side Crunches To Right for 25 reps
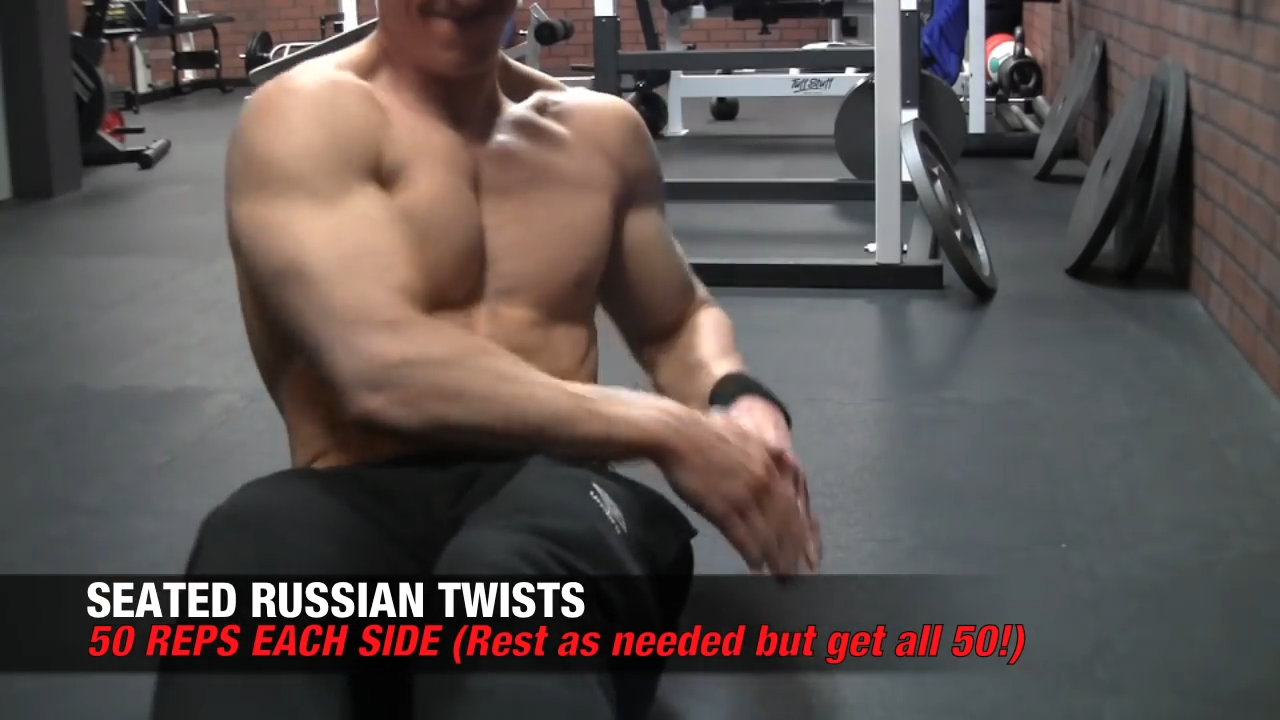
4.) Seated Russian Twists for 50 reps
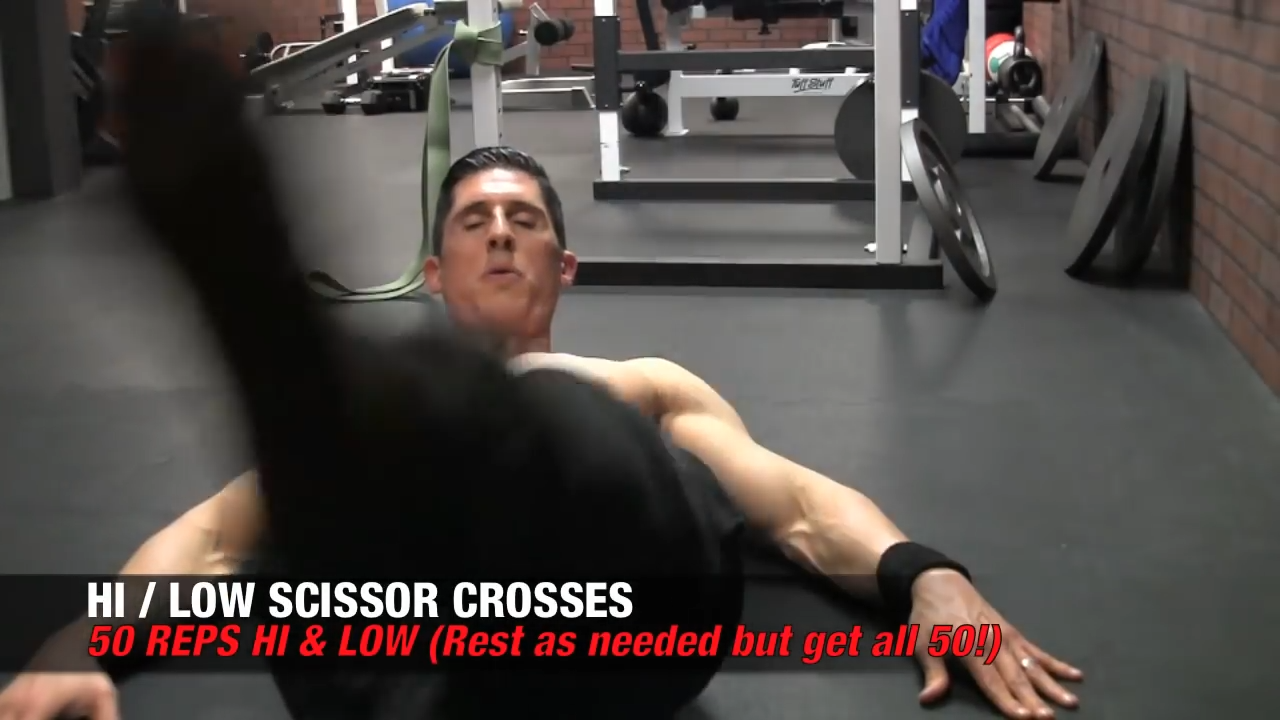
5.) Hi / Low Scissor Crosses for 50 reps hi & low
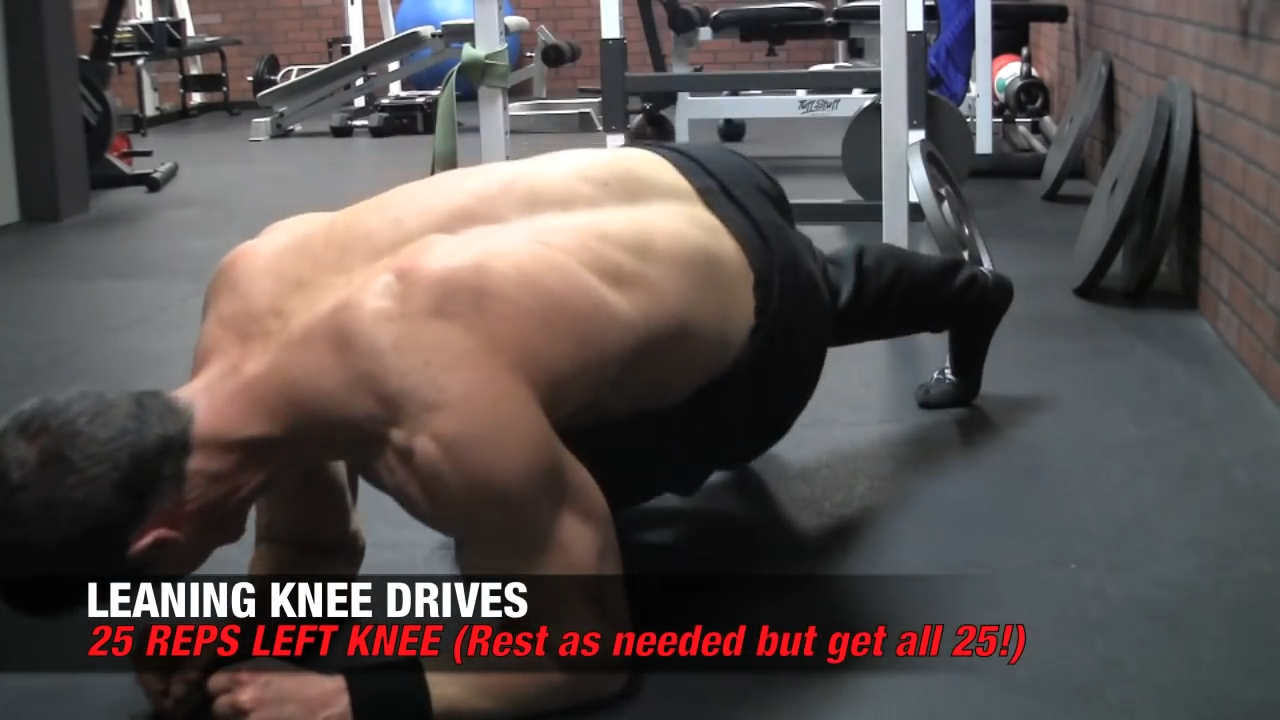
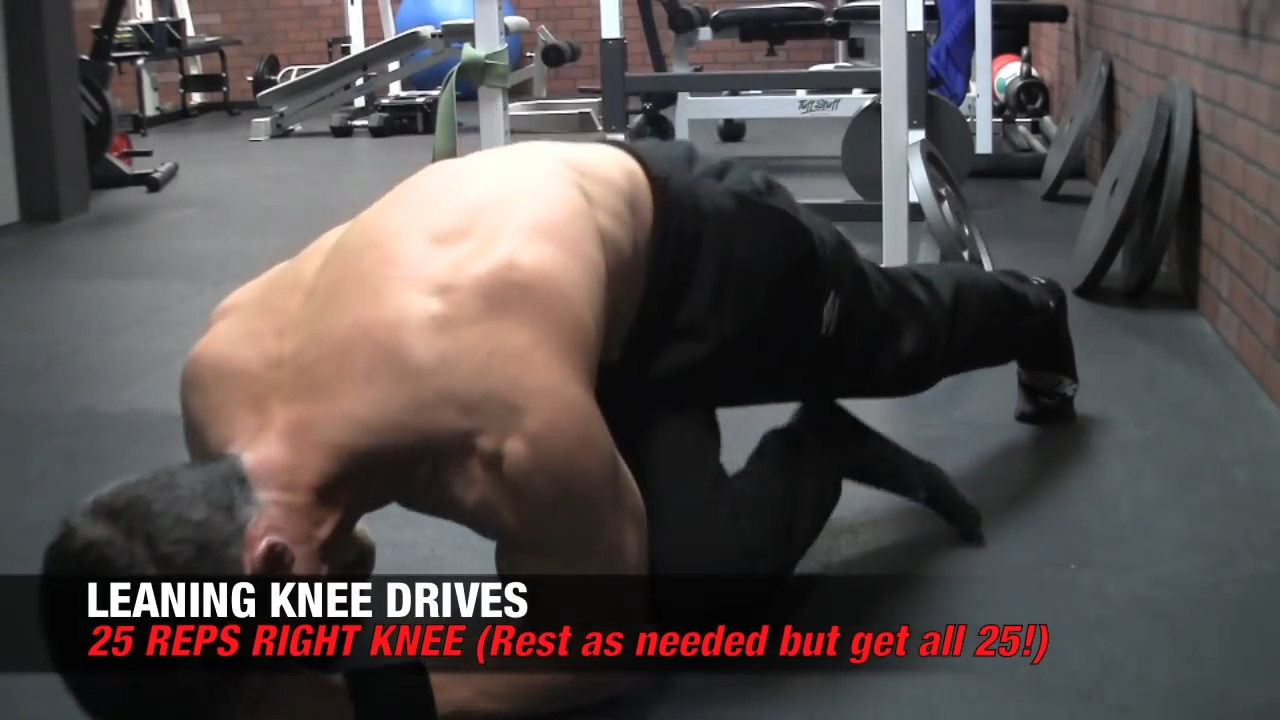
6.) Leaning Knee Drives To Right for 25 reps
7.) Leaning Knee Drives To Left for 25 reps
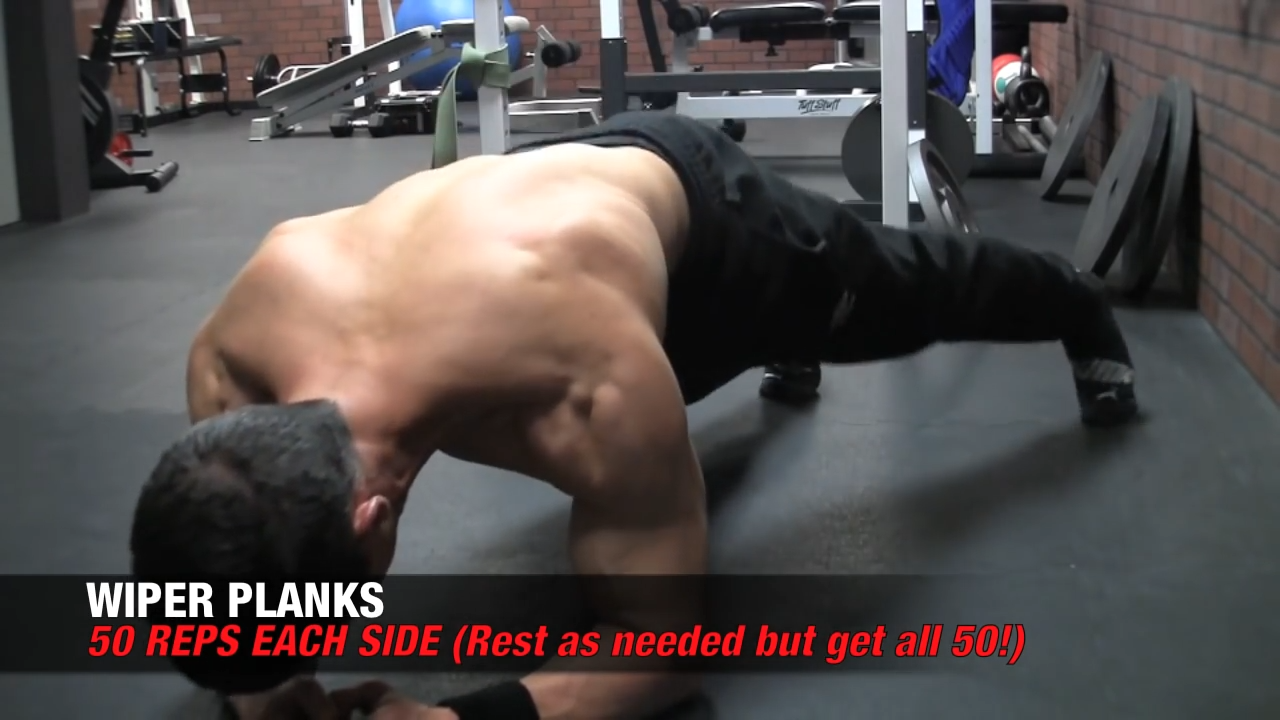
8.) Wiper Planks for 50 reps each side
THE “300” ABS WORKOUT: ADVANCED VERSION
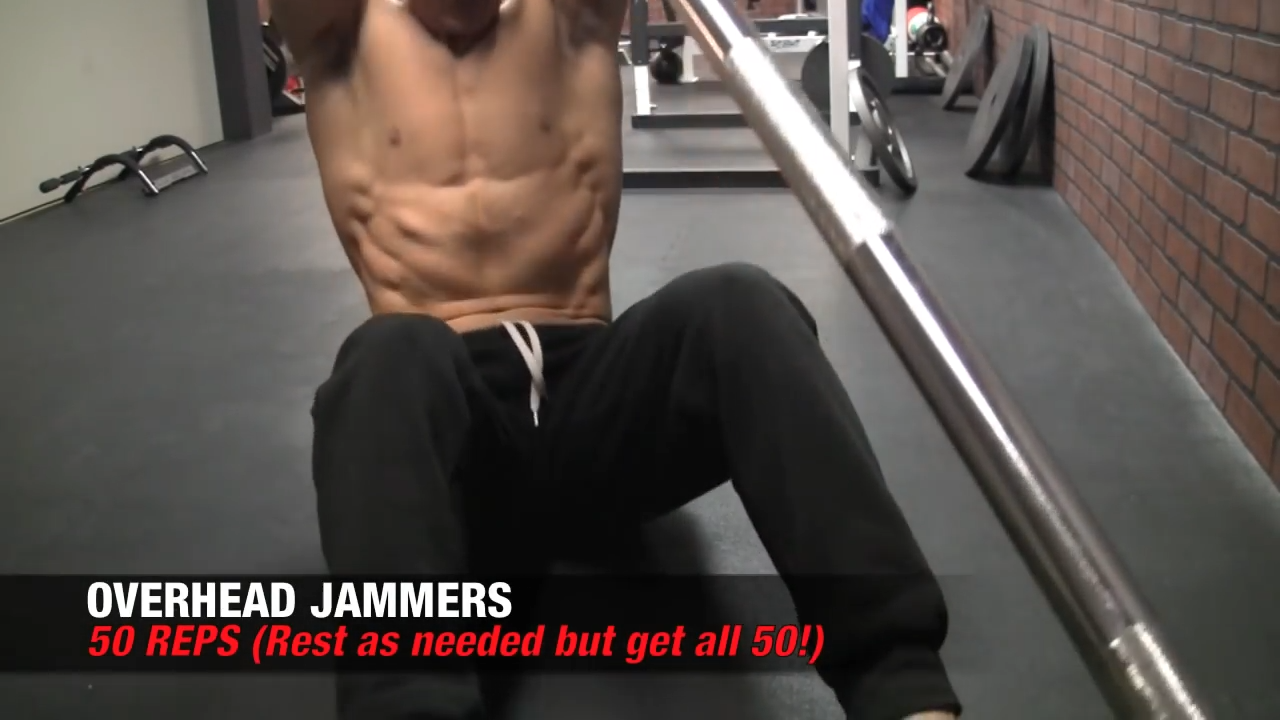
1.) Overhead Jammers for 50 reps
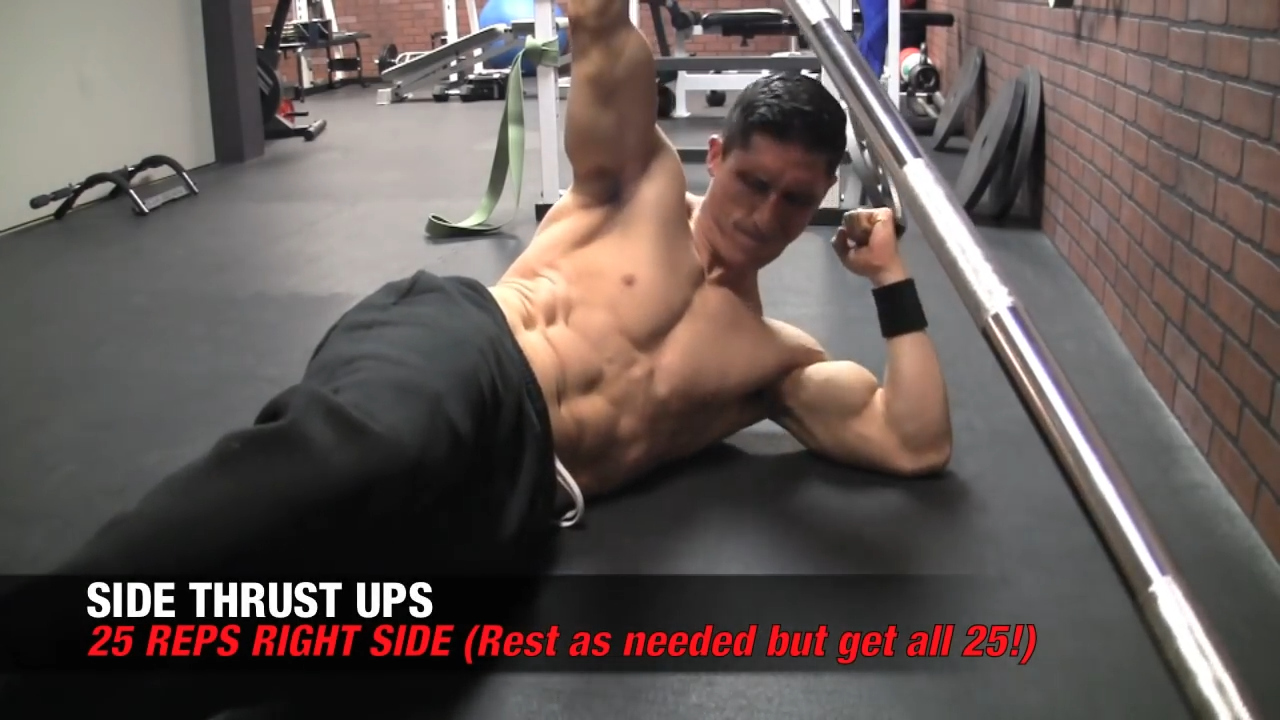
2.) Left Side Thrust Ups for 25 reps
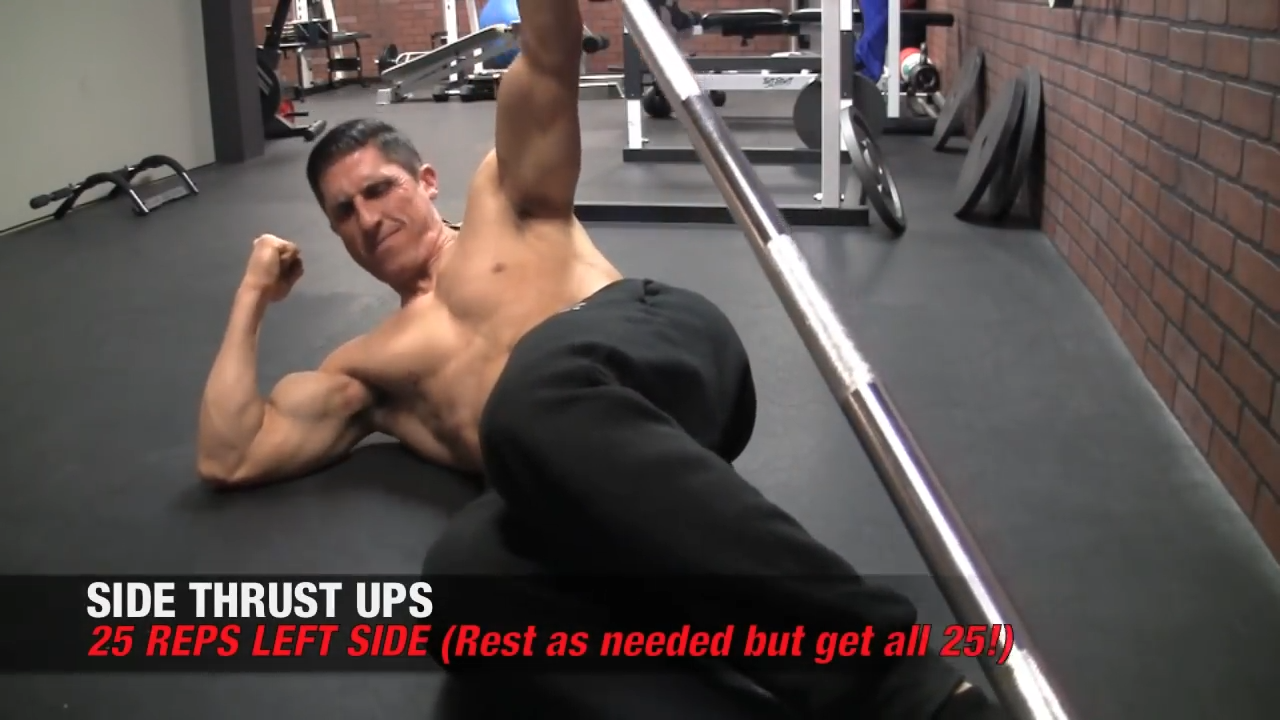
3.) Right Side Thrust Ups for 25 reps
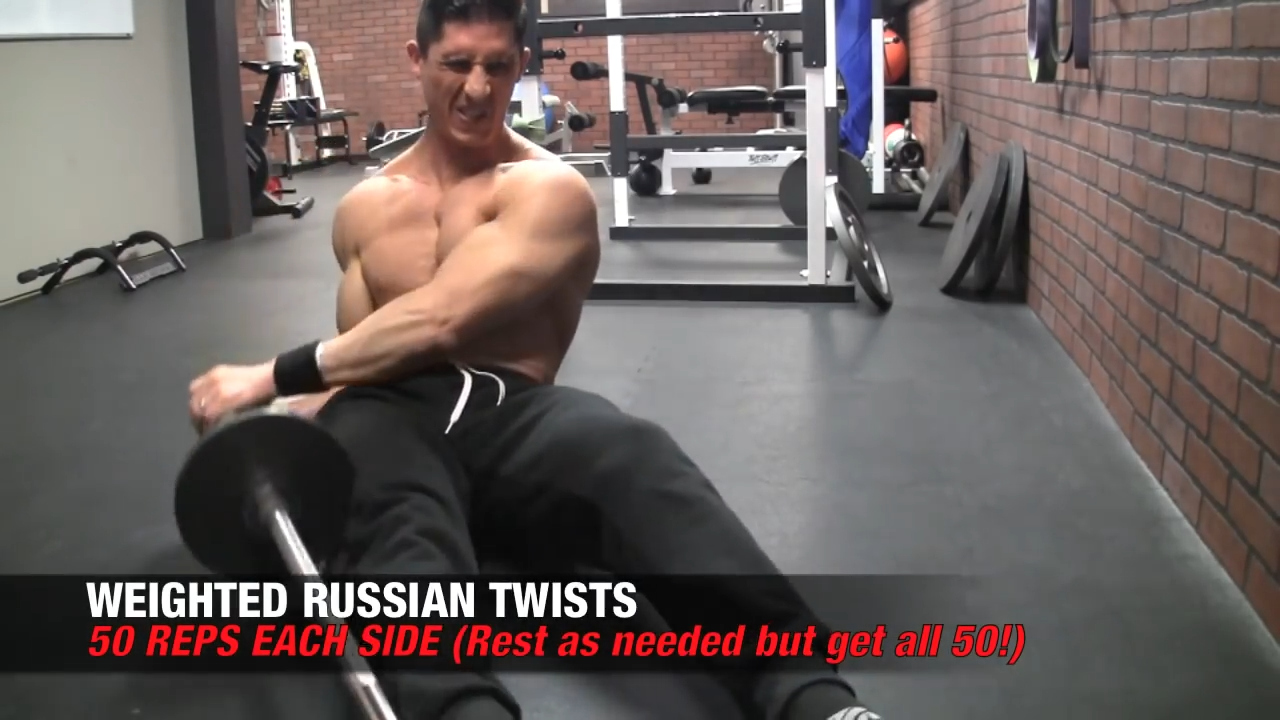
4.) Weighted Russian Twists for 50 reps
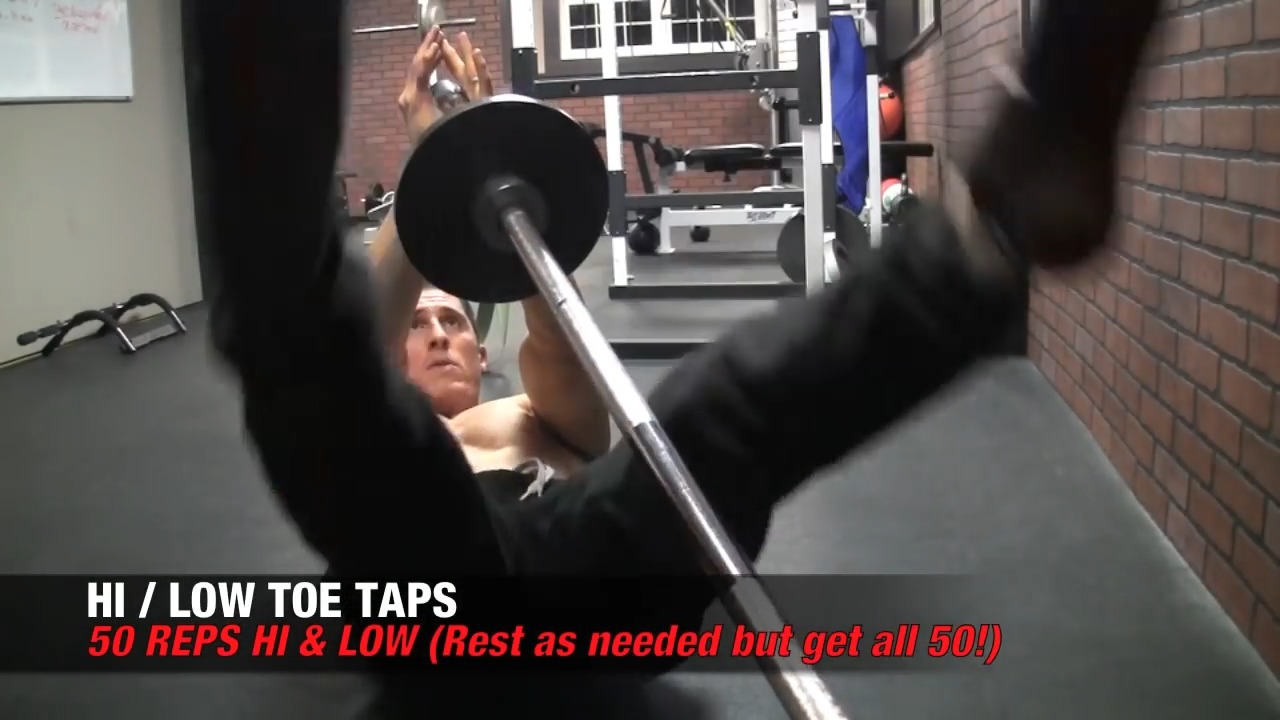
5.) Hi / Low Toe Taps for 50 reps hi & low
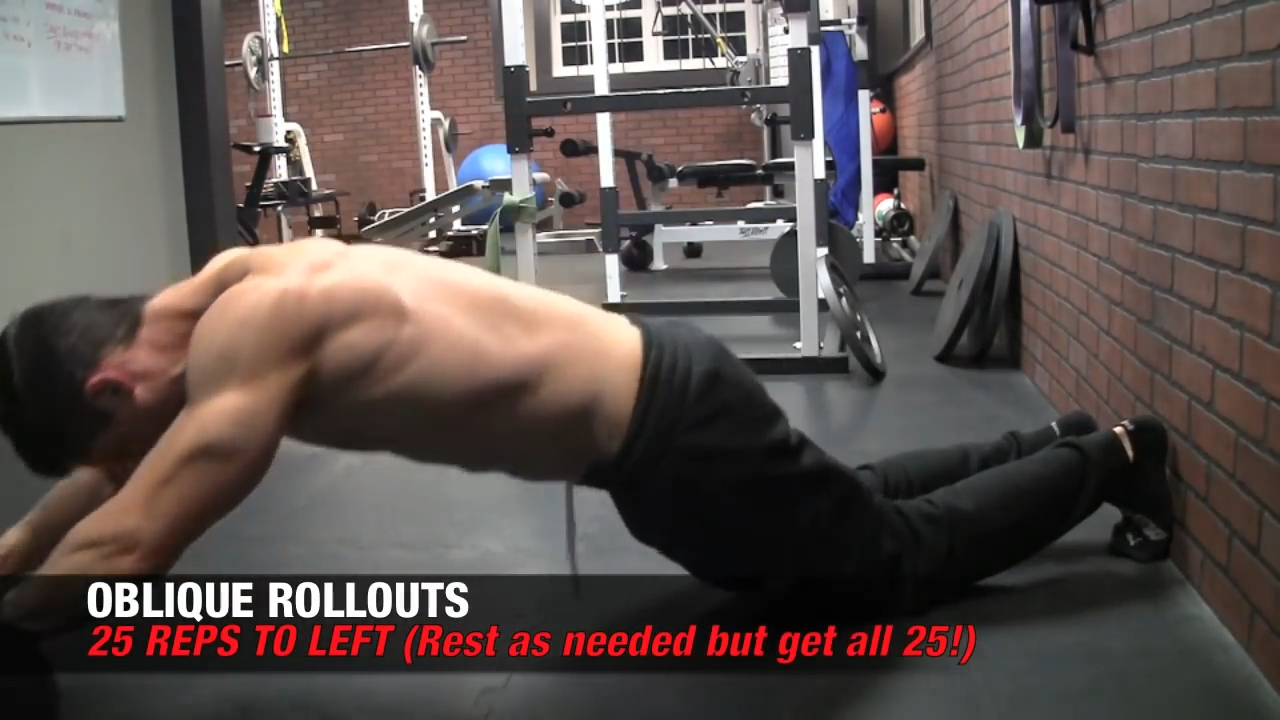
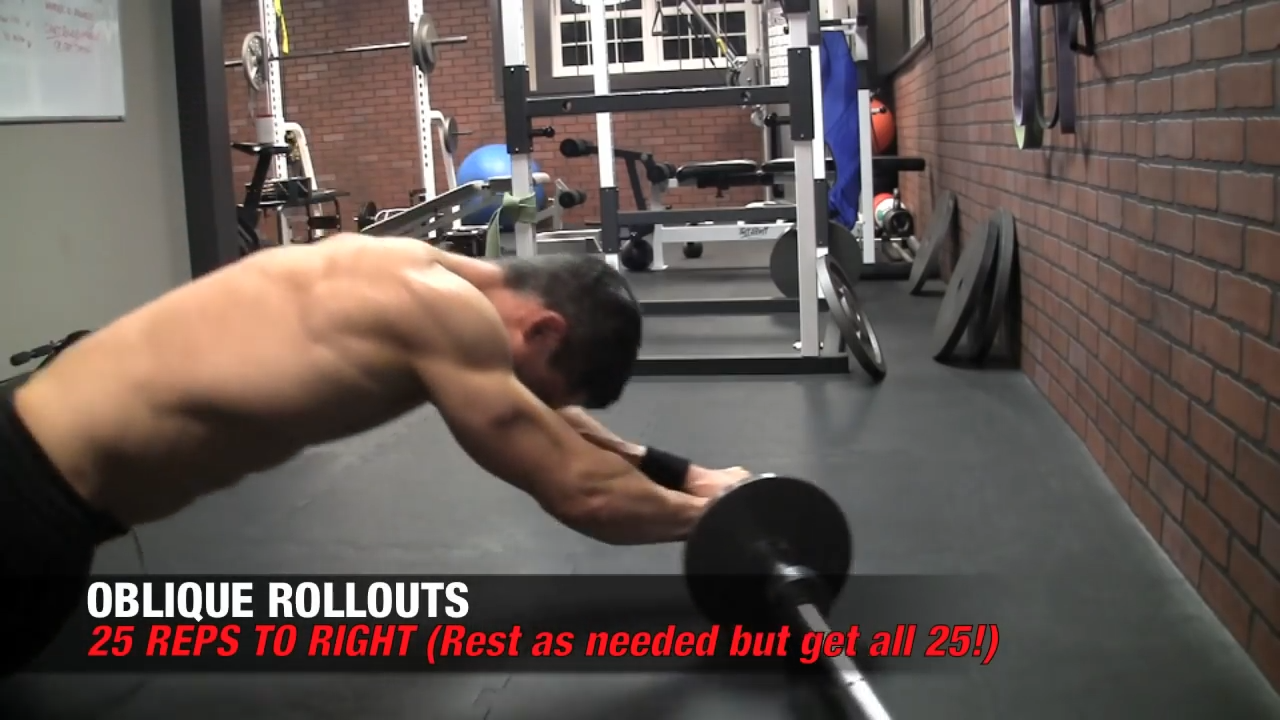
6.) Oblique Rollouts To Left for 25 reps
7.) Oblique Rollouts To Right for 25 reps
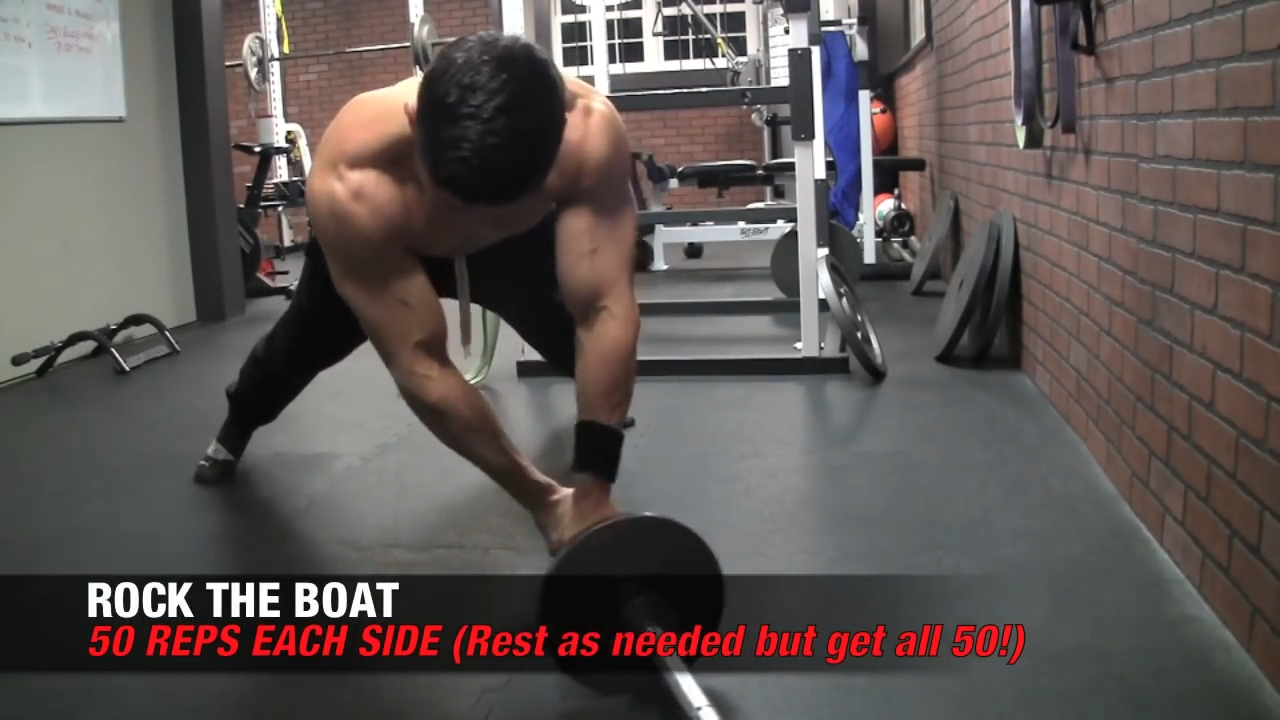
8.) Rock The Boat for 50 reps each side
A KILLER ABS WORKOUT NO MATTER YOUR LEVEL
So there you have it, 300 killer reps in one intense ab workout, beginner and advanced versions.
It doesn’t matter what ability level you’re starting at. The key is to keep working to get better. If you’re a beginner now, one day you’ll be training your abs at the advanced level. And if you’re already advanced, there’s nothing stopping you from throwing more weight on that bar.
No matter what, keep challenging yourself.
At ATHLEAN-X we’re here to help you keep challenging yourself and just as importantly, we put the science back in strength in every single workout. The abs and core are part of everything we do – that’s just how our body works. So if you’re looking for a complete program that is based around this concept, check out our ATHLEAN-X Training Systems.
- Sit Up Reach Ups for 50 reps
- Side Crunches To Left for 25 reps
- Side Crunches To Right for 25 reps
- Seated Russian Twists for 50 reps
- Hi / Low Scissor Crosses for 50 reps hi & low
- Leaning Knee Drives To Right for 25 reps
- Leaning Knee Drives To Left for 25 reps
- Wiper Planks for 50 reps each side
- Overhead Jammers for 50 reps
- Left Side Thrust Ups for 25 reps
- Right Side Thrust Ups for 25 reps
- Weighted Russian Twists for 50 reps
- Hi / Low Toe Taps for 50 reps hi & low
- Oblique Rollouts To Left for 25 reps
- Oblique Rollouts To Right for 25 reps
- Rock The Boat for 50 reps each side
See if you can complete the 300 abs workout with the best form and minimal rest between moves:
- Sit Up Reach Ups (50 reps)
- Side Crunches To Left (25 Reps)
- Side Crunches To Right (25 Reps)
- Seated Russian Twists (50 reps)
- Hi/Low Scissor Crosses (50 reps)
- Leaning Knee Drives to Right (25 reps)
- Leaning Knee Drives to Left (25 reps)
- Wiper Planks (50 reps)
Complete these 300 reps with the best form possible and minimal rest between moves:
- Sit Up Reach Ups (50 reps)
- Side Crunches To Left (25 Reps)
- Side Crunches To Right (25 Reps)
- Seated Russian Twists (50 reps)
- Hi/Low Scissor Crosses (50 reps)
- Leaning Knee Drives to Right (25 reps)
- Leaning Knee Drives to Left (25 reps)
- Wiper Planks (50 reps)
The 300 ab workout is a challenging and effective abs routine that covers all of the areas of the abs. Use this workout several times per week. If you are a beginner, work toward progressing to the advanced version.

ARE YOU A CALF OR A CALF-NOT?
When it comes to the calf size, a lot of people would have you believe that you were either destined to be a CALF OR A CALF-NOT.
What I’ll say is that this is partially true.
Genetics play a large role in calf size.
I am Jeff Caveliere, no doubt, but I’ve never been confused with Jeff CALF-aliere!
My struggles in building bigger, stronger calves have provided me with motivation to find more ways to get the calves to respond, and there is definitely something you can do to build this stubborn muscle.
If you want to know how to get bigger calves, let’s start with a basic understanding which muscles of the lower legs are involved. Then we’ll discuss what type of exercise for calves actually works in the first place and a simple home body weight leg exercise to help you get those calves growing.
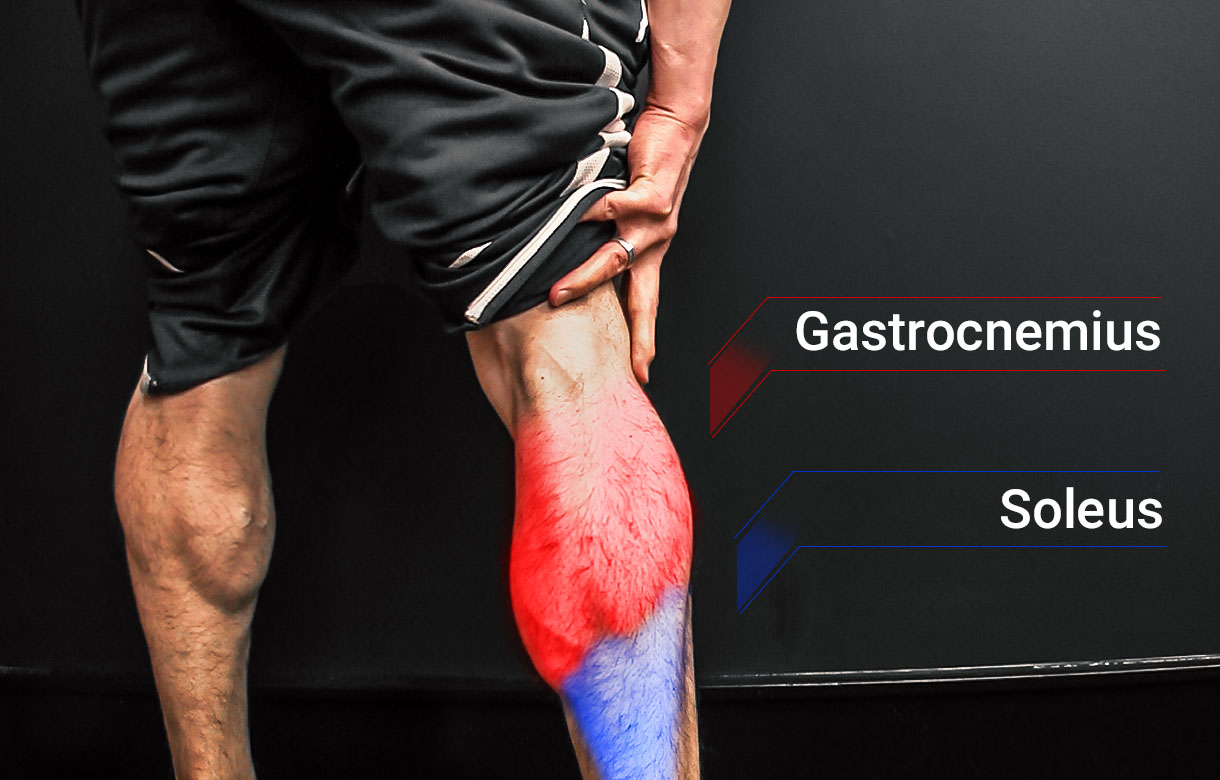
The main muscles in the calf are the gastrocnemius muscle (gastroc for short) and the soleus which is behind it.
The top portion of the soleus muscle fiber is behind the gastroc (the most visible calf muscle), so if you can increase the size of the soleus it will push the gastroc outward and make the entire calf appear larger and more developed.
So what kind of exercises work to build three-dimensional calves? To find out, let’s consider WHO has the most well-developed calves… athletes!
WHY DO ATHLETES HAVE SUCH WELL DEVELOPED CALVES?
Having worked with professional athletes, one thing that you will notice about their training is there’s not a lot of direct calf exercises in it.
Athletes really don’t need to train calves.
That’s because the essence of their activities – running, jumping, cutting in multiple directions – create stronger calves because those athletic activities have one thing that our typical specific calf exercises do not.
That is high tension, spontaneous contraction.
What am I talking about?
It’s when you get a high level of tension generated in a single contraction over a quick period of time. Almost every professional athlete incorporates this into their sport naturally, which leaves them with tremendous calf development without having to spend much time at all on specific calf workouts.
That high tension spontaneous contraction is the key to building bigger calves, because that is how they respond the best. That is how you create true overload. A dedicated calf workout routine is unnecessary and not the best way to do this.
#1 BEST WAY TO DEVELOP YOUR CALVES AT HOME
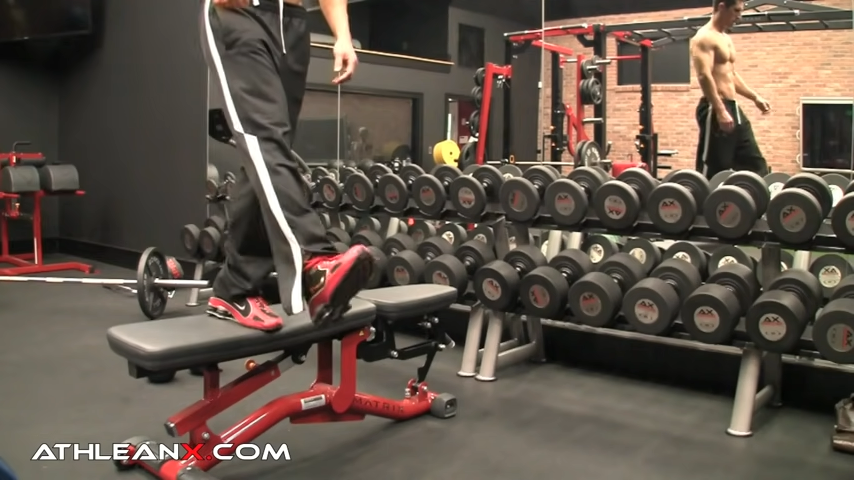
Here I’m going to show you an excellent calf exercise that you can incorporate into your lower body workouts that trains your calves without any equipment at all.
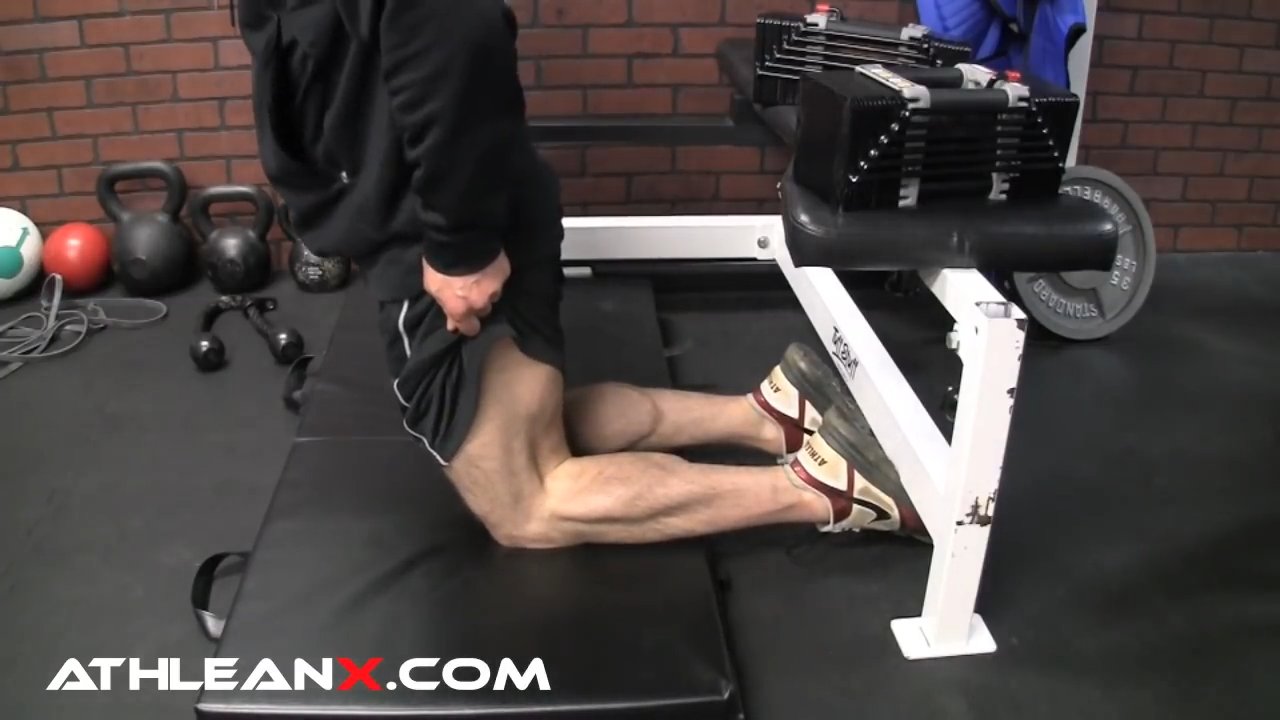
Starting position is kneeling on a mat or on the floor with your feet hipwidth apart, ankles flexed backward and balls of your feet anchored under a bench or under a piece of furniture, tops of the feet flat on the floor.
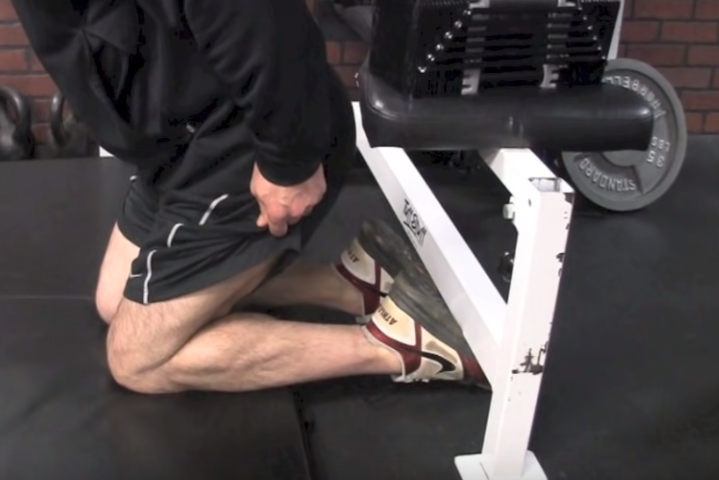
In this starting position with your feet secured under the bench or couch, lift your heel and flex your feet in order to keep your body upright. You will feel the calf contraction as soon as you set up if you do this properly.
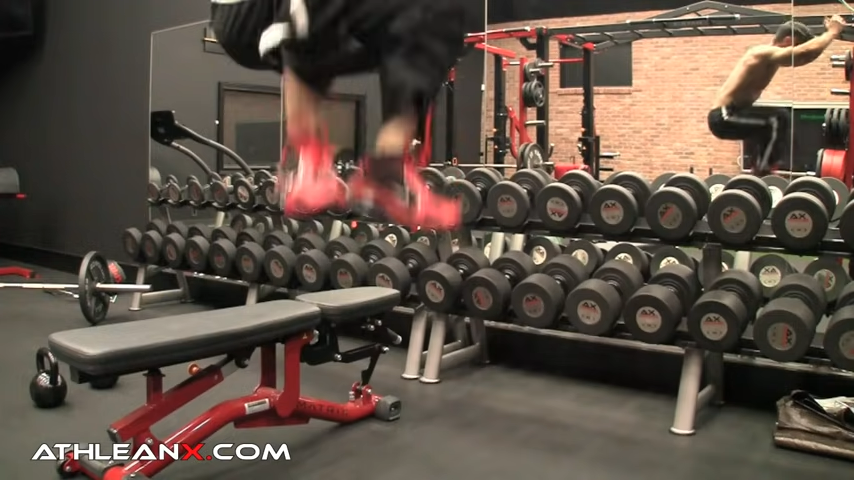
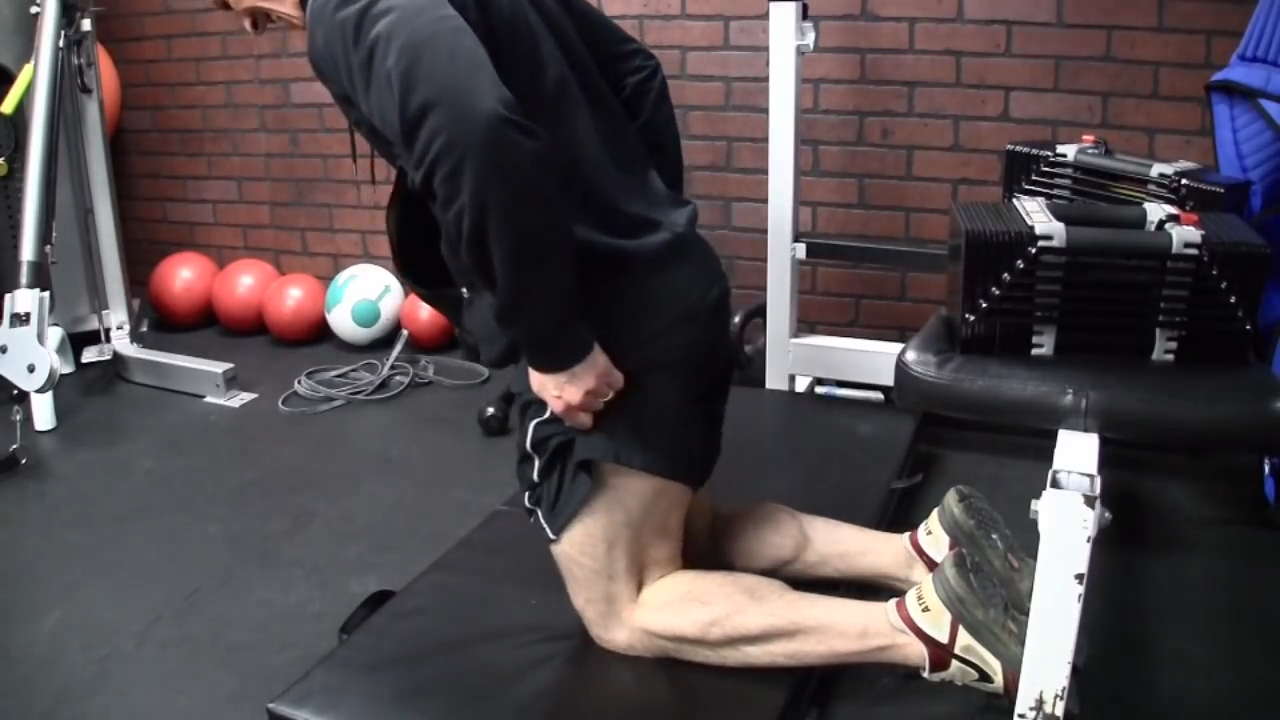
Begin with your butt sitting on your heels. Then, when you are ready to light a fire in your calves, slowly launch your body out, leaning forward with core engaged, as I show you in the exercise. Use only as much range of motion as you need to feel the calf muscles kick in. A limited range of motion is fine if that’s what it takes to set those calves on fire.
CALF LAUNCHERS
The only thing holding me up from falling flat on my face is an incredibly strong contraction of the calves.
If you do this, I guarantee you’ll feel a stronger contraction than with any other calf exercise you’ve ever done. This move trains the calves like none other!
For example, doing heavy weight 300 lb barbell calf raises if you are a 150 lb person will do nothing to overload your calves. You are already carrying the entire weight of your body during single leg stance in the swing phase of gait.
This is not a new challenge.
What I am showing you here WILL be an incredible overload for your calves!
And believe me… you will have sore calves the following day.
EXAMINING HOW THE CALF MUSCLES ARE INVOLVED
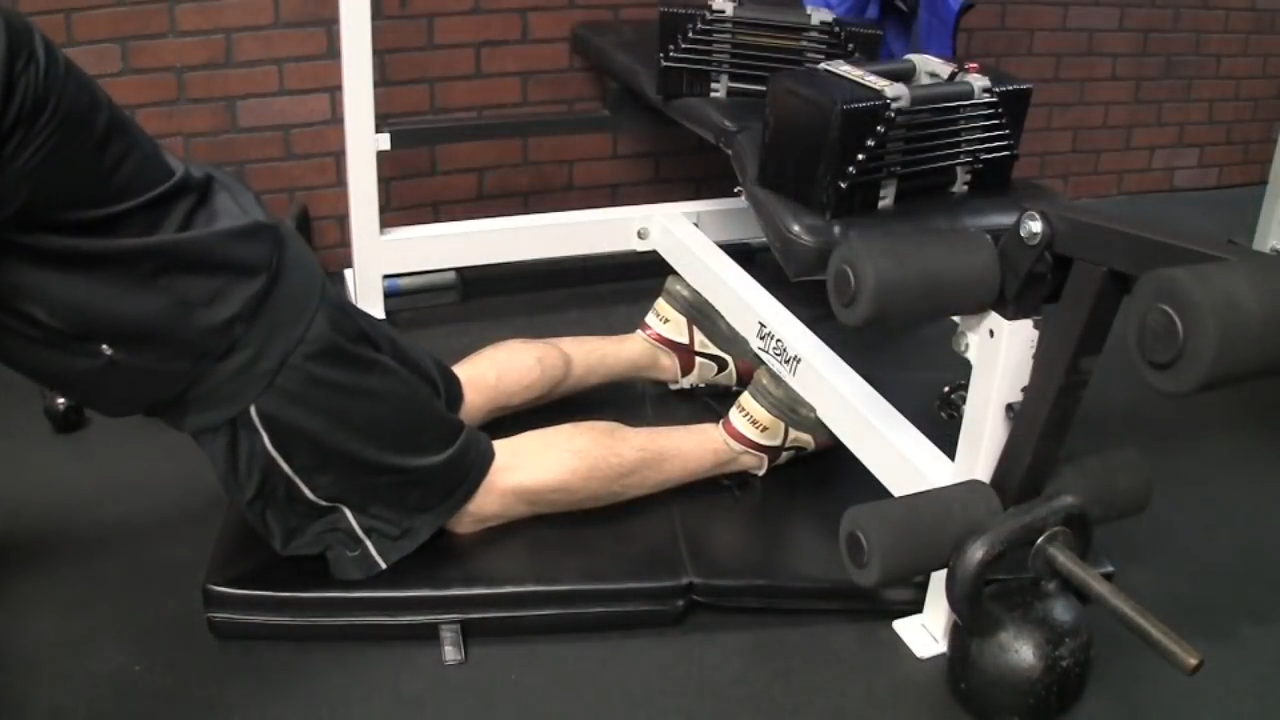
This movement demands a sudden and extremely high level of contraction from both the soleus and the gastroc muscles in your calves.
The more knee flexion involved (as it is in the beginning of the exercise) the more you will be working your soleus.
The soleus is a really important component of your calves. It’s the muscle that lies beneath the more visible gastroc.
As you develop this you can start to build that soleus and push out the gastroc adding more size and definition to your calves. As you get stronger and can extend your body even further out against gravity, the more you will be working the gastroc as well.
The cool part about this move is that I move from a flexed knee position to an extended knee position. So I’m actually activating more gastroc as I get myself further out.
As I get even stronger in the exercise I can actually get more and more gastroc because I can extend even further out.
If you want, you can start that right away by putting a physioball out in front of you to get more activation, because you can actually lean on it as an assist to get you there.
Aim to complete as many reps as you can until failure for each set of this exercise to strengthen your calf muscles. Perform a few sets at a time with plenty of rest between rounds and do this 2-3 times per week to increase the size of those stubborn calf muscles.
Don’t try to rely on the same calf exercises over and over again despite the fact that they are not giving you the calf growth and size that you are looking for. Remember, no dedicated calf workouts necessary!
In order to get your calves to grow bigger you have to start incorporating an element of spontaneous instant contraction with a high degree of tension.
This is a solid calf exercise to do exactly that!
Remember, if you want to build massive calves it’s not about how many exercises or reps you do. It’s about doing quality reps in the way the calves prefer to work, with a high tension overload in a spontaneous manner. It is possible to replicate this at home with no equipment using the simple exercise I showed you above. Incorporate this into your weekly leg workout routine for optimal results.
If you’d like to develop stronger more functional muscles at home check out our ATHLEAN-X programs.
- Direct calf training doesn’t work as well for calf development as high tension spontaneous contraction which is a high level of tension generated in a single contraction over a quick period of time
- Athletes naturally have great calf development because the running, jumping and cutting in multiple directions during sports creates that high tension spontaneous contraction
- To replicate this at home, first anchor your feet under a piece of furniture and then perform a quick launching action to get your calves to fire and create the high tension spontaneous contraction.
- You can use a physioball assist to help you get even more gastroc activation.
- This effective calf exercise should leave you with sore calves the following day! Incorporate it into your regular leg workouts and you’ll see a difference quickly.