


HOW TO DO WRIST CURLS PROPERLY
Guys, the fact is that most people are doing Wrist Curls wrong, setting themselves up for weak forearms.
If you’re cranking out reps without the right grip, starting position, or resistance, you’re wasting your time—and risking injury.
It doesn’t matter if you’re doing a Seated Wrist Curl, Standing Wrist Curl, or using a single D handle, how you set up determines whether this movement increases grip strength or makes sure you just end up with sore wrists.
Your choice for Wrist Curls and your grip style (overhand grip, underhand grip, or even pronated grip) dictates which muscles you’re really hitting—forearm flexors or forearm extensors.
Too heavy? You’ll compromise form and strain your wrists.
Too light? You’re barely doing anything.
Don’t fall into the trap of thinking Wrist Curls are just another one of those throwaway upper body exercises.
Done right, this move increases wrist flexibility but also boosts overall forearm strength and protects against injury.
Let’s discuss how to do Wrist Curls the right way!
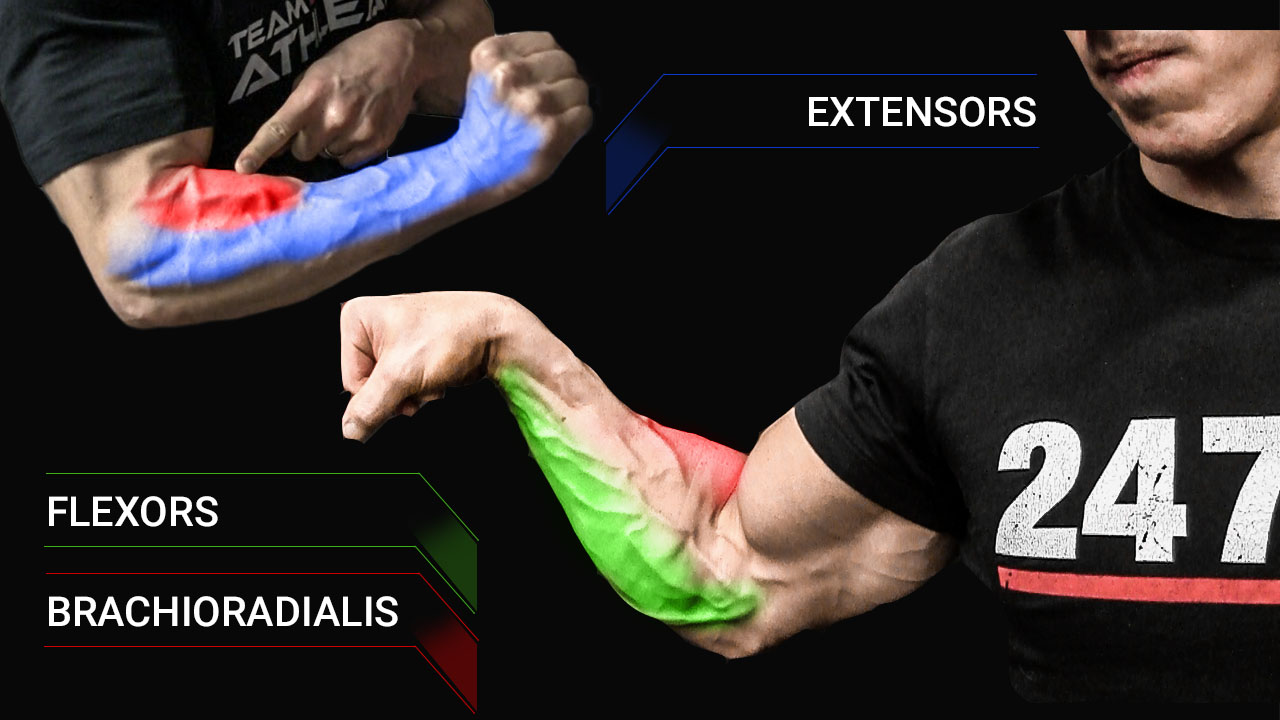
WRIST CURLS: MUSCLES WORKED
When it comes to forearm training, mastering the mind-to-muscle connection is key for getting the most out of wrist curl exercises.
Whether you’re performing a Regular Wrist Curl, Reverse Wrist Curl, or Wrist Extension, focusing on your wrist flexors and forearm muscles ensures proper engagement and maximizes results.
These isolation exercises target both wrist flexor and extensor muscles, making them essential for improving grip strength and forearm strength.
For best results, choose weights that match your fitness level and allow you to maintain a full range of motion without risking wrist strains or sore wrists.
From Seated Wrist Curls using a flat bench to standing variations with handheld weights, proper body position and steady motion are crucial.
The correct grasp on weights—whether using an underhand, overhand, or supinated grip—ensures that your forearm workouts build a strong grip and well-developed forearm muscles.
Start with lighter weights to establish a strong comfort level, gradually progressing to heavier weights as your strength increases.
Here are the major muscle groups that are worked during the Wrist Curl exercise.
FLEXORS
The wrist flexors are the primary drivers of Wrist Curls.
Located on the underside of the forearm, these muscles are responsible for flexing the wrist, curling the weight toward your body, and creating that forearm burn you crave.
Strong flexors not only improve grip strength but also add significant thickness to your forearm, giving you that powerful look.
EXTENSORS
On the flip side, the wrist extensors are crucial for wrist stability and strength, especially during Reverse Wrist Curls.
The extensor muscles work together to extend the wrist and resist against the weight, balancing out your forearm development.
They prevent your wrists from collapsing under pressure, ensuring that every rep counts.
BRACHIORADIALIS
The brachioradialis steals the show when it comes to forearm aesthetics.
Positioned on the top of your forearm, this muscle works hard during Reverse Curls and Wrist Extensions, adding size and definition.
It bridges the gap between your biceps and forearm, helping you flex the elbow and stabilize the wrist during heavy lifts.
For forearms that command attention, you can’t afford to skip this muscle.
HOW TO DO WRIST CURLS
To get the most out of Wrist Curls and build serious upper body strength, nailing the starting position is essential.
You can use handles, a resistance band, or weight plates, but your setup determines how well you target the wrist extensor muscles and avoid injury.
Here’s how you can perfect your Wrist Curl technique:
WRIST CURL
HOW TO DO THE WRIST CURL:
- Stand tall, gripping a dumbbell or barbell with palms up and your knuckles facing the floor. Keep your core tight and let your arms hang naturally in front of you.
- From this position, keep your elbows locked to your sides and curl the weight up by flexing your wrists. Focus on squeezing your forearm muscles at the top—this is where the growth happens.
- Slowly lower the weight back down in a controlled motion, letting your wrists fully extend for that deep stretch.
- Repeat for reps, keeping the movement isolated to your wrists. Don’t let your elbows drift or your shoulders take over.
WHAT MAKES IT EFFECTIVE: This movement brings more of the tension into your forearms and keeps your wrists in the perfect position to handle the load, ensuring the work stays where it belongs—on your forearms, not your upper body.
BACKPACK CLASSIC WRIST CURL

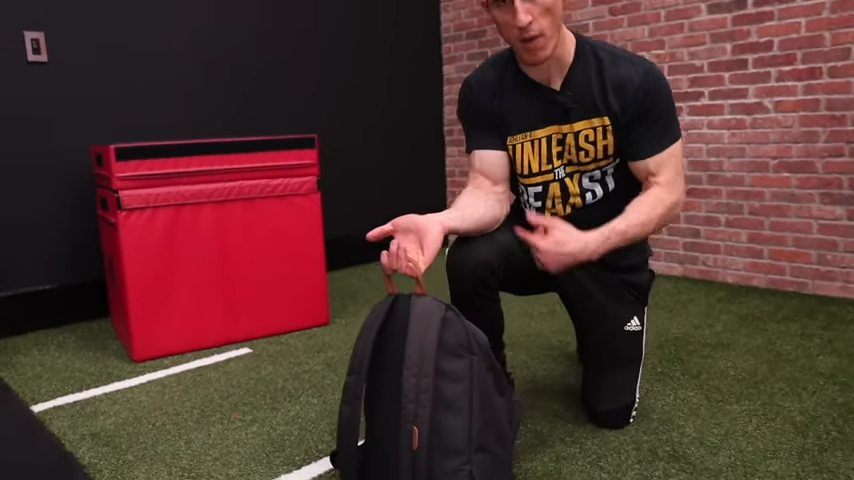
HOW TO DO THE BACKPACK CLASSIC WRIST CURL:
- Get into a seated position with your elbow resting on your knee.
- Grab the backpack by the top handle with an underhand grip, ensuring your forearm is angled down and ready to curl.
- Use your wrist to curl it up, bringing the handle into contact with your forearm as you squeeze at the top.
- Take your time returning to the starting position with full control and repeat.
WHAT MAKES IT EFFECTIVE: By resting your elbow on your knee, you ensure the backpack stays off the ground, providing the perfect selection of weights for continuous tension. This setup maximizes forearm engagement and is a killer move for serious forearm growth, even if you don’t have access to a full gym.
PRONE WRIST CURL
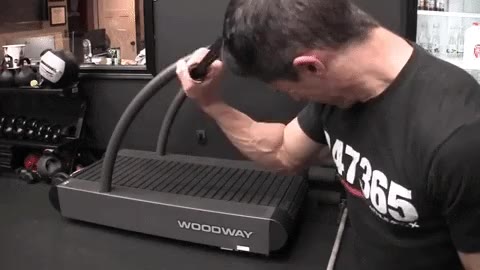
HOW TO DO PRONE WRIST CURLS:
- For the starting position, grab a cable handle attachment at shoulder height using an overhand grip, palms facing away. This setup ensures you hit the wrist extensor muscles hard.
- Bend your elbow slightly to keep your biceps out of the movement.
- Focus on flexing your wrist forward, then return to the neutral position in a controlled manner. The key is to make sure the contraction happens in the forearm, not the upper arm.
- No cable machine? No problem. Swap it out with a resistance band for the same results.
- Single-joint resistance exercises like this are just as effective with bands as they are with traditional weight training exercises using weight plates.
WHAT MAKES IT EFFECTIVE: This variation forces a stronger contraction in the extensor muscles, taking the biceps out of the equation. If you’re chasing that roadmap of veins, the Prone Wrist Curl is your go-to. Whether seated or standing, this move zeroes in on your forearms for maximum pump and vascularity.
BACKPACK EXTENSOR WRIST CURL
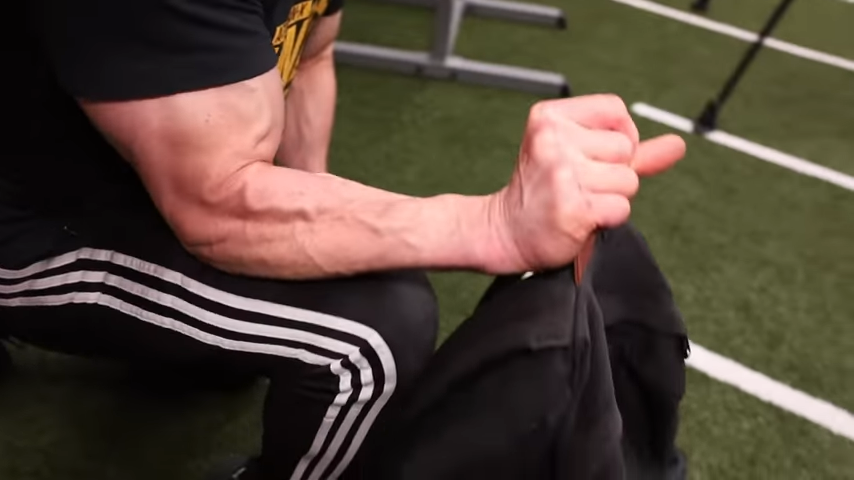
HOW TO DO BACKPACK EXTENSOR WRIST CURLS:
- In a seated position with your elbow on your knee, grab the top handle of the backpack with an overhand grip. Make sure your hand is fully extended, with your wrist ready to move.
- Curl the backpack up by lifting your hand back towards you, focusing on engaging the wrist extensors. Keep it controlled and bring the handle into contact with your forearm at the top.
- Slowly lower back to the starting position and repeat, keeping tension on the muscles throughout the movement.
WHAT MAKES IT EFFECTIVE: By elevating your elbow on your knee, you’re creating just enough height to challenge those forearm extensors for maximum growth. It’s a simple move, but it brings serious results by isolating the muscle in a way that mimics more advanced setups without needing a bench about shoulder height or specialized equipment.
WRIST CURLS: COMMON MISTAKES
If you’re not seeing the forearm growth you want, chances are you’re making some of these Wrist Curl mistakes.
Let’s break down each one so you can fix them and start getting the results you’re after.
Fix these mistakes, and you’ll not only see better forearm development but also improve your grip strength and wrist stability.
Stop cheating your reps, and start training like you mean it!
USING YOUR SHOULDERS AND ELBOWS
A common issue is letting your elbows drift or your shoulders shrug during Wrist Curls.
This takes tension off your forearms and shifts it to your upper body.
Remember, your shoulders and elbows should be completely still.
Lock those elbows in place against your thighs, whether you’re sitting on a bench with knees at a 90-degree angle or standing.
Keep your shoulders down and relaxed and let your forearms do all the work.
SPEEDING THROUGH REPS
Rushing through Wrist Curls is a recipe for wasted effort.
If you’re just bouncing the weight up and down, you’re relying on momentum instead of muscle engagement.
Slow it down.
The real gains come when you control every inch of the movement.
Focus on squeezing at the top and resisting gravity as you lower the weight. Your forearms should be burning by the time you finish each set.
IMPROPER SETUP
How you set up your wrist curl matters more than you think.
If you’re sitting, make sure your knees are bent at a 90-degree angle with your forearms fully supported by your thighs.
Your wrists should hang just past your knees, not too far forward or backward.
This ensures the full range of motion without putting unnecessary strain on your wrists.
If you’re standing, keep your arms at your sides with your wrists positioned for optimal control.
OVERLOADING WITH TOO MUCH WEIGHT
Ego-lifting is a big problem with wrist curls.
Trying to lift more weight than you can handle sacrifices form and increases your risk of injury.
Instead of focusing on how heavy you can go, prioritize quality reps.
Choose a weight that lets you move through the full range of motion while maintaining control.
Remember, it’s better to feel the muscle working with lighter weights than to struggle through bad reps with heavier ones.
IGNORING THE NEGATIVE
Most lifters put all their focus on curling the weight up and then let it drop back down with zero control.
That’s a big mistake!
The lowering phase (the negative) is just as important as the lift.
Slowly lower the weight, making sure your forearms are under tension the entire time.
This will maximize muscle engagement and accelerate your growth. Embrace the burn—this is where the magic happens!
Don’t overlook wrist curls if you want forearms that stand out and a grip that won’t quit.
Whether you’re aiming to boost your lifts, prevent wrist injuries, or just add size and definition, mastering this exercise is a must.
Lock in your form, stay consistent, and watch your forearms go from average to dominant.
If you’re looking for a training program that covers every muscle in the body, we’ve got you covered. Check out our ATHLEAN-X programs to see which is the best fit for your goals and fitness level.
- Wrist curls are essential for developing strong forearms, improving grip strength, and enhancing wrist stability to prevent injuries.
- Here’s how to perform Wrist Curls with a dumbbell or barbell:
- Stand with purpose by keeping your feet shoulder-width apart, chest up, and grip a dumbbell or barbell with palms facing up, knuckles pointing down.
- Engage your core to stabilize your stance and let your arms hang naturally at your sides. Keep those elbows glued to your ribs.
- Now, curl the weight up using only your wrists. As you lift, focus on squeezing the forearms hard at the top—this is where you’re going to drive the most growth.
- Slowly lower the weight, letting your wrists fully extend for a deep stretch. Don’t rush this part; the eccentric (lowering) phase is where you can pack on serious muscle.
- Stay strict and keep the movement isolated to your wrists. No swinging, no shoulder involvement.
- If your elbows start drifting, you’re shifting tension away from the forearms and cheating yourself out of gains.
WRIST CURLS FAQS
Wrist Curls are one of the most underrated exercises for building forearm strength, improving grip, and increasing wrist stability.
Whether you’re aiming for that strong, veiny look or just want to lift more weight without having your grip give out, Wrist Curls are an excellent exercise to do.
They specifically target the wrist flexors (palms up) and wrist extensors (palms down), which are important for overall forearm development.
Beyond aesthetics, Wrist Curls also help bulletproof your wrists against injuries.
If you’re doing heavy lifts like Deadlifts, Rows, or Presses, stronger forearms and wrists mean better control and reduced risk of strains.
Plus, they’re a must for sports and activities that demand a strong grip—think climbing, grappling, or even carrying heavy grocery bags.
So, if you’re skipping Wrist Curls, you’re missing out on a key element of strength training. Get them in your routine and watch your forearm game level up.
Absolutely — but only if you do them right.
Wrist Curls are a solid way to pack on serious forearm mass, but the key is training them with intention.
If you’re just throwing weight around with sloppy form, don’t expect much growth.
To really build size, you need controlled reps, full range of motion, and consistent tension on the muscles.
Wrist Curls specifically target the wrist flexors (palms up) and extensors (palms down), which are responsible for that thick, dense look in your forearms.
The trick is to focus on quality over quantity.
Slow down the reps, feel the muscle contract, and don’t forget to control the negative (the lowering phase). This is where the gains are made.
But remember, Wrist Curls alone won’t give you massive forearms.
You need to combine them with other compound lifts and heavy grips—think Deadlifts, Farmer’s Carries, and Rows—to really maximize growth.
Nail these fundamentals, and you’ll see your forearms grow thicker and stronger.
The real answer? You should be doing both.
Regular Wrist Curls target the wrist flexors (the muscles on the underside of your forearms), which are key for building size and strength.
But if you’re skipping Reverse Wrist Curls, you’re leaving half your forearm development on the table.
Reverse Wrist Curls hit the wrist extensors (the muscles on top of your forearms), balancing out your grip strength and creating that complete, thick forearm look.
If you’re just hammering Wrist Curls and ignoring the reverse, you’ll end up with imbalanced forearms, which can lead to weak points and even injuries down the line.
Plus, balanced strength in your flexors and extensors helps with everything from lifting performance to avoiding wrist strains.
Bottom line: Don’t pick one over the other. Mix them into your routine for full forearm growth and strength.
REFERENCES

Jeff Cavaliere M.S.P.T, CSCS
Jeff Cavaliere is a Physical Therapist, Strength Coach and creator of the ATHLEAN-X Training Programs and ATHLEAN-Rx Supplements. He has a Masters in Physical Therapy (MSPT) and has worked as Head Physical Therapist for the New York Mets, as well as training many elite professional athletes in Major League Baseball, NFL, MMA and professional wrestling. His programs produce “next level” achievements in muscle size, strength and performance for professional athletes and anyone looking to build a muscular athletic physique.


")

")

")

")
")

")


