


BENEFITS OF THE CHEST SUPPORTED ROW
Guys, today, I want to dive straight into the Chest-Supported Row, a powerhouse move for building a muscular, broad back.
Most importantly, I want to guide you through this exercise with the precision and focus it deserves.
This isn’t just about lifting; it’s about sculpting your upper body by engaging the right muscles—the latissimus dorsi, trapezius, and rear deltoids—with pinpoint accuracy.
With the chest supported row we need to leverage the mind-muscle connection to transform every rep into a step towards greater strength and size.
I’ll show you how to perfect your form, adjust your angles, and amplify the effectiveness of your rows, whether you’re using barbells, dumbbells, or T-Bar setups.
If you’re aiming to elevate your upper-body routines and carve out an athletic physique, stick with me.
It’s time to make the Chest-Supported Row work harder for you. Let’s get started and row towards a stronger, more unstoppable you.
MUSCLES ACTIVATED BY THE CHEST-SUPPORTED ROW
The chest-supported row stands out in upper-body training, targeting key muscles from the broad back to the intricate rotator cuff.
Embracing variations like the Chest-Supported Dumbbell Row, T-Bar Row, and Rear Delt Row amplifies its effectiveness.
Central to maximizing this exercise’s benefits is the mind-to-muscle connection, a critical factor that transforms mechanical motion into targeted muscle activation, fostering significant strength and muscle growth.
Let’s explore the primary and secondary muscles engaged by the Chest-Supported Row.
By emphasizing proper technique, suitable weight selection, and the importance of a deliberate focus on each muscle group, we aim to enhance your workout’s impact, ensuring every row contributes to your upper-body strength and muscle mass objectives.
LATISSIMUS DORSI
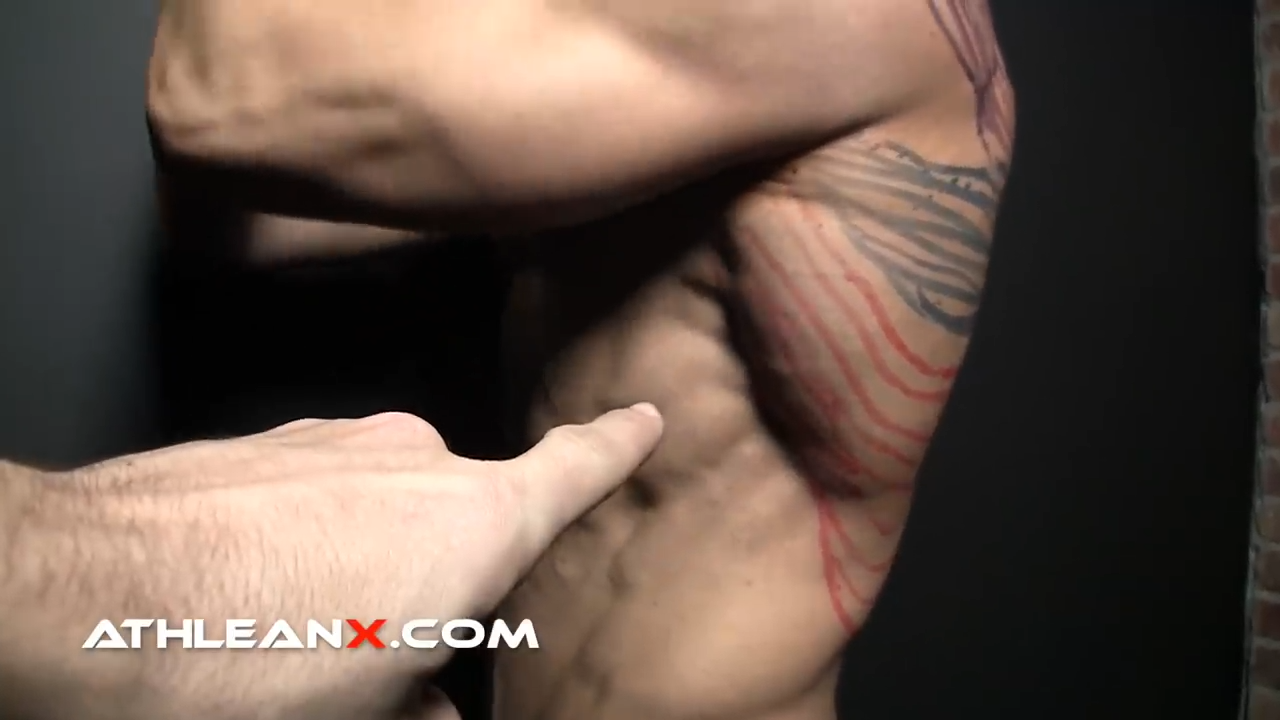
The latissimus dorsi, referred to simply as the “lats,” is a large, flat muscle on the back that stretches to the sides, behind the arm, and is partially covered by the trapezius on the back near the midline.
Think of it as the muscle that gives the back its width and contributes to the V-shape appearance in well-developed physiques.
The latissimus dorsi’s most important functions are:
- Pulling Motions: Essential for movements that involve pulling towards the body or pulling oneself up, such as in pull-ups or rowing, due to its role in shoulder adduction and extension.
- Stabilization: It stabilizes the lower back via its connection to the thoracolumbar fascia, crucial for lifting activities and maintaining posture.
- Arm Movement: Facilitates the downward and backward motion of the arm, supporting activities like swimming and throwing.
- Breathing Support: Aids in forceful expiration, such as coughing or blowing, by its action on the ribs, although this is a secondary function compared to its primary roles in movement and stabilization.
- Medial (Internal) Rotation of the Humerus: The latissimus dorsi also plays a key role in the medial (internal) rotation of the arm at the shoulder joint, rotating the arm towards the body, which is crucial for various activities that require arm rotation inward.
UPPER AND LOWER TRAPEZIUS
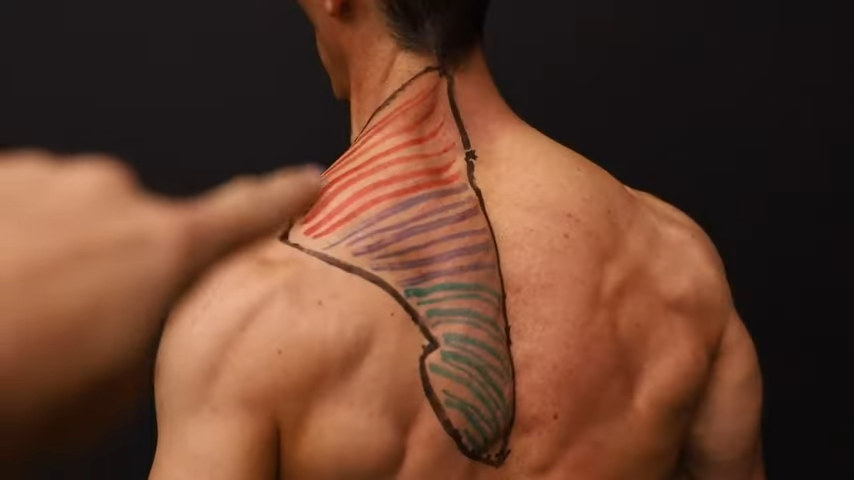
The “traps” are a triangular-shaped muscle stretching from the neck, across the middle of the back, and out towards the shoulders.
It is divided into upper and lower parts, each playing unique roles in the movement and stabilization of the shoulder and neck.
The upper trapezius stretches from the back of the neck and the base of the skull to the shoulders. It is the muscle that adds to the contour of the neck and the slope of the shoulders, contributing to a strong, poised posture.
The lower trapezius extends from the mid-back to the shoulder blades. It is less visible than the upper trapezius but is crucial for a well-aligned and stable shoulder girdle.
Upper trapezius functions include:
- Elevation of the Scapula: Raising the shoulder blades, as in shrugging the shoulders, which is vital for lifting movements.
- Extension and Lateral Flexion of the Neck: Allows the head to tilt back or to the side, playing a key role in head movement and neck stability.
- Upward Rotation of the Scapula: Assists in lifting the arms above the head, essential for overhead activities.
Lower trapezius functions include:
- Depression of the Scapula: Lowering the shoulder blades, which is important for movements that require reaching down or stabilizing the shoulders.
- Upward Rotation of the Scapula: Works in conjunction with the upper trapezius to allow the arms to be raised above the head, providing balance and stability to the upper body.
- Adduction (Retraction) of the Scapula: Pulls the shoulder blades together, which is crucial for good posture and strength in pulling movements.
Both the upper and lower trapezius work together to stabilize the shoulder blades, providing a foundation for strong, functional upper body movements.
They are involved in virtually all movements of the arms and shoulders, as well as in maintaining posture and alignment of the head and neck.
REAR DELTOIDS
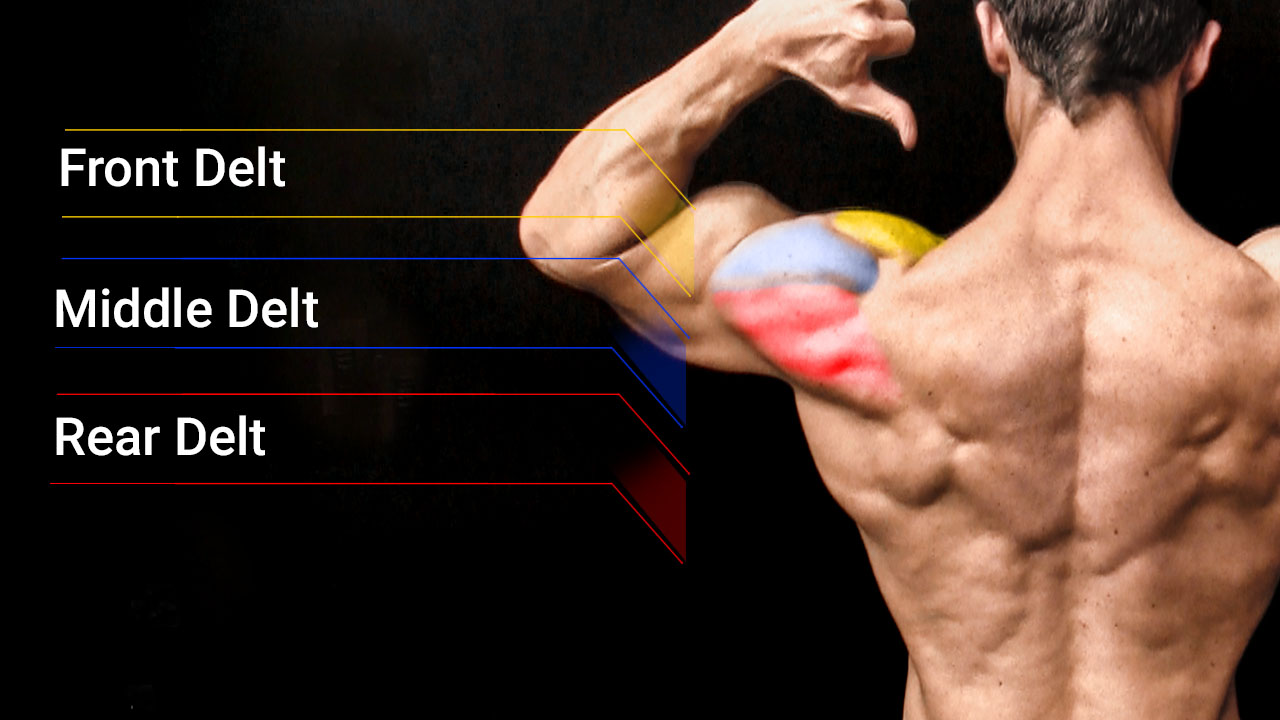
The rear deltoids are the posterior part of the deltoid muscle that caps the shoulder.
This muscle group is crucial for the rounded appearance of the shoulder and plays a role in the overall function and aesthetics of the upper body.
The rear delts are not as prominent in size as the front and middle deltoid muscles, but they are essential for balanced shoulder development and function.
They are located at the back of the shoulder and contribute to the width and thickness of the upper back when viewed from the side.
The rear delts are responsible for the following functions:
- Horizontal Abduction: Moving the arms away from the body in a horizontal plane, which is fundamental in movements like reverse flyes and face pulls, enhancing shoulder stability and width.
- External Rotation of the Shoulder: Rotating the arm away from the center of the body, a crucial movement for shoulder health and in performing various lifting activities with proper form.
- Extension of the Shoulder: Moving the arm backward behind the body, important for activities that involve pulling or throwing.
- Stabilization of the Shoulder Joint: The rear delts work with other muscles of the rotator cuff to stabilize the shoulder joint during movement, helping to prevent injuries and maintain a healthy shoulder function.
The development and strengthening of the rear deltoids are essential for achieving a balanced, strong, and aesthetically pleasing upper body.
They play a key role not only in the visual symmetry of the shoulders but also in the functional movement patterns that involve pulling, lifting, and rotating the arms, contributing to overall shoulder health and performance.
HOW TO DO THE CHEST SUPPORTED ROW
Now that you know exactly which muscles we’re going after with the Chest-Supported Row, we can get into the nitty gritty of how to do it.
Let’s break down the technique for performing the Chest-Supported Row, ensuring you maximize its effectiveness in your workouts.
CHEST SUPPORTED ROW

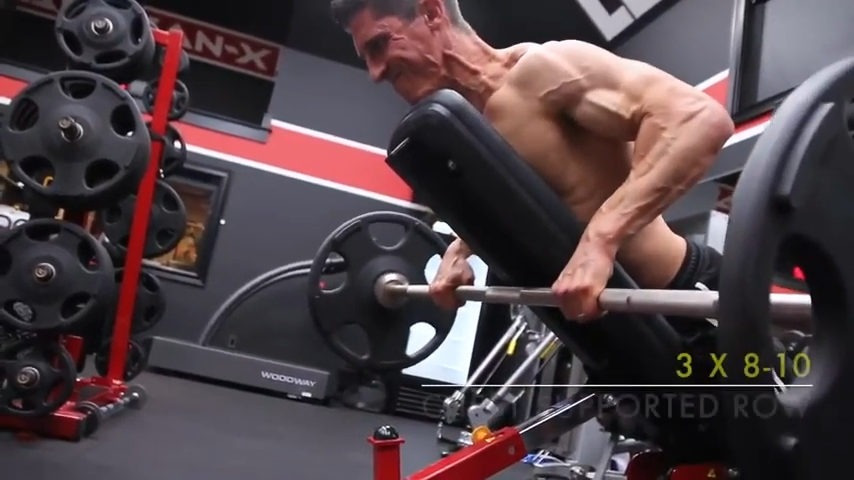
HOW TO DO THE CHEST SUPPORTED ROW:
- Adjust an incline bench to about a 30- to 45-degree angle. The exact angle might depend on your preference and the bench you’re using. Ensure the bench is stable.
- Place a barbell on the floor at the end of the bench where your head will be. Load the barbell with the appropriate weight for your fitness level.
- Lie face down on the bench with your chest and stomach firmly against the pad. Your legs should be extended behind you with your feet on the ground for stability. Reach down and grab the barbell with both hands, using a grip slightly wider than shoulder-width. Your arms should be fully extended downward.
- Tighten your core and draw your shoulder blades back and down as you pull the barbell towards the lower part of your ribcage. Ensure your elbows remain tucked in close to your sides, refraining from allowing them to splay outward. Execute the lift with deliberate control, emphasizing the engagement of your back muscles for the lift, instead of relying on the strength of your arms.
- Pause momentarily at the peak of the movement, then smoothly lower the barbell back to the starting position with control to complete one repetition.
- Breathe out as you pull the barbell towards you and inhale as you return to the starting position.
WHAT MAKES IT EFFECTIVE: The Chest Supported Row effectively targets and strengthens the upper back muscles, which are often neglected, by offloading pressure on the low back and enhancing focus on these muscles, particularly when performed with proper form and a slight flare of the elbow joint.
CHEST SUPPORTED TOUCH ROW

HOW TO DO THE CHEST SUPPORTED TOUCH ROW:
- Begin by lying face down (in a prone position) on an incline bench, gripping a pair of heavier dumbbells, with a second, lighter pair of dumbbells positioned end-up on the floor, if possible.
- Start rowing with the heavier dumbbells and touch the lighter set on the floor at the bottom of each row.
- Once fatigued with the heavier dumbbells, switch to the lighter pair and continue performing reps to push through the burn.
WHAT MAKES IT EFFECTIVE: The Chest Supported Touch Row is effective because its prone position on an incline bench protects the lower back while allowing for lat fatigue without compromising safety, and the unique touch technique with an additional set of dumbbells provides a stretch and enables drop sets for sustained metabolic training, enhancing the exercise’s effectiveness while ensuring low back protection.
COMMON MISTAKES IN THE CHEST SUPPORTED ROW
In the journey to perfect the Chest-Supported Row, a staple in the arsenal of upper-body exercises, there are plenty of common pitfalls that can hinder progress, affect form, and potentially lead to injury.
Understanding these mistakes is crucial for anyone looking to maximize their strength gains and ensure a comprehensive, effective workout routine.
Here’s what you need to know to avoid common errors and optimize your chest-supported row form.
OVERLOADING THE BAR
A frequent mistake is attempting to lift heavier weights than one can manage with perfect form.
The allure of using the heaviest weights, especially on machines like the Chest-Supported Row machine or T-Bar Row machines, can compromise the intended movement pattern and put undue strain on the shoulders and spine.
Start with a lighter weight that allows for a full range of motion and gradual progression to heavier loads.
This approach ensures the largest muscles and secondary muscles involved, such as the rear deltoid (a kite-shaped muscle crucial for shoulder stability) and biceps, are effectively engaged without risking form.
IGNORING THE IMPORTANCE OF GRIPS AND POSITION
The grip—whether overhand, underhand, wide, or neutral—plays a significant role in targeting the desired muscle groups.
For example, a neutral grip can emphasize the rear delts and reduce bicep activation compared to a pronated grip, which might engage the upper back more broadly.
Similarly, the initial position on the inclined bench, ideally set between a 30 to 45-degree angle, ensures that the spine remains in a neutral position, safeguarding against unnecessary stress during the rowing body motion.
SKIPPING THE SCAPULAR MOTION
The act of retracting and protracting the shoulder blades—a crucial component of the Chest-Supported Row, whether you’re performing the Chest-Supported Barbell Row, T-Bar Row, or dumbbell variations—often goes overlooked.
Proper scapular motion ensures that the row not only strengthens the larger back muscles but also the rotator cuff and the smaller stabilizers around the scapula.
Failing to engage these muscles can lead to an incomplete workout and missed strength gains.
NEGLECTING THE BENCH ANGLE AND BODY POSITION
Another common oversight is the incorrect setup of the adjustable bench or neglecting to maintain a proper body position throughout the exercise.
The weight bench angle, which should be between 30 to 45 degrees, is vital for targeting the upper back without overloading the lower back.
An incorrect angle or an improper bent-over position, such as lifting the chest off the adjustable weight bench or not maintaining a neutral spine, can diminish the effectiveness of the exercise and increase the risk of injury.
OVERLOOKING PROGRESSION AND VARIATION
Finally, becoming too comfortable with a single variation of the Chest-Supported Row can lead to plateaus in strength and muscle development.
Integrating variations like the chest-supported rear delt row, alternating Chest-Supported Row, or even incorporating resistance bands, can challenge the muscles in new ways, promoting continued growth and strength improvement.
Additionally, including Chest-Supported Row alternatives and progression exercises ensures a comprehensive approach to upper-body strength, addressing both major muscle groups and the more nuanced muscles involved in arm flexion and shoulder stability.
By avoiding these common mistakes and focusing on proper form, grip, position, and progression, practitioners of the Chest-Supported Row can achieve significant improvements in muscle size, strength, and overall upper-body conditioning.
Remember, the goal is not only to lift but to lift intelligently, ensuring a balanced, effective session each workout day.
CHEST-SUPPORTED ROW ALTERNATIVES
In the realm of strength training, the Chest-Supported Row stands out as a pinnacle exercise for targeting the fan-shaped muscle of the upper back, enhancing muscle strength without the added spinal strain.
However, even within this category, there are numerous variations and alternatives that can offer strength athletes a comprehensive back workout.
These alternatives not only vary the muscle activation but also introduce different body motions and positions for chest support, providing a well-rounded approach to your daily routine.
BENT-OVER ROW WITH OVERHAND GRIP
The standard Bent-Over Row with an overhand grip is a great alternative that emphasizes the shoulder blade muscles and bicep activation, crucial for a balanced upper body routine.
It requires no special equipment beyond a barbell or dumbbells and can be performed with heavy weights, promoting muscle strength and endurance.
INCLINE DUMBBELL ROWS
Utilizing a flat bench set at a 45-degree angle, Incline Dumbbell Rows allow for a controlled movement under less spinal movement, targeting the upper back and incorporating unilateral training to balance strength on both sides of the body.
T-BAR ROWS AND CHEST-SUPPORTED T-BAR ROW
T-Bar Rows, including the banded and conventional chest-supported T-Bar Row, offer a unique position for chest support and allow for the use of heavy loads, simulating a similar motion to the row but with a different body motion and angle, enhancing the response to resistance training.
SINGLE-ARM CHEST-SUPPORTED ROW
Performed on a Chest-Supported Row bench or a Chest-Supported Adjustable Row bench, this exercise allows for focused unilateral training, improving muscle balance and strength across the back. It’s an excellent accessory movement for those looking to break away from barbells.
CHEST-SUPPORTED MACHINE ROW AND CABLE ROW
For those seeking a more stable alternative, the Chest-Supported Machine Row and Cable Machine Row exercises provide fixed motion paths and adjustable resistance, facilitating a focus on muscle strength with controlled movement.
The seated Chest-Supported Cable Row, in particular, offers a unique variation that incorporates a seated position, maintaining a neutral spine while allowing for adjustments in seat height and chest support height.
HELMS ROW
Named after a strength athlete, the Helms row, typically performed with an underhand grip and focusing on a 45-degree upper arm position, emphasizes bicep muscle pump and shoulder stability, serving as a valuable addition to any upper body routine.
Each of these alternatives contributes uniquely to the enhancement of muscle strength and the sculpting of the upper body.
When incorporated into a strength training routine, they offer benefits of weight lifting such as improved muscle strength, better posture, and an increased bench press load capacity.
It’s recommended to alternate these exercises with conventional Chest-Supported Row variations to keep the body responding to new challenges, ensuring continuous improvement in muscle strength and endurance.
Remember, regardless of the alternative chosen, maintaining correct form, keeping the movement under control, and taking appropriate 2-3 minute breaks are crucial for maximizing the benefits while minimizing the risk of injury.
Mastering the Chest Supported Row is a pivotal step towards achieving a powerful upper body.
By focusing on proper form and engaging the targeted muscles, you can unlock significant strength gains and muscle development.
Ready to take your upper body to the next level?
Check out our complete upper body workout program for a comprehensive training regimen designed to maximize your results.
If you’re looking for a training program to get you strong and ripped from head to toe, be sure to try our Program Selector and grab the ATHLEAN-X program that best matches your current training goals. We’ve got something for everyone… from beginners to experienced lifters.
- The Chest Supported Row is one of the best exercises for targeting your back, including the lats, rear delts, and biceps. Here’s how to perform it:
- Set an incline bench row to a comfortable angle, ideally between 30 to 45 degrees, ensuring stability for your workout.
- Position a barbell at the end of the bench where your head rests and load it with the proper weight.
- Lie face down on the bench, aligning your chest and stomach with the pad, while extending your legs behind you for stability.
- Grab the barbell with a grip slightly wider than shoulder-width, keeping your arms fully extended downwards.
- Activate your core and draw your shoulder blades back as you pull the barbell, maintaining controlled movement and keeping your elbows close to your body.
- Temporarily hold the peak position of the movement, then lower the barbell back to the starting position gradually and with control.
- Exhale as you pull the barbell towards you and inhale as you return to the starting position, completing one repetition.
- If you’re new to the exercise, be sure to start with a lighter weight until you master the form and execution of the Chest Supported Row.
CHEST SUPPORTED ROW FAQS
The Chest-Supported Row focuses mainly on the upper back muscles, such as the latissimus dorsi (lats) which span the sides of your back, the rhomboids and trapezius (traps) situated between your shoulder blades, and the rear deltoids located at the back of your shoulders.
This exercise also engages the biceps and forearm muscles to a lesser degree as secondary movers.
By supporting your chest on a bench, it helps reduce the strain on your lower back, making it an excellent option for focusing on upper back strength without placing additional stress on your spine.
The main difference between the Chest-Supported DB Row and the Barbell (BB) Row lies in their setup and the impact this has on the body, particularly in terms of muscle engagement and spinal load.
Position and Support: In the Chest-Supported Row, you lie face down on an incline bench. This position supports your chest and reduces stress on your lower back because the bench absorbs much of your upper body weight.
In contrast, Barbell Rows are performed standing, bent over at the waist with the barbell held in front of you. This requires significant lower back stabilization to maintain the correct posture throughout the exercise.
Muscle Engagement: Both exercises zero in on the upper back, activating muscles like the latissimus dorsi, rhomboids, trapezius, and rear deltoids.
However, because the Chest-Supported Row isolates the upper back by removing the need for extensive lower back and core stabilization, it can allow for a more focused engagement of these muscles.
The Barbell Row, on the other hand, engages a wider range of muscles including the lower back, abdominals, and glutes for stabilization, making it more of a compound movement.
Risk of Lower Back Strain: Due to the supported nature of the Chest-Supported Row, there's less risk of lower back strain, making it a safer option for individuals with lower back issues.
The Barbell Row requires a strong core to protect the lower back, and improper form can lead to strain or injury in that area.
Equipment and Versatility: The Chest-Supported Row typically requires a specific bench and can be performed with dumbbells or a barbell.
The Barbell Row needs just a barbell and weights, making it a more accessible exercise that can be easily adjusted for difficulty with weight plates changes.
Yes, Chest Supported Rows are good for targeting the latissimus dorsi, or lats, which are the large muscles on the sides of your back.
By stabilizing your torso on a bench, this exercise allows you to focus on pulling with your arms and back muscles, including the lats, without the need to stabilize your lower back and spine as you would in standing rows.
This focus helps in effectively isolating and working the lat muscles, leading to strength and muscle development in that area.
Additionally, the ability to maintain a consistent form throughout the exercise enhances the effectiveness of targeting the lats.
When referring to the angle for Chest-Supported Rows, it's common to use either a 45-degree or 30-degree incline bench, depending on the specific goals and preferences of the individual.
A 45-degree incline is more common and allows for a comfortable range of motion while targeting the upper back muscles, including the lats, rhomboids, and traps effectively.
This angle is often preferred for its balance between muscle engagement and comfort.
A 30-degree incline positions the body slightly flatter than the 45-degree setup, which can shift the focus slightly more towards the lower traps and lats, offering a different emphasis in muscle engagement.
This angle might be chosen to target specific muscles or to accommodate personal comfort and performance.
Ultimately, both angles are effective for performing Chest-Supported Rows, and the choice between a 45-degree or 30-degree incline can depend on individual training objectives, comfort, and the specific muscles one aims to emphasize.
Experimenting with both angles can be beneficial to understand which works best for you.

Jeff Cavaliere M.S.P.T, CSCS
Jeff Cavaliere is a Physical Therapist, Strength Coach and creator of the ATHLEAN-X Training Programs and ATHLEAN-Rx Supplements. He has a Masters in Physical Therapy (MSPT) and has worked as Head Physical Therapist for the New York Mets, as well as training many elite professional athletes in Major League Baseball, NFL, MMA and professional wrestling. His programs produce “next level” achievements in muscle size, strength and performance for professional athletes and anyone looking to build a muscular athletic physique.


")

")

")

")
")

")


