


HOW TO TRAIN CHEST AND BACK
Guys, a lot of you have been asking about my training routine.
And not just any workout – You want to know about how I’m still training despite an injury to my shoulder and bicep.
Today, I want to take you through my chest and back workout, covering the exercises and the methodology behind them.
Those things aside, there’s one variable in particular that we’re going to focus on: volume.
The fitness world is divided over how to approach volume. Some advocate for high volume, low intensity while others swear by a low volume, high intensity approach.
But what’s the right balance? How do we determine the number of reps to leave in reserve, or decide when to push to failure?
Let’s take a closer look at the ‘sweet spot’ for workout volume, understanding your body’s signals, and making adjustments that cater to your unique fitness journey regardless of your training experience.
ANATOMY OF THE CHEST AND BACK
You have heard me talk about mind muscle connection and how important it is.
If you can’t mindfully contract a muscle to the point of discomfort, then you don’t have a strong mind-muscle connection with that muscle.
And it oftentimes leads to it being somewhat of a weak spot.
The first step to building strong muscles-to-mind connections is to understand the anatomy of the chest and back. That way, you know how to target the muscle more effectively.
Starting with the chest, here’s a rundown of the upper body muscles we’ll be targeting in this chest and back workout.
UPPER CHEST FIBERS (CLAVICULAR)

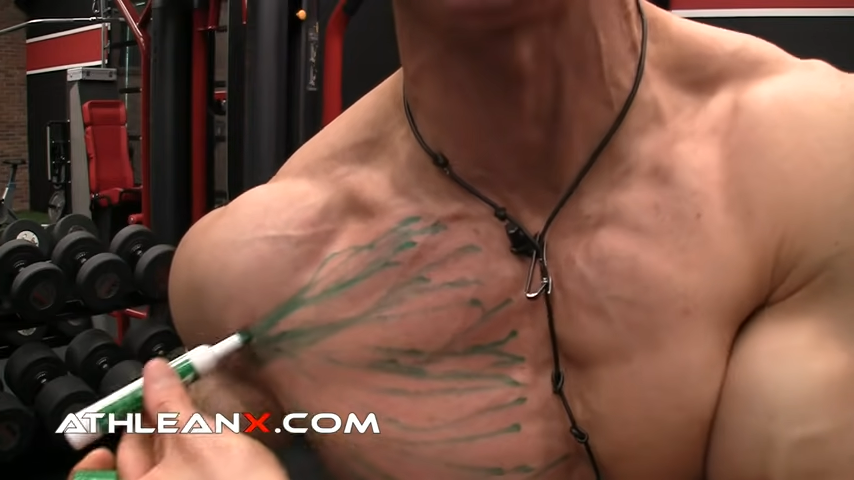
The clavicular head, often referred to as the upper chest fibers, is part of the pectoralis major muscle.
For the upper chest fibers, they originate from the clavicle, which is the long, slender bone that runs across the top of your chest, connecting your sternum (breastbone) to your shoulder muscles.
The upper chest fibers insert into the humerus, which is the upper bone of your arm. Specifically, these fibers attach to a groove in the humerus known as the intertubercular sulcus.
The primary functions of the upper chest fibers include:
- Lifting the Arm Forwards: When you raise your arm in front of you, these muscles are at work.
- Rotation of the Arm: They also help in rotating the arm inward.
- Assisting in Deep Breathing: Although not their primary role, they assist in deep breathing by elevating the ribcage.
In simpler terms, think of the upper chest fibers as the muscles that help you do things like reaching forward to grab something off a shelf, swinging your arm while walking, or even pulling something towards you.
MID CHEST FIBERS (STERNAL HEAD)
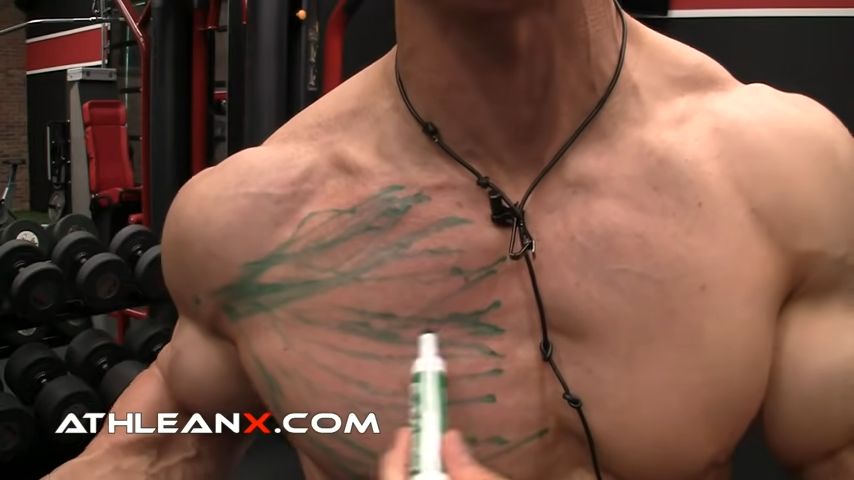
The mid chest fibers (sternal head) originate from the sternum. This part of the muscle also attaches to the cartilage of the first six or seven ribs.
The sternal head inserts into the same place as the upper chest fibers, which is the humerus. It specifically attaches to the lateral lip of the intertubercular sulcus of the humerus.
The sternal head has a few key functions:
- Pulling the Arm Downward and Across the Body: This action is like hugging someone or swinging your arm across your body.
- Rotation of the Arm: Similar to the upper chest fibers, the sternal head helps in rotating the arm inward.
- Assisting in Deep Breathing: By pulling the ribcage downward, it aids in exhaling during forceful breathing.
The mid chest fibers are the muscles you use when you push something away from your chest, like pushing open a heavy door, or when you swing your arms while walking or running.
They play a significant role in movements that involve pushing or pressing with your arms, as well as in providing overall chest strength and stability.
The Barbell Bench Press is a classic example of an exercise that targets the pec major muscles, particularly the mid chest muscle fibers.
LOWER CHEST FIBERS (ABDOMINAL HEAD)
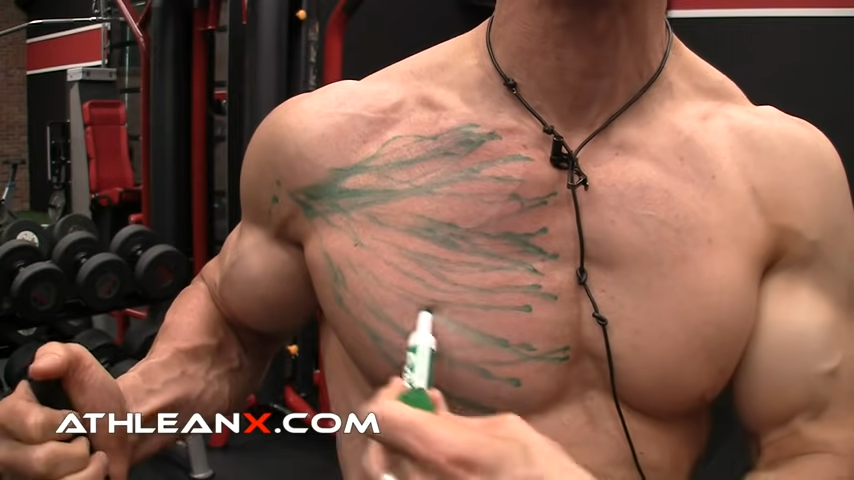
The lower chest fibers, also known as the abdominal head, are another component of the pectoralis major muscle.
These muscle fibers originate from the aponeurosis of the external oblique muscle. This is a broad, flat sheet of tendon-like material located in the lower part of the chest and upper part of the abdomen. It’s connected to the muscles that make up the outer layer of the side of your abdomen.
Like the upper and mid chest fibers, the lower chest fibers also insert into the humerus bone. They attach specifically to the crest of the greater tubercle of the humerus.
The lower chest fibers have several important functions:
- Pulling the Arm Downwards: They are involved in movements where you bring your arms down from raised positions, such as when you lower something heavy.
- Rotation of the Arm: These fibers assist in rotating the arm inward, like when you turn a doorknob.
- Drawing the Arm Closer to the Body: When you pull your arm towards the side of your body, these fibers are at work.
The lower chest fibers are used in actions like pulling a handle down, doing a dip on parallel bars, or even when you swing your arms while walking briskly.
They contribute to the overall strength and shape of the chest, playing a vital role in various arm movements and some aspects of posture.
LATISSIMUS DORSI
Moving on to the back, we start with the latissimus dorsi, commonly referred to as the lats. These are some of the largest muscles in your back, covering a significant area of the lower and middle back.
These broad, fan-shaped muscles start from the lower (lumbar) and middle (thoracic) sections of your spine and connect to the upper arm bone.
When you notice a back that has a distinct V-shape (and overall aesthetic back muscles), it’s usually due to well-developed lats.
The latissimus dorsi are responsible for several key functions:
- Shoulder Extension: This occurs when you move your arm backward, like what happens during a pull-up.
- Shoulder Adduction: This involves moving your arm downward towards your body’s side, as seen in exercises like the Lat Pulldown.
- Internal Rotation of the Shoulder: This action, where your arms rotate towards your body’s center, is facilitated by the lats.
- Spinal Stability: Besides specific back exercises, the lats are crucial for stabilizing the spine, particularly during lifting activities, making them essential for overall body movement and function.
To target the lats, you can use a rowing exercise and a vertical pulling exercise. For example, the Barbell Row and Lat Pulldown are two of the most popular exercises to target the lats.
UPPER AND LOWER TRAPS
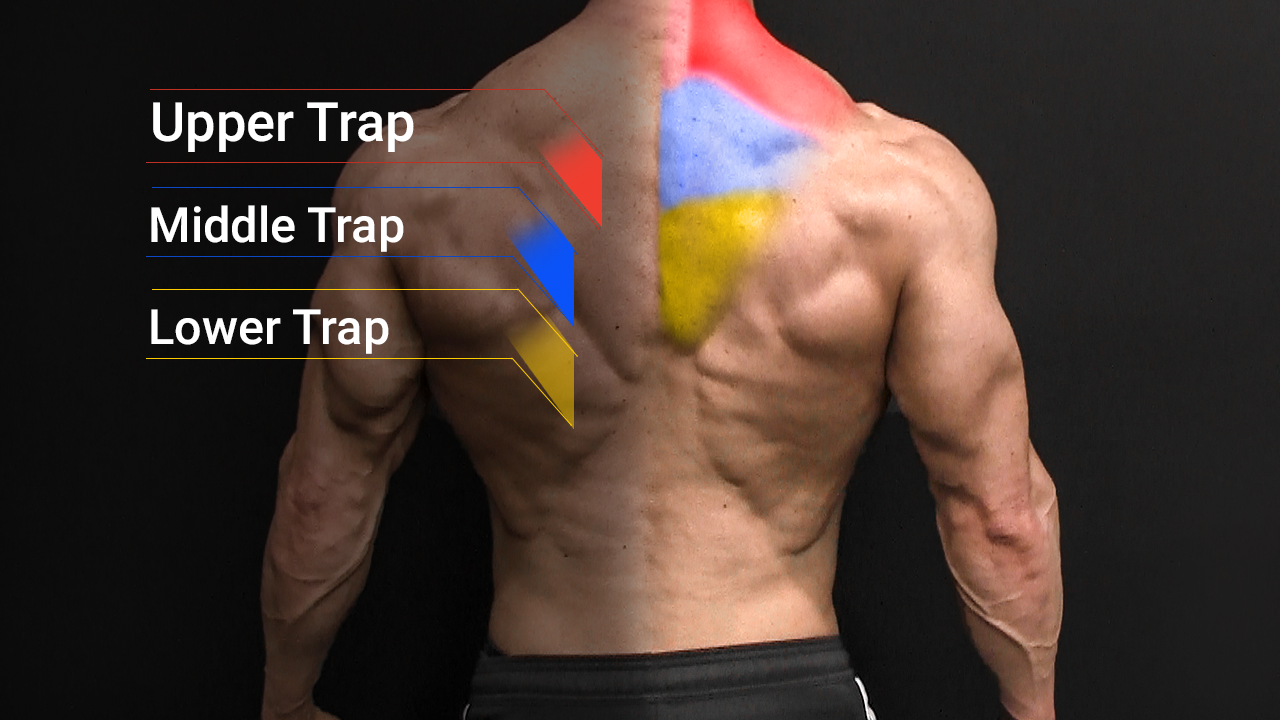
The trapezius muscle is a diamond-shaped muscle that lies among the middle and upper back muscles, extending to the back of the neck and reaching down to the mid-spine.
This muscle is broken down into three distinct sections: the upper traps, middle traps, and lower traps.
In our back and biceps training, we’ll concentrate on the upper and lower traps, exploring their specific functions:
UPPER TRAPEZIUS FUNCTIONS:
- Scapula Elevation: This is the action seen when shrugging the shoulders.
- Neck Extension: Enables tilting the head backward or looking upwards.
- Upward Rotation of the Scapula: Aids in lifting the arms above the head, ensuring fluid movement.
LOWER TRAPEZIUS FUNCTIONS:
- Scapula Depression: Involves pulling the shoulder blades downward, opposing the shrug motion.
- Scapular Retraction: Assists in bringing the shoulder blades closer together.
- Downward Rotation of the Scapula: Plays a crucial role when lowering the arm from a raised position, managing a controlled movement.
Additionally, exercises like the T-Bar Row and Chest-Supported Row can effectively target muscles of the middle of the back where the traps are located.
LOW BACK / ERECTOR SPINAE
The erector spinae, a complex of muscles and tendons, extends vertically along the entire spine.
Located in the deeper layer of back muscles, they play a crucial role in maintaining postural stability.
While these muscles stretch from the spine’s base to the neck, their most significant portion is in the lumbar region, or lower back.
The primary functions of the erector spinae include:
- Spinal Extension: They straighten and assist in returning the spine from a flexed (bent forward) position.
- Lateral Flexion of the Spine: Involves bending the spine to one side, with the erector spinae on the opposite side actively working during this movement.
- Maintaining Upright Posture: These muscles are constantly active when sitting or standing upright, preventing the spine from bending forward under gravity’s pull.
- Spinal Stabilization: They also stabilize the spine during various movements and activities, playing a protective role in spinal health.
ROTATOR CUFF
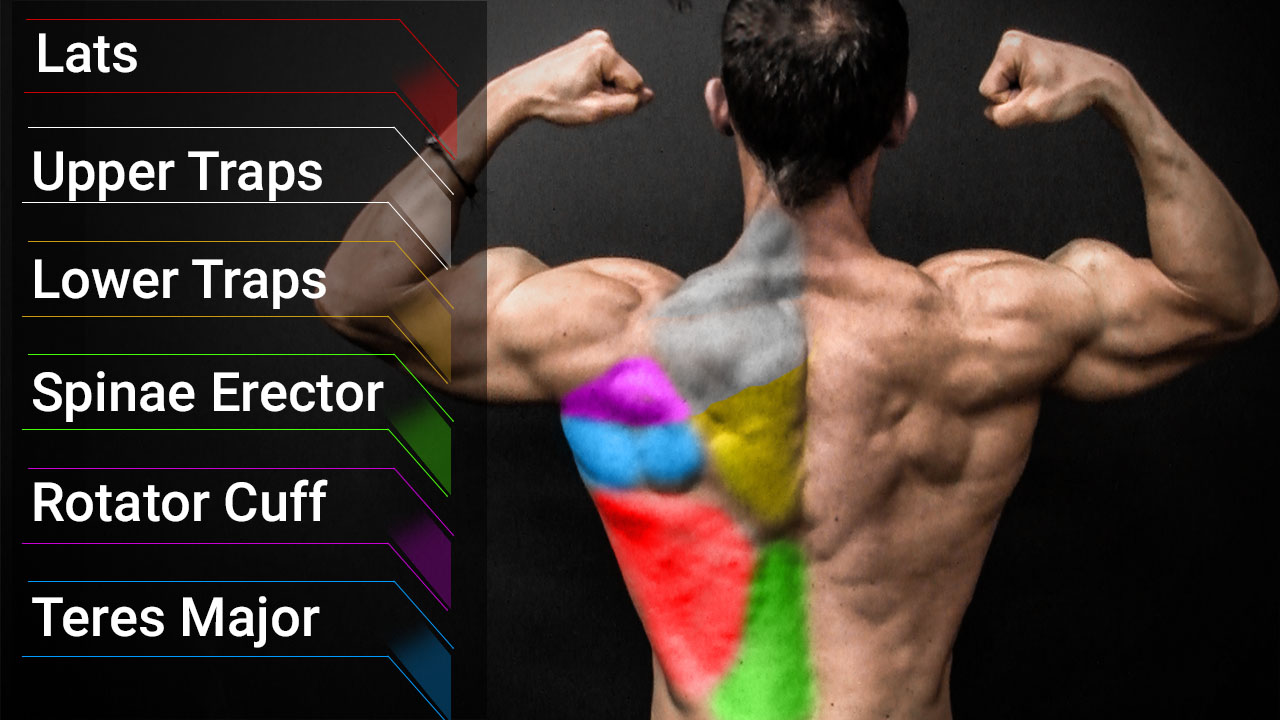
The rotator cuff comprises four smaller muscles and their tendons, rather than being a single muscle. These muscles include the supraspinatus, infraspinatus, teres minor, and subscapularis.
They envelop the head of the humerus and link it to the scapula (shoulder blade). As a cuff around the shoulder joint, the rotator cuff enables the smooth and stable operation of this highly versatile joint.
The primary functions of these muscles are:
- Humerus Stabilization: They anchor the humerus within the scapula’s shallow socket, ensuring shoulder stability amid its wide range of motion.
- Lifting the Arm: The supraspinatus initiates lifting the arm away from the body.
- Outward Rotation of the Arm: The infraspinatus and teres minor work together for the arm’s outward rotation.
- Inward Rotation of the Arm: Facilitated by the subscapularis muscle.
- Maintaining Optimal Position of the Humerus: As the arm is raised, the rotator cuff keeps the humeral head suppressed to prevent pinching against the shoulder blade.
TERES MAJOR
The teres major, a smooth muscle situated in the upper arm and shoulder area, lies just underneath the teres minor, which is part of the rotator cuff.
Originating from the lower section of the shoulder blade, this muscle extends to attach itself to the upper segment of the humerus, the bone of the upper arm.
Though not included in the rotator cuff group, the teres major collaborates closely with these muscles, playing a crucial role in actions that demand shoulder stability and power.
The primary roles of the teres major include:
- Adduction of the Shoulder: This muscle aids in drawing the arm towards the center line of the body, guiding it downwards after it’s lifted.
- Medial Rotation of the Shoulder: The teres major contributes to rotating the arm inward.
- Extension of the Shoulder: Additionally, the muscle facilitates the backward movement of the arm, particularly from a bent position to an extended state behind the body.
HOW MUCH VOLUME SHOULD YOU PERFORM?
The debate between low volume, high intensity, and high volume, low intensity workouts remains a topic of interest, particularly when it comes to chest and back exercises.
When we talk about volume, we can think about our bodies – our muscles – like the tires on a car.
Just as tires have a limited number of rotations and wear down with each mile, our muscles and joints (especially the shoulder girdle) also experience wear and tear through repeated use.
So, the question becomes what type of volume training is ideal to make sure we extend the life of our tires – our muscles – for as long as possible?
VOLUME TRAINING AND MUSCLE HEALTH
Volume training refers to the total amount of work done, including the number of sets and reps in a workout.
When muscles or joints are already stressed or damaged, it’s crucial to manipulate the volume of training.
It’s not necessarily the volume that causes breakdowns; instead, it’s the accumulation of stress on an already weakened structure.
This is similar to tires wearing down faster if they’re already damaged.
THE ROLE OF STABILITY IN WORKOUTS
Stability also plays a pivotal role in workouts. A lack of stability can expose vulnerable structures, especially during high-intensity training.
Rushing through sets or losing good form compromises stability, making the muscles and joints more susceptible to injury. It’s crucial to maintain proper form to protect the body’s structure.
LOW VOLUME, HIGH INTENSITY APPROACH
The low volume, high intensity approach, exemplified by the Mike Mentzer method, involves performing a very limited number of sets (1 to 2), but with maximal effort.
This approach focuses on achieving muscle stimulation with fewer, but more intense, sets.
It’s beneficial for those looking to minimize joint strain while still pushing the body towards muscle growth.
This method aligns with the idea that muscle growth can be stimulated sufficiently without reaching absolute failure in every set.
HIGH VOLUME, LOW INTENSITY APPROACH
Conversely, the high volume, low intensity approach involves performing more sets with lower intensity, staying short of muscle failure.
This method is backed by studies suggesting frequent stimulation of muscle protein synthesis is effective for muscle growth.
It involves multiple sessions per week, stimulating muscle growth more often.
BALANCING INTENSITY AND VOLUME IN HYPERTROPHY
When aiming for hypertrophy (muscle growth), the intensity of the sets is crucial.
While it’s not always necessary to train to the point of absolute failure, taking sets to a significant degree of intensity ensures effective muscle stimulation.
This is especially important in a low volume approach, as each set must count towards muscle growth.
WHICH SHOULD YOU CHOOSE?
Whether opting for a low volume, high intensity workout or a high volume, low intensity routine, the key is understanding how your body responds to different types of stress.
Maintaining stability and proper form is essential in both approaches to prevent injury and ensure effective muscle growth.
As with the car analogy, it’s about finding the right balance to keep the ‘tires’ – in this case, our muscles and joints – in optimal condition.
CHEST AND BACK WORKOUT: THE WARM-UP
Continuing with the question above, for the purposes of this chest and back workout, I’m opting for the low volume, high intensity approach.
I’ll begin with a progressively difficult warm-up.
This is where I’ll start with lighter weights, move to a moderate weight, and finish with a heavier weight for each warm-up set, limiting the sets to only three.
For example, I start with 40 pounds then progress to 60 pounds and end with 80 pounds.
The goal is not to go to failure during the warm-up. Your goal is to get the blood pumping and the muscles ready for the working sets that follow.
My warm-up for this chest and back workout uses the typical exercise choices: Dumbbell Bench Press and Lat Pulldown.
DUMBBELL BENCH PRESS
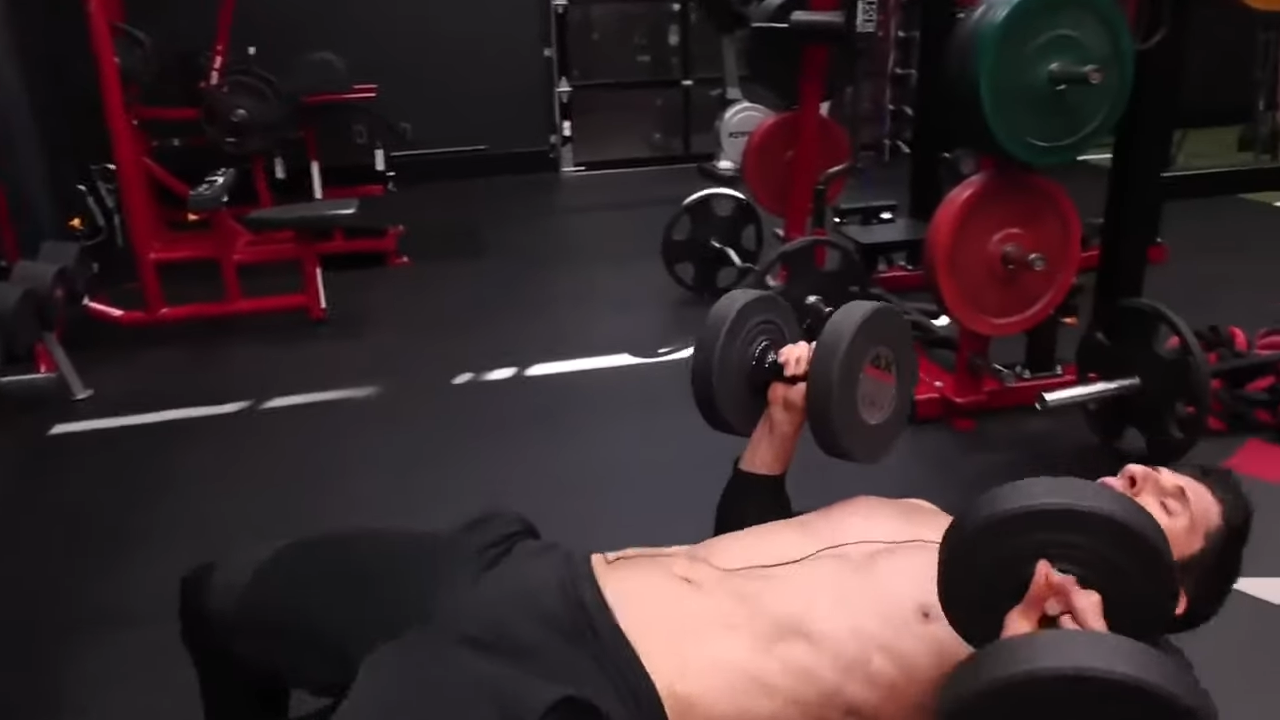
HOW TO DO THE DUMBBELL BENCH PRESS:
- Start with a pair of dumbbells that are lighter weights. It should be a challenging weight but manageable to maintain proper form throughout the exercise.
- Ensure the flat bench is stable. If you only have access to adjustable benches, set one to a flat position.
- Position yourself on the edge of the bench, holding a dumbbell in each hand and resting them on your knees. Keep your feet hip-width apart, flat on the floor.
- Recline onto the bench, simultaneously bringing the dumbbells to either side of your chest. Your palms should be facing forward, and elbows bent at about a 90-degree angle.
- Firmly plant your feet on the floor for stability. Keep your core tight and slightly arch your lower back. Ensure your head, shoulders, and buttocks are in contact with the bench.
- Breathe out and lift the dumbbells above your chest, straightening your arms in the process. Keep the dumbbells parallel and avoid clanging them together.
- At the top of the lift, your arms should be straight but not locked out. The dumbbells should be directly above your chest, not your face or abdomen.
- Inhale as you slowly lower the dumbbells back down to the starting position. Your elbows should move down and out to the sides, creating a 90-degree angle at the bottom of the movement.
WHAT MAKES IT EFFECTIVE: Moving slowly and focusing on that forward motion is going to help you prepare the muscles for the workout that’s coming. Remember: Do not go to failure during the warm-up sets. If you want to change the angle and have an alternative exercise, consider using an incline bench for Incline Presses.
LAT PULLDOWN
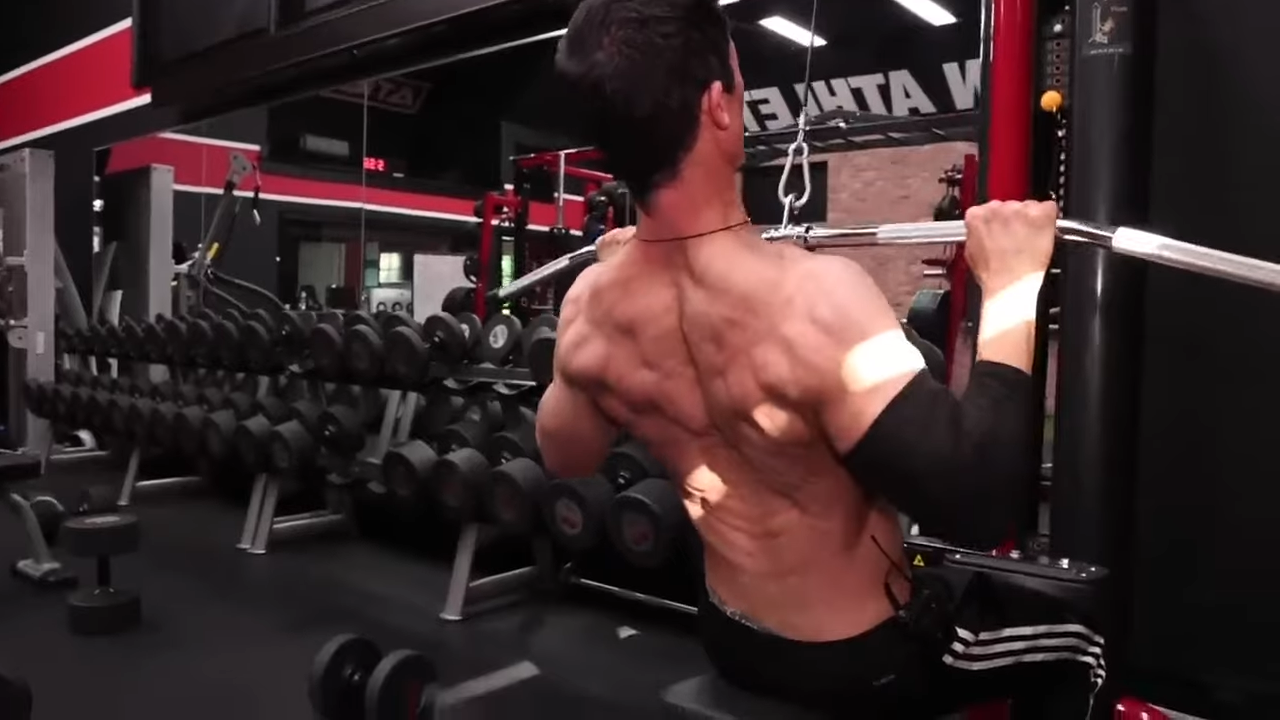
HOW TO DO THE LAT PULLDOWN:
- Take a seat at the pulldown machine and adjust the knee pad to ensure it fits tightly against your legs, thereby preventing your body from lifting due to the resistance.
- Grip the bar with your hand in a wide grip (wider than shoulder-width apart). For a standard Lat Pulldown, use an overhand grip (palms facing away from you).
- Sit down and keep your back straight. Lean back slightly, around 15-30 degrees, creating a small arch in your lower back. Your chest should be up and out.
- Exhale and pull the bar down smoothly towards your chest. The movement should be driven by your back muscles, not your arms. Keep your elbows pointed straight down. Maintain a tight core.
- Bring the bar down to your chest. Don’t lean backward excessively as you pull the bar down and keep your arm position stable.
- Once the bar is at chest level, pause briefly and squeeze your shoulder blades together, focusing on using your lat muscles.
- Inhale and slowly return the bar to the starting position with the weight under control. Don’t let the weight plates crash.
WHAT MAKES IT EFFECTIVE: The Lat Pulldown is one of the best exercises to target the lats since the cables provide consistent tension during both the concentric and eccentric portions of the lift. You can also take advantage of variable resistance with an elastic exercise band.
CHEST AND BACK WORKOUT: CHEST FOCUS
With your warm-up out of the way, you can move on to the working sets.
And we’re going to kick things off with the chest exercises.
You’re going to pair up two exercises together in a superset workout.
The first exercise can be looked at as the pre-exhaust exercise that isolates the chest muscles.
The second exercise is a compound exercise (multi-joint exercise) that targets the surrounding muscles like the anterior and rear deltoids and triceps. It also helps to bring the chest to muscular failure.
You want to use a weight that will cause you to reach muscle failure at about the 6 to 10 rep range.
Also, keep in mind that this is a superset so you’re not resting between exercises. Your rest intervals come after you complete a superset.
Even then you’re not aiming for several minutes of rest. You’re only resting for about 60 seconds tops.
Any bit of recovery that you allow will let the chest become dominant again. We don’t want that. We want to keep the chest fatigued so the surrounding musculature must jump in to lend a hand.
What’s more, your workout time will be shorter than a traditional upper body workout.
Perform two sets of the superset exercises and then do one or two sets of the third exercise (Single Arm Cable Crossovers).
SUPERSET 1A: FLOOR FLY
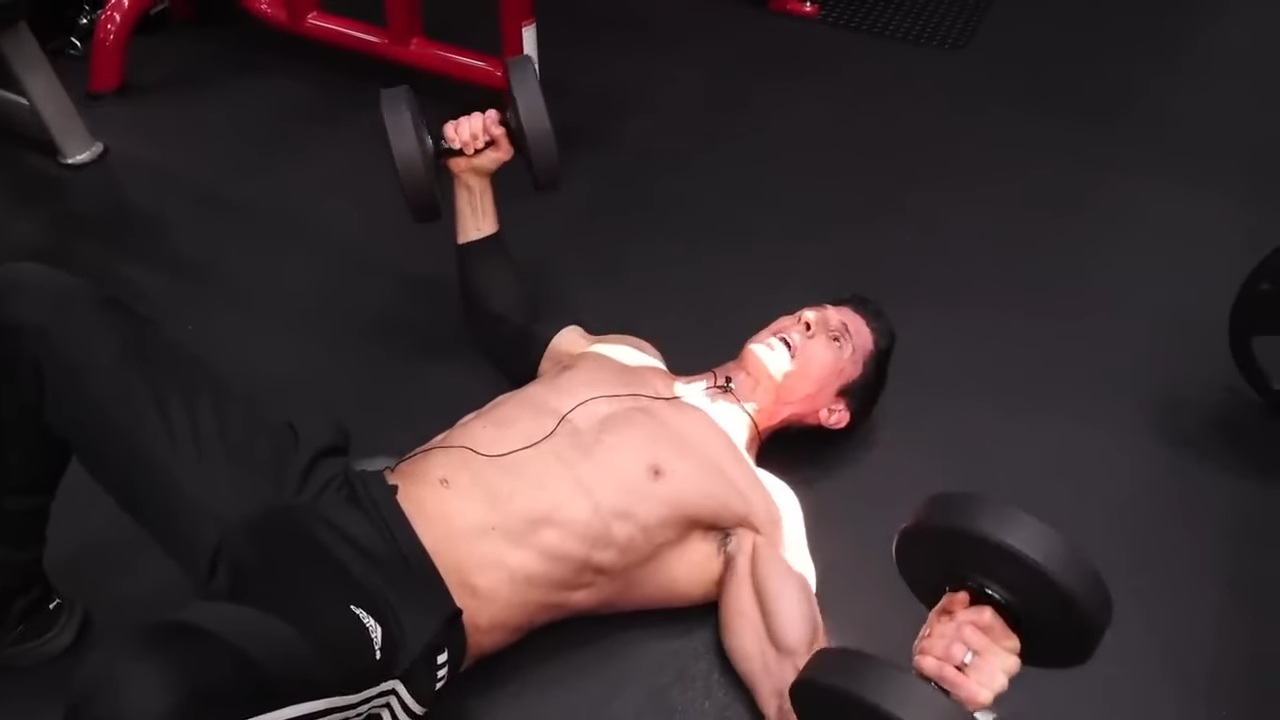
HOW TO DO THE FLOOR FLY:
- Lie flat on your back on the floor. You can use a yoga mat for comfort. Keep your knees bent with feet flat on the floor, about hip-width apart.
- Hold a dumbbell in each han12d with a neutral grip (palms facing each other). Extend your arms straight up above your chest, but avoid locking out your elbows.
- Extend the dumbbells to your sides, moving them in an arc. Keep a slight bend in your elbows throughout the movement. Go as low as you can without causing discomfort in your shoulders.
- Once your arms are parallel to the floor, you should feel a deep stretch across your chest. Ensure that your back remains flat against the floor.
- Using your pectoral muscles, bring the dumbbells back up in the same wide arc. Imagine hugging a large barrel to maintain the correct form.
- When the dumbbells are back above your chest, squeeze your chest muscles without clanking the weights together.
WHAT MAKES IT EFFECTIVE: I prefer the Dumbbell Floor Fly because it’s safer to perform, both from a technical and injury standpoint. If your shoulder health is good, you can consider Cable Flys.
SUPERSET 1B: DUMBBELL BENCH PRESS
HOW TO DO THE DUMBBELL BENCH PRESS:
- Start with a pair of dumbbells that are lighter weights. It should be a challenging weight but manageable to maintain proper form throughout the exercise.
- Ensure the flat bench is stable. If you only have access to adjustable benches, set one to a flat position.
- Position yourself on the edge of the bench, holding a dumbbell in each hand and resting them on your knees. Keep your feet hip-width apart, flat on the floor.
- Recline onto the bench, simultaneously bringing the dumbbells to either side of your chest. Your palms should be facing forward, and elbows bent at about a 90-degree angle.
- Firmly plant your feet on the floor for stability. Keep your core tight and slightly arch your lower back. Ensure your head, shoulders, and buttocks are in contact with the bench.
- Breathe out and lift the dumbbells above your chest, straightening your arms in the process. Keep the dumbbells parallel and avoid clanging them together.
- At the top of the lift, your arms should be straight but not locked out. The dumbbells should be directly above your chest, not your face or abdomen.
- Inhale as you slowly lower the dumbbells back down to the starting position. Your elbows should move down and out to the sides, creating a 90-degree angle at the bottom of the movement.
WHAT MAKES IT EFFECTIVE: Super-setting the Dumbbell Bench Press with the Floor Fly ensures you’re pushing the chest muscles as well as the surrounding muscles to the point of maximum fatigue.
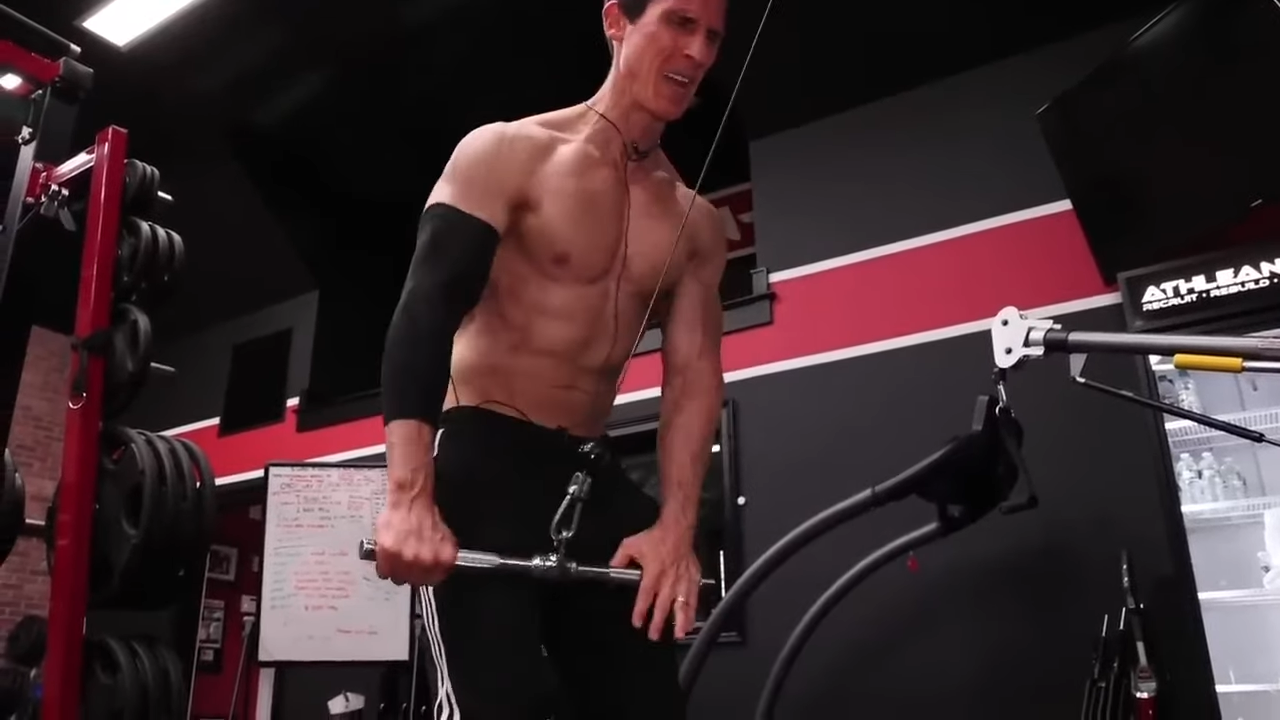
SINGLE ARM CABLE CROSSOVER
HOW TO DO THE SINGLE ARM CABLE CROSSOVER:
- Position the cable pulley at a high point above your head. It’s important to use a cable machine that allows the pulley to be adjusted to this height.
- Stand a couple of feet away from the machine, facing away from it. Your feet should be shoulder-width apart for stability. If you’re using the right hand, your right side should be closer to the machine, and vice versa for the left hand.
- Reach up and grab the single-grip handles with one hand. Your arm should be slightly bent at the elbow, and your palm should be facing down.
- Before starting the movement, tighten your abdominal muscles. This helps maintain balance and protects your spine.
- Keeping your arm slightly bent, pull the handle down and across your body. The movement should come from your shoulder and chest muscles, not just your arm.
- Continue pulling the handle down and across your body until it reaches the opposite side of your waist. Your arm should cross over your chest during this motion.
- Once your hand is at the opposite side of your waist, pause briefly and squeeze your chest muscles to maximize the contraction.
- Slowly return the handle to the starting position with control. Avoid letting the weight pull your arm back too quickly.
WHAT MAKES IT EFFECTIVE: I adopt a mindful mass approach, focusing on high-repetition exercises pushed to failure, enduring intense muscle burn to the point where further movement is nearly impossible. By performing exercises one arm at a time, I ensure concentrated, mindful chest muscle contraction and emphasize adduction for maximum muscle engagement and growth.
CHEST AND BACK WORKOUT: BACK FOCUS
Once you’re all wrapped up with those three chest exercises, it’s time to move into the back portion of the workout.
Just like above, you’ll start off with three sets of a warm-up exercise.
From here, you’ll perform two sets of a superset followed by one or two sets of a third exercise.
Be sure to select a weight that allows you to stick within that 6 to 10 rep range.
Again, we’re aiming to pre-exhaust with an isolation movement then use a compound lift to target the surrounding muscles.
Let’s get started with a Straight Arm Pushdown:
STRAIGHT ARM PUSH DOWN
HOW TO DO THE STRAIGHT ARM PUSH DOWN:
- Position the pulley at a high setting above your head and attach a straight bar to the cable.
- Position yourself in front of the cable machine with feet set apart at shoulder width to ensure stable footing. Keep a slight bend in your knees.
- The bar will start at shoulder level. Grip the bar with both hands, about shoulder-width apart. Your palms should be facing down.
- Tighten your abdominal muscles to stabilize your torso and protect your spine.
- Keeping your arms straight, exhale and push the bar down towards your thighs. Your movement should come from your shoulder joints, not your elbows.
- Your torso should remain stationary throughout the exercise. Avoid swaying or leaning forward to help move the bar.
- Once the bar reaches thigh level, pause briefly. Make sure your arms are fully extended and parallel to the floor.
- Inhale and slowly raise the bar back to shoulder height with a controlled motion. Ensure that your arms remain straight, and the movement is smooth.
WHAT MAKES IT EFFECTIVE: While you can’t fully isolate the lats, the Straight Arm Pushdown gets pretty close. And since our goal is to start with an isolation movement, this is the best option to do just that.
LAT PULLDOWN
HOW TO DO THE LAT PULLDOWN:
- Take a seat at the pulldown machine and adjust the knee pad to ensure it fits tightly against your legs, thereby preventing your body from lifting due to the resistance.
- Grip the bar with your hand in a wide grip (wider than shoulder-width apart). For a standard Lat Pulldown, use an overhand grip (palms facing away from you).
- Sit down and keep your back straight. Lean back slightly, around 15-30 degrees, creating a small arch in your lower back. Your chest should be up and out.
- Exhale and pull the bar down smoothly towards your chest. The movement should be driven by your back muscles, not your arms. Keep your elbows pointed straight down. Maintain a tight core.
- Bring the bar down to your chest. Don’t lean backward excessively as you pull the bar down and keep your arm position stable.
- Once the bar is at chest level, pause briefly and squeeze your shoulder blades together, focusing on using your lat muscles.
- Inhale and slowly return the bar to the starting position with the weight under control. Don’t let the weight plates crash.
WHAT MAKES IT EFFECTIVE: Moving from the isolation exercise of the Straight Arm Pushdown, the Lat Pulldown is going to recruit the surrounding musculature to help you push the back to total fatigue.
STRAIGHT ARM PUSHDOWN WITH TWIST
HOW TO DO THE STRAIGHT ARM PUSHDOWN WITH TWIST:
- Adjust the pulley to a high setting above your head and attach a straight bar to the cable.
- Stand in front of the cable machine with your feet spaced shoulder-width apart. Keep a slight bend in your knees.
- Hold the bar with both hands, about shoulder-width apart, palms facing down.
- Tighten your abs to stabilize your torso and protect your spine.
- With arms straight, exhale and push the bar down towards your thighs. The movement should originate from your shoulder joints.
- Keep your torso stationary. Avoid leaning forward or using body momentum.
- Once the bar reaches thigh level, pause and twist your torso slightly to one side. Keep your arms straight.
- Slowly bring your torso back to center and raise the bar to the starting position.
- Perform another pushdown and this time, twist to the opposite side at the bottom of the movement.
- Bring your torso back to center and the bar up. Repeat the exercise for the desired number of repetitions, alternating the side twist with each rep.
WHAT MAKES IT EFFECTIVE: That extra twist at the end of the rep with this finishing exercise allows you to get more of a contraction while taking the bar slightly behind the body for a better range of motion.
Remember, there’s an inverse relationship here: amp up the volume, and you’ll need to dial back the intensity, but if you’re going all-in on intensity, keep the additional training volume in check.
If your fitness level is new to this game of low-volume, ultra-high-intensity training, brace yourself – it’s a game-changer that’s going to push you right out of your comfort zone.
And that’s the sweet spot, right where you need to be. After all, making you embrace that discomfort is the hallmark of a workout that truly tests and builds your gains in strength and endurance.
If you’re looking for a training program to help you reach your muscle building goals, you’ve come to the right place. Check out our ATHLEAN-X programs to see which best fits your goals and fitness level.
- Like car tires, muscles and joints have a wear-and-tear limit. It’s essential to adjust workout volume to prolong muscle health, especially when muscles or joints are stressed or damaged.
- Stability is vital in workouts. Maintaining proper form is necessary to protect muscles and joints from injury, particularly during high-intensity exercises.
- The low volume, high intensity approach involves doing a few sets (1-2) with maximal effort, beneficial for minimizing joint strain while stimulating muscle growth without reaching absolute failure.
- The high volume, low intensity approach involves more sets with lower intensity, staying short of muscle failure. This method stimulates muscle growth frequently through multiple weekly sessions.
- For muscle growth, the intensity of sets matters. In low volume training, each set should contribute significantly to muscle stimulation.
- When structuring a chest and back workout day, start with compound exercises for a warm-up. Then follow that with a superset routine of an isolation movement with a compound lift.
- As far as training variables, perform 6-10 reps for each set. Complete two sets of the superset training followed by one or two sets of another exercise. Finish back workouts with Straight Arm Pushdowns and a twist, and chest workouts with Single Arm Cable Crossovers.
- Choose between low volume, high intensity, or high volume, low intensity based on how your body responds. Ensure to maintain stability and proper form in either approach for effective muscle growth and injury prevention.
CHEST AND BACK WORKOUT FAQS
Training both back and chest muscles together in a workout is an effective strategy known as targeting antagonist muscle groups. This method promotes balanced muscle development and posture, preventing muscle imbalances that could lead to postural issues. It's particularly efficient for individuals with limited training time, allowing them to work on two major muscles in one session.
Integrating back and chest exercises in the same workout can also increase workout intensity. While one muscle group is active, the opposing group gets a chance to rest. This can potentially enhance overall performance, possibly leading to improvements in upper body strength and muscular endurance.
Deciding whether to start with back or chest exercises in a workout largely depends on your individual fitness goals and preferences. If your objective is to enhance building strength or muscle gains in a particular muscle group, it's best to begin with exercises targeting that group when your energy levels are at their peak.
For example, start with chest exercises if building strength in your chest is your priority, or focus on back exercises first if that's your area of emphasis.
Muscle fatigue plays a significant role in workout effectiveness. The first muscle group worked out will receive the most effort, as muscles tend to tire as the workout progresses. However, if your goals for back and chest development are equally weighted, alternating the starting muscle group in different sessions can be beneficial. This helps maintain balanced development and ensures both muscle groups receive focused attention.
If you want to structure a back and chest day like I have above, then you’ll want to start with a compound exercise for three warm-up sets. For the back, I recommend Lat Pulldowns and for the chest, I recommend Dumbbell Bench Presses.
Next, move into your working sets. Perform a superset of an isolation movement and then a compound lift. Aim for 6 to 10 reps for each set. I recommend two sets of the superset combination followed by one or two sets of a third exercise.
Some suggestions for compound exercises:
- Back: Bent-Over Row exercise
- Back: Lat Pulldown
- Back: Chest-Supported T-Bar Row Machine
- Chest: Dumbbell Bench Press
- Chest: Machine Chest Presses
- Chest: Incline or Decline Bench Pressing
For my workout, I superset Straight Arm Pushdowns with Lat Pulldowns then finish with the Straight Arm Pushdown with a Twist. For the chest, pair up Floor Flys and Dumbbell Bench Presses, and finish with the Single Arm Cable Crossover.
Training chest and back on the same day is a great way to pair muscle groups together. It allows for a balanced workout by targeting both pushing (chest) and pulling (back) muscle groups, which can help prevent muscular imbalances and promote a more symmetrical physique.
This method also maintains high workout intensity, as while one muscle group is active, the other gets rest time, making the session more efficient and effective.
Combining chest and back exercises in one workout is also time-efficient, suitable for those with tight schedules, as it consolidates two major muscle groups into one session.
Be sure to alternate which muscle group you start with on training days. For example, if you start with chest on Monday, start with Back on Thursday (or whenever you train chest and back again).
Many bodybuilders opt for a bodybuilding routine to train chest and back together due to the efficiency of working two major muscle groups in one session.
This approach promotes balanced muscle development, as it targets the opposing muscle groups of the chest (push muscles) and the back (pull muscles), crucial for achieving a symmetrical and proportional physique in bodybuilding.
Additionally, bodybuilding workouts that train chest and back together can lead to higher workout intensity and training volume, both of which are key factors in muscle hypertrophy and strength gains.
REFERENCES
Ackland DC, Pak P, Richardson M, Pandy MG. Moment arms of the muscles crossing the anatomical shoulder. J Anat. 2008 Oct;213(4):383-90.

Jeff Cavaliere M.S.P.T, CSCS
Jeff Cavaliere is a Physical Therapist, Strength Coach and creator of the ATHLEAN-X Training Programs and ATHLEAN-Rx Supplements. He has a Masters in Physical Therapy (MSPT) and has worked as Head Physical Therapist for the New York Mets, as well as training many elite professional athletes in Major League Baseball, NFL, MMA and professional wrestling. His programs produce “next level” achievements in muscle size, strength and performance for professional athletes and anyone looking to build a muscular athletic physique.


")


")

")


")
